

In this guide we’re running through the deployment of VCF 9.1, the latest GA drop from May 2026. I’ve covered this pretty heavily in VCF 9.0 and even the old v5 days, but this is a full end‑to‑end deployment of 9.1 to see exactly what’s changed and what hasn’t.
VCF 9.1 — What’s New
VCF 9.1 adds VCF Management Services — a common runtime unifying lifecycle and operational capabilities including the License Server, Software Depot, and Salt RaaS in a consolidated cluster.
ESX — Memory Tiering — Software RAID1 mirroring for Memory Tiering is introduced — if one NVMe device fails, the secondary device continues memory tiering, preventing failure regardless of device wear-out
Native S3 Object Storage — managed with the same workflows as block and file storage
APIs —vCenter now supports OAuth 2.0 API tokens.
DRS & vMotion – Intel QAT offload for encrypted vSphere vMotion reduces source CPU utilization by nearly 67% and destination by nearly 22%, with significantly lower variance in total migration time.
VPC Transit Gateway, Traceflow, and Live Traffic Analysis are now configurable from the vSphere Client,
VAAI-NAS Unmap support added for NFS v4.1, enabling space reclamation for VMs on thin-provisioned NFS v4.1 datastores
VCF 9.1 — Lab Deployment
If you’re planning to try this in the lab, the whole stack will happily chew through around 500 GB of RAM. This entire setup is running on a single physical ESXi host, and for this build I’m using a HP ProLiant DL380 Gen10 with 756 GB RAM.
| Component | Specification |
| vCPU | 34 with HW virtualization turned on |
| Memory | 200 GB |
| Disk | NVMe Controller 900 GB 1×25 GB NVMe for ESXi installation 1×40 GB NVMe for vSAN Cache 2×200GB NVMe for vSAN Capacity 1*250GB NVMe vSAN ( Extra Capacity )# |
| Network | 4×10 GBPS connected to trunk port group |
Management Domain fqdn & Ip Pools
Here is the IP info for my mgmt domain
| FQDN | IP Address | Purpose |
| vc9-sddcmgr.ash.local | 172.16.11.81 | External SSDC Manager |
| vcf9-vc.ash.local | 172.16.11.80 | Mgmt vCenter |
| sa-esx01.ash.local | 172.16.11.101 | ESX 01 |
| sa-esx02.ash.local | 172.16.11.102 | ESX 02 |
| sa-esx03.ash.local | 172.16.11.103 | ESX 03 |
| sa-esx03.ash.local | 172.16.11.104 | ESX 04 |
| vcf9-ops.ash.local | 172.16.11.71 | VCF Ops |
| vcf9-fs.ash.local | 172.16.11.72 | VCF Ops Fleet Services |
| vcf9-cp.ash.local | 172.16.11.84 | VCF Cloud Proxy |
| vcf9-ls.ash.local | 172.16.11.85 | License Server |
| vcf9-nsx.ash.local | 172.16.11.86 | NSX VIP |
| vcf9-nsx01.ash.local | 172.16.11.87 | NSX Node 1 |
| vcf9-nsx02.ash.local | XXX | NSX Node 2 |
| vcf9-nsx03.ash.local | XXX | NSX Node 3 |
| vcf-edge01.ash.local | XXX | NSX Edge 1 |
| vcf-edge02.ash.local | XXX | NSX Edge 2 |
| vcf9-is.ash.local | 172.16.11.73 | VCF Instance Services FQDN |
| vcf9-ib.ash.local | 172.16.11.74 | Identity Broker |
| vcf9-sr.ash.local | 172.16.11.77 | VCF Service Runtime FQDN |
| vcf9-at.ash.local | 172.16.11.78 | VCF Automation |
| vcf9-atsr.ash.local | 172.16.11.79 | VCF Auto Services Runtime FQDN |
| 172.16.11.200-220 | VCF Mgmt Service IP Pool | |
| 172.16.11.235-240 | VCF Automation IP range | |
| placeholder | VCF Logs | |
| placeholder | VCF VRNI | |
| VCF Ops Networks Collector |
VCF 9.1 Bill of Materials
VCF 9.1 Deployment Mandatory Pre Install Checklist
- A minimum of 4 physical servers with preinstalled VMware ESX ESX 9.1 hypervisor is required
- Hardware virtualization must be enabled on the base host
- Generate host certificates and host names correctly
- Static IP Address assigned to the Management interface (vmk0)
- ESXi must have ‘VM network’ and ‘Management network’ VLAN id of mgmt configured was th default in VCF 9.X but this is no longer required.
- NTP server address should be in place on all ESXi and set to sync to Active Directory
- Ensure that your software depot is configured
- SSH & NTP and activity directory service to be enabled to start with the host
- vSAN ESA Disk & HCL workaround for VCF 9.0 followed by a host reboot
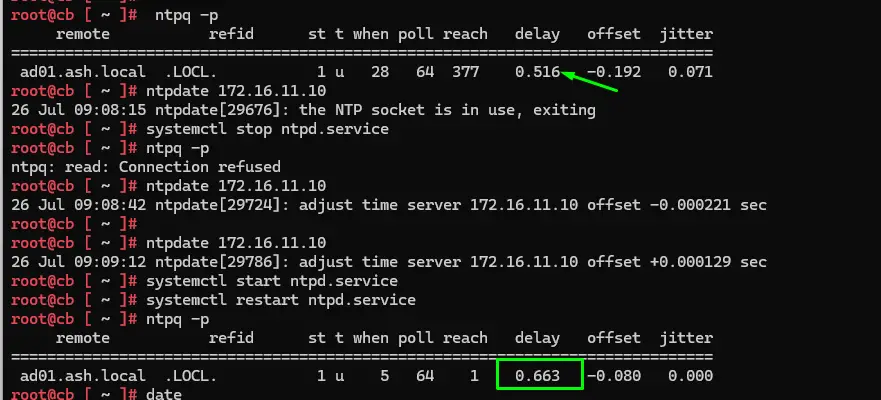
- Ensure the cloud builder/vcf installer appliance NTP sync works correctly.
- A DHCP server to configure the IP address for the VTEP on each ESXi hosts
- An NVMe controller replaces the SCSI controller and this is required for vSAN ESA
- MTU must be 9216 (recommended) or at minimum 1600 for NSX overlay.
- No uppper case letters should used anywhere in the deployment of endpoints such as for hosts,vCenters etc
- Do not use capital letters in the FQDN.
- All passwords must be:≥ 15 characters, only allowed special characters:!@#$%^&*
- Forward and reverse records for every endpoint.
Host Configuration
The hosts are setup as shown


Set Certificates, Hostname and NTP
Before doing anything else, get the basics sorted. Set the hostname, generate the certificates, and make sure NTP is actually working — not “should be working”, but is working.
NTP needs to be configured and syncing cleanly. If NTP is off, VCF will fall over later and you’ll waste time chasing pointless errors.
The ESXi certificate must use the FQDN, and it must be lowercase. No exceptions.
Hostname should match the FQDN exactly — again, all lowercase.
# Specify at least one of: --host, --domain, --fqdn
esxcli system hostname set --host=sa-esx02
esxcli system hostname set --fqdn=sa-esx02.ash.local
# Generate Certificates
/sbin/generate-certificates
ls -l /etc/vmware/ssl/

# Deploment for nested lab

esxcli software acceptance set --level CommunitySupported
Host acceptance level changed to 'CommunitySupported'.
esxcli software vib install -v /nested-vsan-esa-mock-hw.vib --no-sig-check

esxcli software vib install -v /vmfs/volumes/2999b9f4-c0675609/vib20/nested-vsan-esa-mock-hw/williamlam.com_bootbank_nested-vsan-esa-mock-hw_1.0.0-1.0.vib
esxcli storage nfs remove -v NFS2

# Conifgure ntp
 esxcli system ntp set --server 172.16.11.10 --enabled true
 /etc/init.d/ntpd start
 chkconfig ntpd on
 esxcli system ntp get
ntpq -p

If you’re running this on hardware that VCF/ESXi 9.1 doesn’t officially like, you’ll need to add the CPU override flags into boot.cfg so the installer doesn’t bail out.
Add the following options to the boot.cfg kernel line:
allowLegacyCPU=true
ignoreUnsupportedCPU=true

ESX must have ‘VM network’ and ‘Management network’ VLAN id of mgmt configured as shown

Below is my base ESXi host and the list of VMs currently running on it.

Verify vmnic alignment
On some servers, especially older Gen9/Gen10 boxes or anything running quirky PCI layouts, the vmnic numbering doesn’t always line up with the actual PCI devices. VCF won’t care until NSX comes into play — then it becomes a problem.
Use esxcli network nic list to confirm vmnic → MAC → PCI mapping.
for i in 0 1 2 3 4 5 6 7; do
echo "=== vmnic$i ==="
localcli --plugin-dir /usr/lib/vmware/esxcli/int/ deviceInternal alias list | grep "vmnic$i$"
done
The pci and logical numbers should clearly match.

localcli --plugin-dir /usr/lib/vmware/esxcli/int/ deviceInternal alias list > /tmp/alias_backup_$(date +%F).txt

Fix commands for physical devices

localcli --plugin-dir /usr/lib/vmware/esxcli/int/ deviceInternal alias store --alias vmnic0 --bus-address s00000002:03.00 --bus-type pci

Fix commands for logical devices

localcli --plugin-dir /usr/lib/vmware/esxcli/int/ deviceInternal alias store --alias vmnic0 --bus-address pci#s00000002:03.00#0 --bus-type logical
Network Requirements
For this deployment we’re sticking with the usual VCF networking expectations. Jumbo Frames (MTU 9000) are recommended across all VLANs, but at an absolute minimum you need 1600 MTU for NSX‑T overlays to function. Anything lower and you’ll hit packet drops the moment Geneve traffic shows up.
These are the port groups we’ll be creating for the VCF bring‑up, and because this is a nested vCloud Foundation setup, you need all the virtual networks in place before Cloud Builder even gets a look in.
A nested vCloud Foundation deployment requires multiple virtual networks to be in place before we can start the deployment. As part of this deployment, we’ve bgp configured on the vyOS tor routers.
| Network Type | VLAN | PortGroup |
| Management Network | 1611 | pg-mgmt-1611 |
| vMotion Network | 1612 | pg-vMotion-1612 |
| vSAN Network | 1613 | pg-vSan-1613 |
| NSX-T-Host Overlay | 1634 | pg-host-overlay-1634 |
| NSX-T-edge-uplink-1 | 2711 | pg-nsx-t-edge-overlay |
| NSX-T-edge-overlay | 2713 | pg-nsx-t-edge-overlay |
| SDDC-vcF-TRUNK | 4095 | Trunk Port |
VCF Installer
Download and deploy the OVA from the VMware portal. The process is the same as any standard OVA deployment. Note that the appliance requires an admin password with at least 15 characters.
For this setup, the installer appliance is deployed on VLAN 1611, giving it access to the domain controller and all ESXi hosts. As long as routing and VLAN tagging are correct, Cloud Builder will see everything it needs.
Make sure NTP sync is configured properly on the VCF installer. This is one of the most common failure points.
Cloud Builder is extremely sensitive to time drift — if the clock between the installer and the ESXi hosts drifts by more than ~30 seconds, the deployment can fail with completely unhelpful errors.
William Lam has documented quite a lot of hot fixes that can be applied . A few of them I used are here.
# Increase VCF Management Services Deployment Timeout
echo "vsp.bootstrap.task.timeout.minutes = 240" >> /etc/vmware/vcf/domainmanager/application.properties
echo "vsp.bootstrap.command.timeout.minutes = 200" >> /etc/vmware/vcf/domainmanager/application.properties

# Increase General Retry
echo "orchestrator.task.retry.max = 5" >> /etc/vmware/vcf/domainmanager/application.properties

# Increase NSX Manager Timeout
echo "nsxt.manager.wait.minutes = 180" >> /etc/vmware/vcf/domainmanager/application.properties

# Increase NSX Edge Timeout
echo "edge.node.vm.creation.max.wait.minutes = 90" >> /etc/vmware/vcf/domainmanager/application.properties

# Disable 10GbE pNIC Check
echo "enable.speed.of.physical.nics.validation = false" >> /etc/vmware/vcf/domainmanager/application.properties

# Disable vSAN ESA HCL Check
echo "vsan.esa.sddc.managed.disk.claim = true" >> /etc/vmware/vcf/domainmanager/application.properties

# Disable vMotion Connectivity Check
echo "validation.disable.vmotion.connectivity.check = true" >> /etc/vmware/vcf/domainmanager/application.properties
echo "validation.disable.vmotion.l3.gateway.connectivity.check = true" >> /etc/vmware/vcf/domainmanager/application.properties

# Disable vSAN Connectivity Check
echo "validation.disable.vsan.connectivity.check = true" >> /etc/vmware/vcf/domainmanager/application.properties

# Disable TEP MTU Check
echo "validation.disable.network.connectivity.check = true" >> /etc/vmware/vcf/domainmanager/application.properties
echo "nsxt.mtu.validation.skip = true" >> /etc/vmware/vcf/domainmanager/application.properties

# Disable NFS Connectivity Check
echo "validation.disable.nfs.configuration.connectivity.check = true" >> /etc/vmware/vcf/domainmanager/application.properties

# Single Node AVI Load Balancer
echo "feature.vcf.vgl-41078.alb.single.node.cluster = true" >> /etc/vmware/vcf/domainmanager/application.properties

# Restart domainmanager
systemctl restart domainmanagerAlso add to operationsmanager (needed for vSAN ESA HCL and 10GbE checks):
echo "enable.speed.of.physical.nics.validation = false" >> /etc/vmware/vcf/operationsmanager/application-prod.properties
echo "vsan.esa.sddc.managed.disk.claim = true" >> /etc/vmware/vcf/operationsmanager/application-prod.properties
systemctl restart operationsmanagerAnd feature.properties (for single host and vSAN ESA):
echo "feature.vcf.vgl-29121.single.host.domain = true" >> /home/vcf/feature.properties
echo "feature.vcf.vgl-43370.vsan.esa.sddc.managed.disk.claim = true" >> /home/vcf/feature.properties
echo 'y' | /opt/vmware/vcf/operationsmanager/scripts/cli/sddcmanager_restart_services.shVCF Installer – Initial Login
Log in to the VCF Installer VM using the web UI and move past the initial welcome screen. URL for this setup:
https://vcfinstaller.ash.local
Once you’re in, the first thing the installer will complain about is software binaries. VCF needs either:
- a configured download token in the depot settings, or
- an offline depot already uploaded.
If you haven’t generated a token yet, follow the VMware instructions and create one — you’ll need it for the automated bundle downloads.
From the main screen, click: Depot Settings and Binary Management. This is where you add your token, confirm connectivity, and verify that Cloud Builder can actually pull the required bundles before you move on.

From the Depot Settings and Binary Management page, click the Connect to the Online Depot widget, then hit Configure.

Copy the service ID from the VCF Installer screen, then head over to: vcf.broadcom.com
Paste the service ID into the registration field and click Register. This links your Cloud Builder instance to the online depot so it can actually pull the bundles.

Click Software depot registration and click new registration

Take the activation code you generated on the Broadcom portal and paste it into the Activation Code field in the VCF Installer. Once it’s in, click Authenticate.

If the code is valid, the installer will confirm the connection and you’ll see the depot status change to authenticated.

Our service-id is registered

Once the activation code is authenticated and the depot connection shows as valid, click Download All.

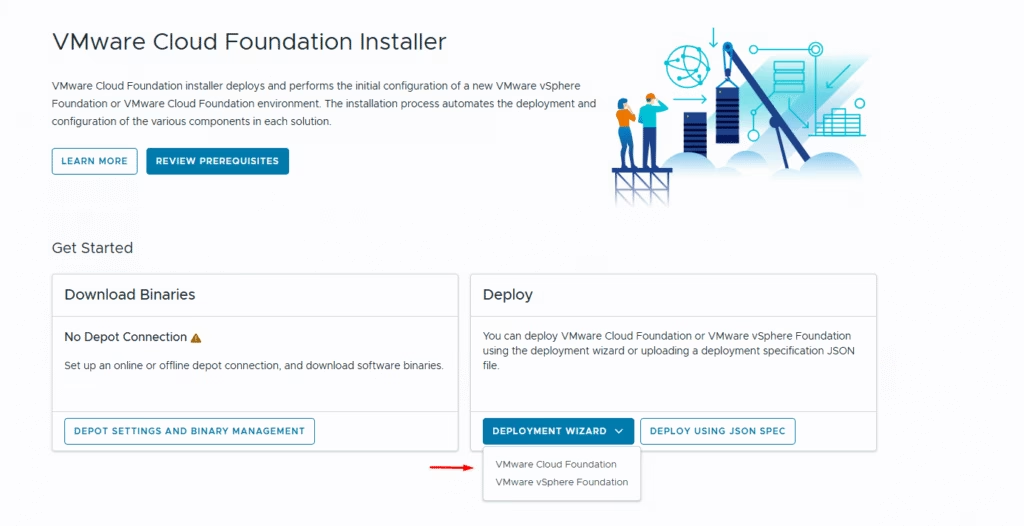
On the Deploy Wizard, click VMware Cloud Foundation

Click Next

Since I am performing a greenfield deployment, I selected the first option to deploy a new VCF fleet. If you already have an existing VCF fleet and want to scale your environment, choose the second option to deploy an additional VCF instance into the existing fleet.

If you are performing a brownfield deployment and need to import VCF Operations or VMware vCenter, select the corresponding option.

Select the Simple Deployment option and move on.

For the VPC Gateway Connectivity option, select Centralized Connectivity. This keeps the routing simple and avoids any of the distributed or advanced topologies that aren’t needed for this build.

Select principle storage type: vSAN, VMFS on Fibre Channel, or NFS v3.

Review and click proceed


You can either prefill this section using an exported JSON from a previous deployment, or just enter everything one field at a time. For this lab we’re entering the values manually.
These are the parameters you need to provide:
- VCF version — Select the version matching the bundles you downloaded.
- VCF instance name — Lowercase only, no spaces, no uppercase.
- Management domain name — This becomes the SDDC Manager domain.
- Deployment model — Single or HA. For this lab: single.
- DNS domain name — Must match your environment’s FQDN structure.
- DNS servers — Forward and reverse lookup must work.
- NTP servers — Must be reachable and in sync with Cloud Builder and ESXi.

Enter the root password and FQDN for each ESXi host in the management domain.


Navigate back to the home screen to launch the deployment wizard. Depending on your use case, you can choose to deploy either VMware Cloud Foundation or vSphere Foundation.
Here we need 12 IPs for current scope or 30 IPs to allow for more components like VCF automation etc and auto-scaling for these VCF Management Services and automation so just reserve 30 IP’s

Choose vMotion Network (VLAN 1612): 172.16.12.0/24 and vSAN Network (VLAN 1613): 172.16.13.0/24

Host Tep Pool Network (VLAN 1634): 172.16.34.0/24

Enter the FDQN values for these here
- VCF Operations Collector Appliance FQDN
- VCF Operations License Server FQDN
- VCF Fleet Services
- VCF Insatance services FQDN
- VCF Cloud proxy FQDN
- Identity Broker FQDN
- VCF AutomationFQDN
- VCF Automation Services Runtime

Enter the vCenter and cluster details

In my setup we have 6 NIC’s so i’ll pick Storage Traffic And NSX Traffic Separation adn this will spin up 3 vDS

Leave everything as default

Enter the FQDN for the NSX VIP and NSX Mgr

Here we are deploying a new vcf installer

Click review

Runn all validations

After successful validation click deploy to start the deployment. The deployment takes few hours to complete.

Once deployment is complete, download the JSON specification and the passwords.

Here are the list of VM’s deployed

Login via VCFOps to validate everything.

vCF Build Logs
The location of the log file is /var/log/vmware/vcf/domainmanager in the VCF Installer VM. This file will give you a live update of the deployment and any errors if any
Bringup logs ( VCF Installer):
/var/log/vmware/vcf/bringup/vcf-bringup-debug.logSDDC Manager (VCF 9.x):
/var/log/vmware/vcf/domainmanager/domainmanager.log
VCF Fleet Management:
/var/log/vrlcm/vmware_vrlcm.logCollect all logs via SOS bundle:
# All logs
/opt/vmware/sddc-support/sos --collect-all-logs --zip

# VCF Installer logs only
/opt/vmware/sddc-support/sos --vcf-installer-logs --zip

# SDDC Manager logs only
/opt/vmware/sddc-support/sos --sddc-manager-logs --zip