


When you deploy Cisco UCS Manager for the first time, one of the most important housekeeping tasks is replacing the default self‑signed certificate on the Fabric Interconnects. Because the two FIs operate as a cluster, you only need to perform the process once the configuration automatically synchronises across both units.
- Download the Root CA Certificate
- Create a Trusted Point in UCSM
- Create a Key Ring & Certificate Request
- Submit the CSR & Download the Signed Certificate
- Import the Certificate into the Key Ring
Download the CA certificate chain
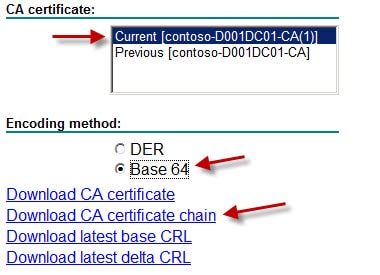
To get the root/intermediate chain from your Microsoft CA as a PEM file open your Microsoft CA Web Enrollment page: http:///ca/certsrv and select Download a CA certificate, select Base 64, and download the CA certificate chain.

Save the .p7b file and open it in a text editor and Copy the entire Base64 block to your clipboard — you’ll need it shortly

Creating a Trusted Point
To create a Trusted Point in UCS Manager,Go to Admin tab > Key Management > Right‑click Trusted Points and choose Create Trusted Point. Paste the Base64 certificate chain into the window. Save it.

Create a Key Ring & Certificate Request
After creating it, select the key ring and choose Create Certificate Request. Fill in the CSR fields using your actual environment values:
Give it a meaningful name (e.g., the name of your CA) and provide all these details
- Locality:
Camden - State:
London - Country:
GB - Organization Name:
VMA - Organization Unit:
IT - Email:
admin@ash.local - Password: Leave blank, or enter a challenge password if your CA requires one
- Subject:
ucs01 - IP Address:
172.16.11.41
The IP Address must be the UCSM cluster VIP — the floating management address shared between both Fabric Interconnects — not the individual FI management IPs.

Click OK. The CSR will appear in the Request field on the same page. Copy the entire block including the -----BEGIN CERTIFICATE REQUEST----- and -----END CERTIFICATE REQUEST----- lines.

Submit the CSR & Download the Signed Certificate
Return to your Microsoft CA. Submit a certificate request using the Web Server template and paste the CSR into the request form.

Submit it and download the issued certificate in Base 64 format and save as .cer file and open it in a text editor
Importing a Certificate into a Key Ring
Back in UCS Manager, navigate to Admin → Key Management → Key Rings and open your key ring (keyring-ash). Select the Certificate tab.
You’ll see two things to fill in:
- →Trusted Point — select
tp-ashfrom the dropdown - →Certificate — paste the full Base64 PEM content of your signed certificate

Click Save. UCSM will validate the certificate against the Trusted Point chain. If everything matches, the key ring status will update to show the certificate as valid.
Apply the Key Ring to HTTPS
Navigate to Admin → Communication Management → Communication Services. In the HTTPS section, change the Key Ring dropdown from default to your newly created keyring-ash. Leave the port as 443 and Admin State as Enabled. Click Save.

Relaunch the browser and login UCSM, now you can see the UCSM site is secured.