WDS offers a simple method to deploy and boot systems on the network that have no installed operating system on it ( also known as PXE boot ). In this blog, we will boot and install a Windows 2019 server image from a Microsoft Windows Deployment Services (WDS) Server.
I’ve downloaded and mounted a Windows Server 2019 ISO Image on the WDS server. The two files we need in this are the boot.wim (used to boot client machines) and the install.vim (the actual Windows installation file).

Install and Configure Windows Deployment Services
Under Roles and Features choose Windows Deployment Services

Click Add Features in the popup window then click Next.

Click Next to Continue

On the WDS tab, Select the role services box, and click Next.

Click Install.

Launch Windows Deployment Services

Right-click and then click Configure Server.

Verify if all prerequisites are met.

Choose the Integrated with Active Directory option and then click Next.

We will just accept the default location as C:\RemoteInstall and then click Next.

Under Settings, we will choose to respond to all PXE requests from all client computers for now.

Choose to add images to the server and Click Finish.

Adding Install Images
In order to boot an OS from the network, we will need an Install Image which is the actual Windows installation file. The Install Image is located on the Windows install media under \sources\install.wim.
Right-click on the Install Images and choose Add Install Image Group

Choose to add an Install Image

Select ‘install.wim’ file from the ISO disk

Our ISO detects, four versions of Windows 2019, we will just pick the datacenter version.

Review the summary and click Next to proceed

Wait till the image is added to the PXE server

We can now see under Install Images our Windows 2019 ‘install.wim’ file

Adding Boot Images
In order to boot from the network, we will need a boot Image. The boot Image is located on the Windows install media under \sources\boot.wim.

Select ‘boot.wim’ file from the ISO disk

Give a name for our Boot Image and a description if required.

Review the Summary and click Next

Click Finish

Select the Boot Images to see the 2019 image added.

Add Drivers to WDS
A common error when deploying WDS is WdsClient: An Error Occurred While Obtaining IP Address From the DHCP Server. This is linked to network drivers on the VM and can be resolved by injecting drivers into our image.
If you wish to boot the VMware VM which has a VMNet3 driver, this driver will need to be added to the image.

Go to the Drivers Menu and choose to add a Driver Group. A driver group is just an empty container or a collection group for a set of drivers.

We will name it as VMware Drivers

Click Next to Continue

Click Next to Continue

Choose the option to install driver packages to this group

Click Finish to Continue

Our empty container is now created and we will attach our network drivers to it.

Under Drivers > Select the option to add a driver package and specify the path where we downloaded our network card drivers. Click Next to Continue

The drivers are added to our WDS server config.

Choose the container to move the drivers to and click Next to Continue

Click Next to continue

Validate everything and click Next to continue

Our NIC Drivers are now added to the VMware container.

Under Boot Images, right click on our Windows 2019 Image to add driver packages to the image

Select Add driver package, and click the Search for packages button.

The drivers you just added to our wds config will now appear in the search results

WDS will open the image, inject the drivers and close the image

Review and click Finish

Approve WDS Requests
Under properties, we could also choose to approve the WDS deployments as in when new requests come in to deploy a VM.

Booting over LAN
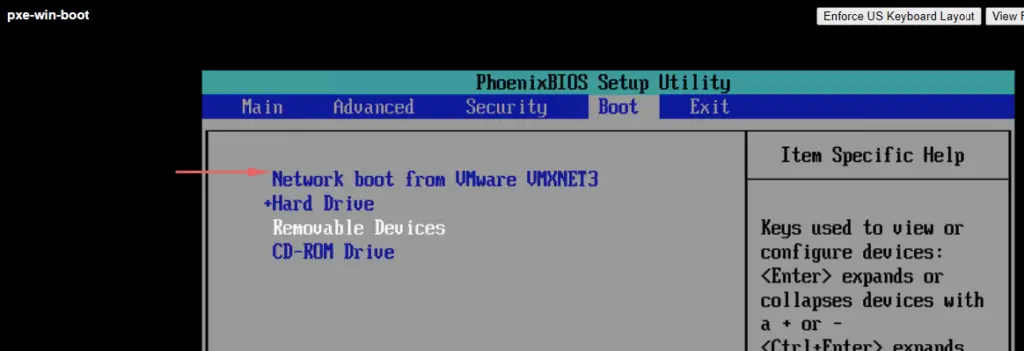
To perform a PXE boot, on the shell VM we will go to BIOS setting and change the first boot to Network Boot.

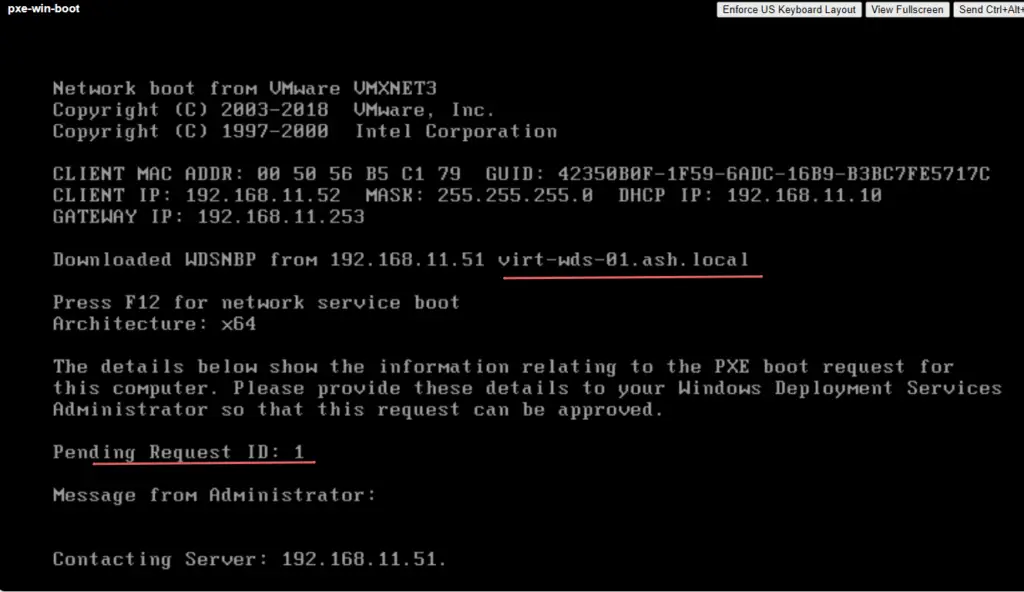
On boot, we should see now our new VM is loading files from the WDS server over the network.

On the WDS Server, under Pending Devices, right-click the pending request, and then click Approve

Once it’s approved, we can see the boot.wim file being transferred across

WDS Windows Setup box will appear and we can proceed by clicking Next.

Type a User Name and Password to establish a connection with the WDS server

Next, on the Select the operating system you want to install, choose the Windows 2019 image.

Choose the disk to deploy it to.

Wait for the deployment to complete

Once it’s installed, change the boot order to a Hard drive.

Our VMs is now booted up from our local hard disk.


