

With the release of 4.0.0.1, the product name changes from “VMware NSX-T Data Center” to “VMware NSX“. In this blog, we will take a look at the process involved in upgrading the NSX-T from 3.2.1 to 4.0.0.1.
Lab Topology
Our NSX cluster runs on 3.2.0 and I’ve got all my ESX hosts on 7.0.3 and vCenter running on 7.0.3 as well. There are two edge clusters each with 2 edge nodes in it. The environment runs on nested vSAN.
Prerequisites for Upgrading NSX-T to NSX
Before upgrading your environment you must review the base requirements
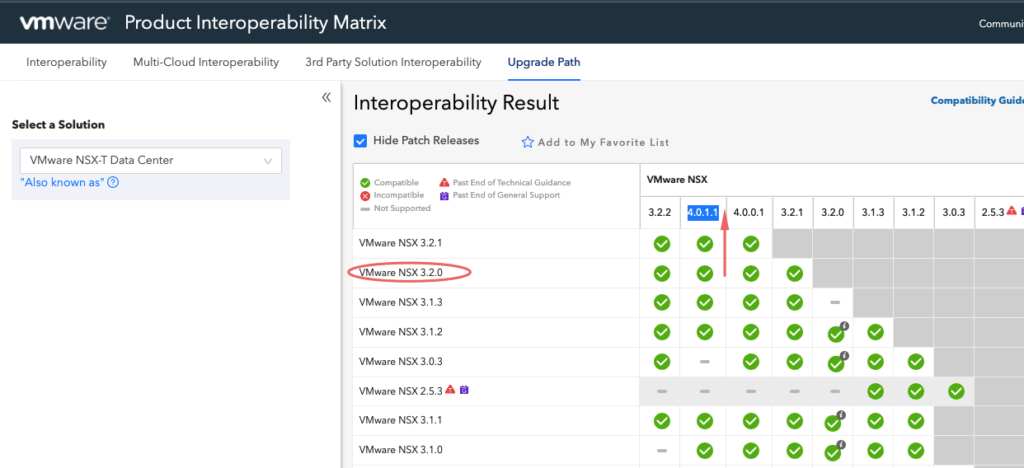
- Supported Upgrade Paths
- Pre-Upgrade Tasks
- Deploy NSX Upgrade Evaluation Tool
- Backup your NSX appliance
As per the matrix, our vCenter is compatible with the new version we will just upgrade it.

As per the matrix, we are good for this upgrade.
Patching Process
Let’s do a quick health check on the NSX-T Management cluster to ensure the Management Cluster status is stable and cluster connectivity is up and the load on the system is optimal.

Validate NSX CLI Stats
NSX-CLI Is a bit more granular to verify the cluster status and provides in-depth details so let us do further checks from the CLI end.
Login to any one of the NSX-T manager modes as admin via an ssh section and run the command below to get the version of NSX-T installed
get version
Run the below command to get the NSX Manager nodes that are part of the cluster
get managers

To get the status of the NSX Cluster, run the command
get cluster status or get cluster status verbose

The output above will pick up if our Group types are Stable or not.
| Group Type | Purpose |
| Datastore | This group runs a Corfu Server which has info on everything running on nodes and they are always in sync |
| Controller | This group is responsible for the routing and switching operations on the NSX-T |
| Https | This acts as a reverse proxy that servers our UI authentication |
| Manager | Holds all NSX policy and stores the configuration in the CorfuDB |
| Cluster_Boot_Manager | Holds the Quorum for the 3 NSX |
| Policy | Handles the Security policies on the NSX |
To query the status of the NSX Cluster, run the command
get cluster config
Verify the status of all the services on the NSX Manager using this command
get service
The next step in this process is to deploy a special tool that does a precheck for us in an automated fashion.
Deploy NSX Upgrade Evaluation Tool
Download the NSX Upgrade Evaluation OVA from the VMware portal and deploy it to the vCenter

SSH to the VM using root and run the following command to start evaluating an existing NSX-T deployment to be upgraded to NSX-T 4.0
> start dry-run data-migration mp-ip 192.168.11.53
Root password of the Remote MP node:
Checking ssh connectivity to the MP node 192.168.11.53 with root user...
Checking if nub is unpacked
Untaring nub file
Unpacking nub bundle
Nub unpacked
Creating a temporary folder on MP 192.168.11.53
Copy Corfu data to the temporary folder on MP 192.168.11.53
Copy nsx_issue file to the temporary folder on MP 192.168.11.53
Create tar of the temporary folder on MP 192.168.11.53
Delete the temporary folder on MP 192.168.11.53
Fetching tar containing Corfu data
Delete tar file on MP
Downloaded corfu tgz file of size 36 MB
Loading the fetched Corfu data
Stopping Corfu server
Stopping CBM
Preparing config_bak on this VM
Untaring the data
Starting Corfu server
Starting data-migration dry-run
Running.... Please track progress in /var/log/cloudnet/data-migration.log, /var/log/proton/data-migration.log, /var/log/policy/data-migration.log, /var/log/proton/logical-migration.log

All pre-upgrade check(s) passed. You can proceed with the upgrade.
NSX-T Upgrade Workflow
Login to NSX Manager UI using https://nsx-fqdn/ and click on System and Upgrade.

Download the upgrade file from the VMware portal

Upload the VMware-NSX-upgrade-bundle-4.0.0.1.0.20159689.mub file to the NSX manager UI as shown

The upload is to take a while.

The package is extracted and it does a compatibility check.

Accept the EULA settings and click Next to continue


Click Next to Continue

If there are any warnings, it will prevent you from upgrading the NSX manager so ensure this is all corrected.

Upgrade Edge Nodes
There are two ways we can upgrade the edge nodes – Serial or Parallel
This would mean if there were multiple edge clusters in the environment, serial will allow us to upgrade these in sequence and the next edge cluster is only upgraded once the current edges in the edge cluster are fully done.
A parallel option would mean multiple edges are upgraded simultaneously, however, edges within the cluster are upgraded serially, This is the default setting.
I am sticking to Parallel so that all my edge clusters get upgraded at the same time. Click on Start to Begin the upgrade.

Monitor the progress of the workflow

It may be worth logging this UI as well in a separate webpage to check the progress of the upgrade.

After few moments, our edge cluster has thus been upgraded.

Validate if any nodes are still in the NSX maintenance mode or if there are any issues on the tunnels prior to upgrading the hosts.

Upgrade Hosts
The next step of the workflow is what pushes VIB bundles to the host so during this time, the host will enter maintenance mode. The hosts will also have the same options to upgrade in serial or parallel fashion so again we will set it to parallel but on production, you want to set it to serial to have bit control.

Under the Edit Group option, I’ll ensure Evacuated powered-off VMs is selected so powered-off VMs can move around during host maintenance operations.

Under the preferred option, I am going to select parallel here in my lab but in the production, you may just want to set it to Serial. Click Start so let NSX Manager can proceed with the upgrade.

The host will enter maintenance mode one by one to prepare itself for installing the new NSX vib’s

Validate the progress per cluster by selecting the Host Groups.

Once all the Edge Nodes are upgraded -> Click Run Post Check. Don’t proceed with your upgrade, if there are errors here and this is why we had a separate webpage opened to check the tunnel stats.

Upgrade NSX Manager
The final step in the upgrade process would be to upgrade the NSX Manager.
Click Start to confirm upgrading the NSX Managers.

Click Start to confirm upgrading the NSX Managers.

After a bit, we will lose access to the UI so for further monitoring, we will need an SSH login to one of the NSX managers.

The progress of the upgrade can be monitored via the CLI using the command
get upgrade progress-status
Once the Manager has fully started up all the needed services, you can return to the upgrade tool and check the status of the manager up. Status should be Successful and Progress should be 100%.


Summary
In this blog, we had gone through the entire process of moving from NSX-T to NSX. Going forward we will only be referencing the product as NSX instead of NSX-T.