In this blog, we are going to take a look at how to configure a SQL Server Always On Availability Group on Windows Server 2016.
Introduction to SQL AG
The SQL Server Availability Groups offers the following benefits
- HA for databases
- Supports offloading some read workloads to the secondary replica.
- Allow us to configure database backups from the secondary/replica instance.
Prerequisites
- Join Servers to domain
- Allocate shared disks
- Configure a failover cluster
- Define quorum configuration
The process of SQL AG Server cluster installation involves two stages, first is to install SQL Server on one node and once this installation is successful then we need to install SQL Server on the other nodes of the cluster
| Name | Mgmt IP Address | HeartBeat HA IP | Purpose |
sql-ag 616a | 172.16.11.20 | 172.16.99.20 | Primary Node |
| sql-ag-616b | 172.16.11.21 | 172.16.99.21 | Secondary Node |
| vi-sql-ag | 172.16.11.22 | Microsoft Failover Cluster VIP | |
| sql-ag-listener | 172.16.11.80 | SQL Server Cluster VIP |
The following accounts are needed in order to achieve a successfully clustered SQL Server instance installation:
| ASH\SVCSQLEngine | SQL Server Engine service account |
| ASH\SVCSQLAgent | SQL Server Agent service account |

Create the SQL VIP Server computer name SQLAGLISTENER s an AD Object and keep the computer object disabled. This SQLAGLISTENER Ad group will later be used

- Under the security tab of the SQLAGLISTENER computer object add the Microsoft cluster computer SQLCluster with full access to the SQL Server as shown

I’ve created a failover cluster already and both my nodes are up

Cluster Quorum configuration
A quorum would ensure the failover cluster is kept running depending on the majority of voting members within the failover group preventing a split-brain scenario when none of the nodes owns the resources.
Right-click on the Windows Cluster name and go to More Actions -> Configure Cluster Quorum Settings.

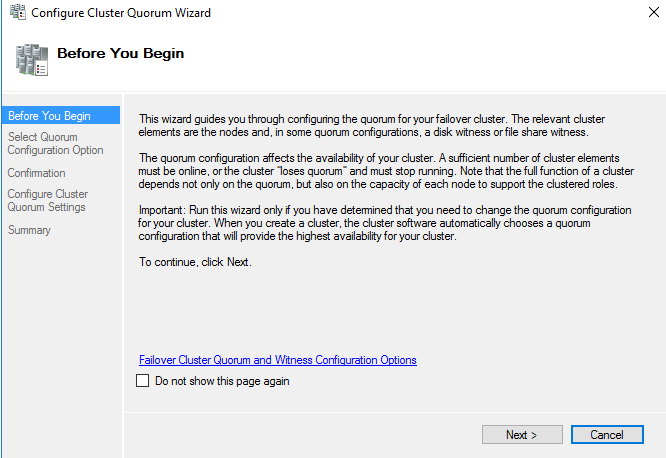
Click Next to proceed

Choose our witness type as disk

Choose the quorum disk we provisioned earlier

Review your configuration and click confirm to proceed further.

Our quorum is thus provisioned.

You can connect to the failover cluster manager, and it shows the disk share witness in the console.

Our disk witness shows up under the cluster tab

We are now ready to install our SQL cluster
Install SQL server 2019 on Primary Node – sql-ag 616a
Mount the SQL 2019 Install media and choose option to install stand-alone installation.

Add license and click Next to proceed

Accept the licensing agreement

Choose the features you want to install on your SQL cluster server. and choose where the binaries will be placed.

Give the SQL Server Network Name

Enter the SQL Server service accounts and their passwords to run the SQL Server services for SQL Server DB and SQL Agent

Select the authentication mode of the SQL Server. Choose Mixed Mode and enter an sa password.

Under the “Data Directories” is where we specify the location to keep the data directories, user database, temp DB, backup et

Under the “Temp Directory” is where we specify the location to keep the temp files

MaxDOP is a feature introduced in SQL 2019 and this controls the number of cores for parallel query execution.

If you have used previous editions of SQL server we know that those are memory intensive and typically consumes all the memory allocated to it causing severe performance bottlenecks on the SAN. However, in 2019 we can actually cap the memory within SQL itself to control the memory spikes

Choose Install to begin the SQL server installation

The installation has been completed successfully.


Install SQL server 2019 on Primary Node – sql-ag 616b
Follow the above method we did to install SQL server 2019 on our primary onto our second SQL Server as well. Our second node for the Availablity group doesn’t need to be clustered as we did previously.
Mount the SQL 2019 Install media and choose the option to install stand-alone installation.

Create a SQL database for our Availability group
For us to create an availability group we do need an empty database so lets create one as demodb

I’ve also created a test user

Configure SQL Server Always On availability group
Right-click on Always On Availability groups and choose to create a new availability group wizard.

Click Next to continue

Give the Availability group a name. The DNS for this should be created

Choose the database we created and it says that a full backup is required

We will go back to our demodb database and create a full backup

This time our wizard will let us continue our work

Our primary node is SQL-AG-616A. Under the add replica tab, we will now add our secondary node SQL-AG-616B

Select SQL-AG-616B

We will also change the Availability mode to synchronous commit

Choose automatic seeding

Validate all settings

One advantage AG gives is it allows us to configure database backups from the secondary/replica instance.

We use a listener to connect to the primary node. SQL listener helps to avoid any modification in the connections string, in case of a database failover. They can connect to SQL using listeners, and it always redirects the connection to the primary replica. We will create a DNS record for this IP we plan to use

Select the method for the initial synchronization

Validate all settings and click on Next to proceed

Choose Install to begin the SQL server installation

The installation has been completed successfully.

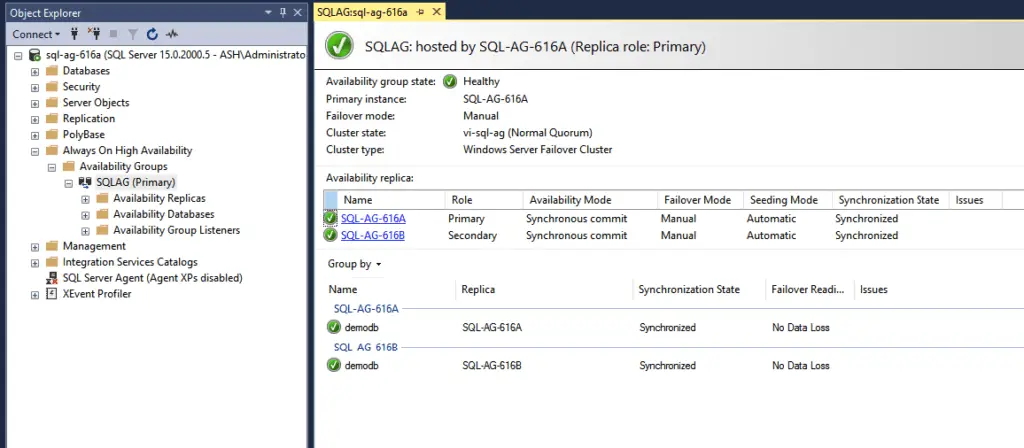
We can see now under the Availability groups database is in synchronized mode on both our primary and secondary nodes

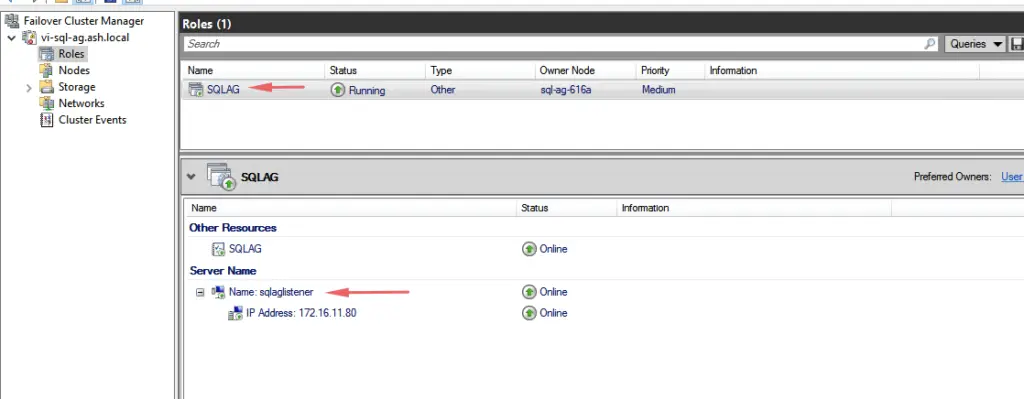
After the AG configuration, we can see the role of the SQL listener under our Failover cluster roles which was created by the SQL installer.

Failover testing for SQL Server Always On availability groups
Choose the AG group > Right click> Failover.

Click Next to continue

Select the new primary replica

Click Connect

Select the account that has admin access to the SQL instance

View the summary for the current and new primary replica along with the affected database during failover.

Click Finish to perform a failover from SQL-AG-616A to SQL-AG-616B

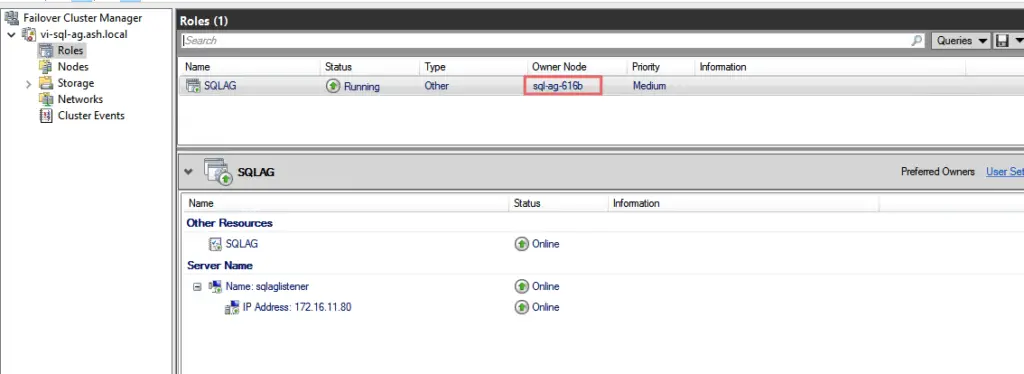
In the Failover Cluster Manager we can see the role has been switched to SQL-AG-616B


