In this blog, we will take a look at how to assign NTFS permissions correctly to a new SMB share
Step 1 – Navigate to Server Manager > File & Storage Services

Step 2 – Create New Share

Step 3 – Create SMB Share

Step 4 – Choose a location and create new folder

Step 5 – Our folder is created under K:`

Step 6 – Give the SMB share a name

Step 7 – Enable access-based enumeration

Step 8 – Choose to customize permissions

Step 9 – Disable inheritance

Step 9 – Select convert inherited permissions into explicit permissions

Step 10- Remove both Users

Step 10- Our Users are now removed

Step 10- Click Add to add a new user or group

Step 11- Select principal – Add the Group that needs permissions

Step 12 – Apply permissions to the folder only and choose the below permissions

Step 13 -Once the user creates files they will be creator owner and create owner will have full control over the files as per permissions set

Step 14 – Review and Click Next to continue

Step 15 -Click Create

Step 16 – If we check the folder permissions, we can see the below set

Step 17 – Advanced config is shown below

Step 18- Login as a group user and create a new folder in there

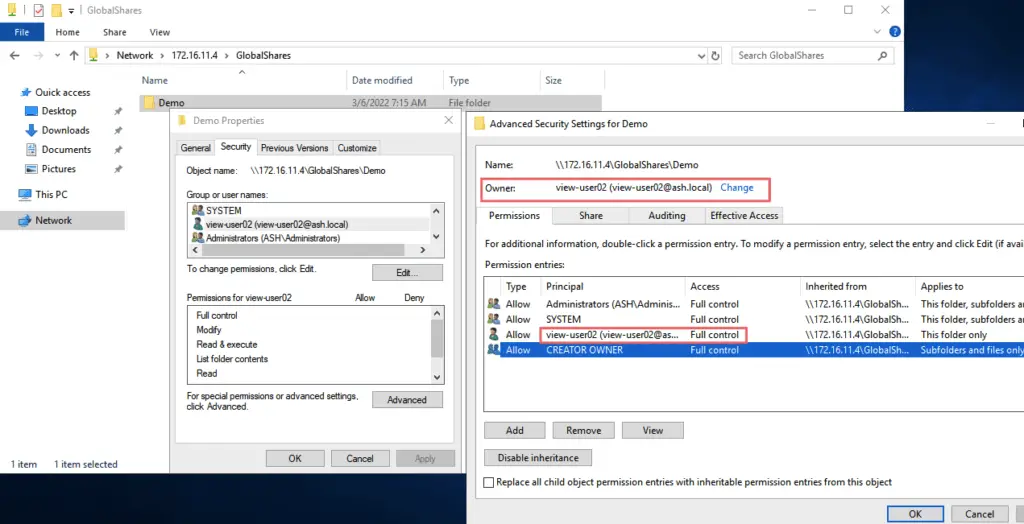
Step 19- As expected, the view-user02 is now the owner of the folder created and thus attains the creator owner with full control privileges.

Traditional way of creating SMB shares
Step 20 – Open file explorer and create a new folder and go to advanced sharing

Step 21 – Click Share this folder which sets the sharing permissions

Step 22 – Follow Step 9-13 to assign NTFS permissions

