In this blog, we will create a CA Server and replace the self-signed vCenter on vCenter 8. X with a valid certificate from a Microsoft Certificate Authority (CA).
Blog Series
- End‑to‑End Machine SSL Replacement on VVF vSphere 8/9.x with vCert via CLI
- End‑to‑End Machine SSL Replacement on VVF vSphere 8/9.x with vCert via UI
- Walkthrough covers how to install and run the vCert 6.0.0 utility
- Create a CA and Replace vCenter Server SSL certificate with CA signed certificate via vSphere Certificate Manager
Creating a Microsoft Certificate Authority Template for SSL certificate creation in vSphere
2. For creating a Microsoft Certificate Authority Template for SSL certificate creation in vSphere 6.x/7.x, open Cert Manager > Certificate Templates> Manage > Choose Web Server> right-click and choose Duplicate Template.

3 In the Duplicate Template window, select Windows 7 / Server 2008 R2 Enterprise for backward compatibility. if you need more security and encryption level higher on your cert choose the higher version of OS from the list. For backward compatibility choose a lower OS version.

4. Under the general tab, give a name for our template

5. Under Extensions tab > Application Policies > Click Server and Client Authentication and click Remove, then OK.


7. Next Go to Key Usage, click check on Signature is a proof of origin (nonrepudiation)


9 – Open Server Manager, go to Tools choose Certificate Authority. On the Certificate Templates right click, go to New > Certificate Template to Issue.


That’s everything we need to do to create a certificate template.
Replacing a vSphere 7x /8.x Machine SSL certificate with a Custom Certificate Authority Signed Certificate
11. In order to enable us to upload and download contents into the vCSA via SCP, login into the vCSA appliance and change the shell as shown.
chsh -s /bin/bash root 
12. Run the command below to launch the certificate manager
/usr/lib/vmware-vmca/bin/certificate-manager13. Authenticate using your Admin SSO Credentials (non-AD one) and choose option 1 to replace the machine SSL certificate with a custom certificate and choose a directory to store our certificates onto such as /root.

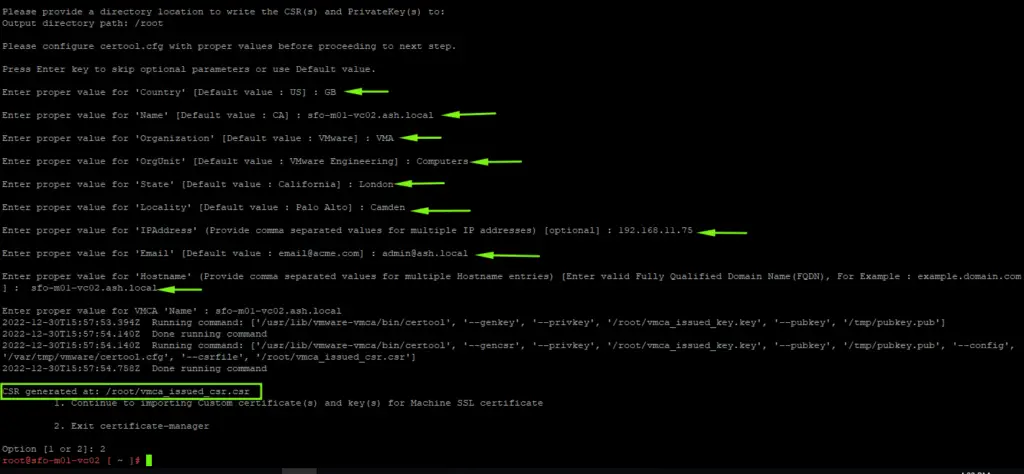
14. Provide these details to the vSphere certificate manager
- Country: Two-letter country code
- Name: FQDN of the vCSA
- Organization: Your organization name
- Organizational Unit: Name of your unit/department
- State: State
- Locality: City
- IPAddress(optional): vCSA IP address
- Email: your email address
- Hostname: FQDN of your vCSA
- VMCA Name: FQDN of your vCSA

15. The certificate request (.CSR) is generated and this now needs to be signed by our external CA

16. via WINSCP, copy vmca_issued_csr.csr to your local desktop

17. Open the csr file and copy all the contents

18. Go to your Microsoft Certificate Authority Web-Enrollment (http://hostname/certsrv) to request a certificate

19.Submit an advanced certificate request.

20. Copy the.CSR file output here and choose the template we created earlier

21- Click Submit and our certificate should be issued by the CA. Choose Base 64 and Download the certificate chain which will have the Root CA and also the signed certificate for our vCSA.

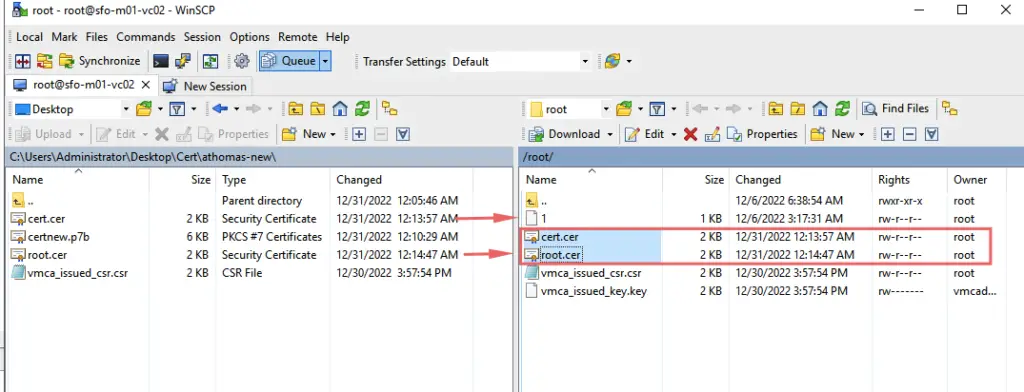
21- Open the certnew.p7b file, choose the vCenter and export the file and name it as cert.cer

22- Export as cert.cer


23- Likewise, choose the root CA and export the file and name it as root.cer

24- Our signed vCSA cert and root CA cert is now ready and this will need to be moved back to the vCSA appliance.

25. Upload your Machine certificate (cert.cer) and Root CA certificate (root-ca.cer) using WinSCP to the vCSA /root folder:

26. Run the command again and Choose Option 1 to Continue replacing the machine SSL with Custom Cert. In the submenu, choose to import custom certificate(s) and key(s) for the Machine SSL certificate

27- Press Y to continue replacing Machine SSL cert using custom cert and provide certificate file paths as below
Provide custom machine certificate:
 cert.cer

Provide custom key for machine certificate:
 vmca_issued_key.key

Provide the Root CA certificate:
 root-ca.cer

27- Press Y to continue replacing Machine SSL cert using custom cert

28. This may take a couple of minutes for vCSA to replace certificates and update all services.

29. Once completed, you are finished. vCenter Server Appliance should now be logging in via a signed Cert

30. Finally, ensure to add your Root CA certificate to a trusted root store in MMC or via Group Policy to let your browser know it’s a safe CA when your client machines access the vCenter URL.
References
How to use vSphere Certificate Manager to Replace SSL Certificates
Obtaining vSphere certificates from a Microsoft Certificate Authority

