In this blog, we will take a look at the Raw device mapping on a Windows Cluster environment.
A Raw Disk Mapping (RDM) is a traditional way of presenting a LUN directly from a SAN to a virtual machine. These presentations were the de facto standard in old SANs as rather than creating virtual disk files on a shared datastore, these mappings are direct from SAN and thus were believed to show better performance than using shared datastores before flash offerings became widely available.
In principle, RDM’s actually don’t offer any performance benefits comparing themselves to VMDK’s on a VMFS datastore however there are specific scenarios such as the MS SQL clustering etc needing formatted NTFS disks to be shared across multiple VM’s. RDM’s are effectively another cluster on top of an existing clustering platform such as VMware so they shouldn’t be used that often.
Blog Series
- Create/Add a Raw Device Mapping (P-RDM) to a VM Cluster
- SQL Server Failover Cluster Installation
- Expand a Virtual and Physical RDM LUN
- How to Set Up and Configure Failover Cluster On Windows Server 2022
Limitations of the RDMs
- If you are using the RDM in physical compatibility mode, you cannot use a snapshot with the disk.
- RDMs require the mapped device to be a whole LUN and you can not map to a disk partition.
- For vMotion to migrate virtual machines with RDM disks around ensure consistent LUN IDs for RDMs across all ESXi hosts in the cluster.
The RDM must be located on a separate SCSI controller. LUNs presented from FC, FCoE and iSCSI are supported for RDMs.
There are two RDM modes to be aware of;
- Virtual Compatability Mode – this is the common deployment and it provides vSphere snapshots of this virtual disk.
- Physical compatibility mode – allows the VM to pass SCSI commands direct to the storage system LUN. This allows it to leverage SAN-specific features such as interaction with the SANs own snapshot functions and this is presentation is favoured across MS Clustered VM’s.
Different types of VMDKs
- Thin Provisioning: This takes very little time and generally doesn’t take a lot of space on creation.
- Thick Provisioning Lazy Zeroed: Allocates the Space on the Datastore, but doesn’t zero all the bits, so it’s relatively faster.
- Thick Provisioning Eager Zeroed: Allocates the Space on the datastore and zeroes all the bits claimed. This is the slowest operation and takes a long time to complete. This is to be used for Microsoft Clusters
Virtual Compatability – Dependent, Independent Disks & Persistent and Non-persistent Modes
Dependent Disks
This is the default disk mode that gets added to a VM. VMDK is included in snapshot operations.
Independent Persistent Mode VMDK is excluded from snapshot operations and data will persist post-reboot. In simple terms, this means these disks that are carved up as Independent do not support snapshot operations. In an independent persistent disk mode, VM snapshots can be taken however there is no delta file associated. All writes go directly to disk and this VMDK behaves as if no snapshot was ever taken. No delta file is created when the VM snap is taken but all changes to the disk are preserved when the snapshot is deleted.
Independent Non-persistent Mode – VMDK is excluded from snapshot operations and data will not persist post-reboot. When a VMDK is configured as Independent Non-persistent Mode, a redo log is created to capture all subsequent writes to that disk. The changes captured in that redo log are discarded for that Independent Non-persistent VMDK If the snapshot is deleted, or the virtual machine is powered off.
Guest OS clustering
Raw device mapping provides three different ways of implementing clusters using VMs:
- Cluster-in-a-box (CIB). When you have two virtual machines running on the same ESX/ESXi host, you can configure them as a cluster. This approach is useful in testing and development scenarios.
- Cluster-across-boxes (CAB). When you have VMs on different ESX/ESXi hosts, you can use vRDM or PRDM to configure them as a cluster using CAB and this is the most common deployment.
- Physical-to-virtual cluster. With this approach, you get the benefits of both physical and virtual clustering, even though you can’t use vRDM with this method.
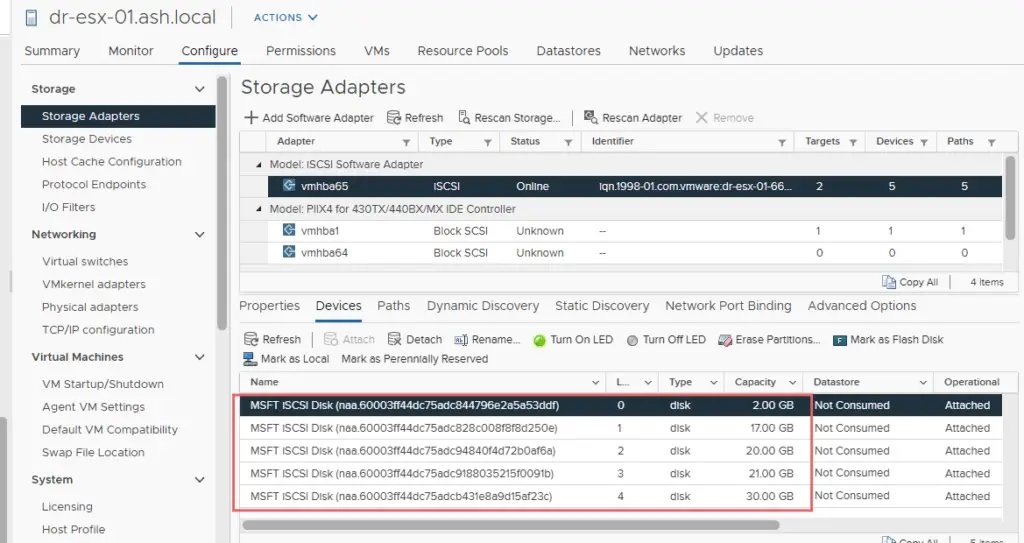
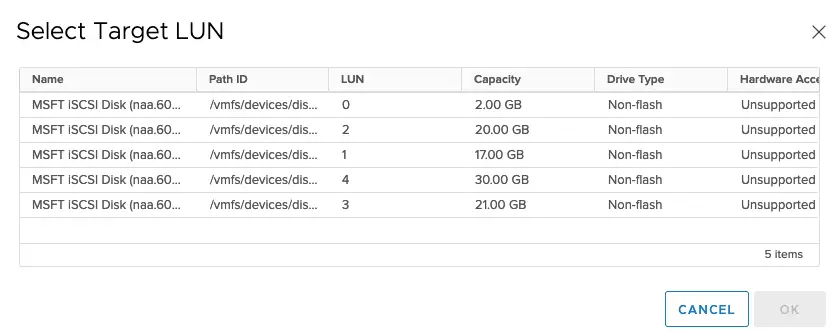
Step 1. The first step to adding an RDM to a virtual machine is to assign a new lun to your ESXi Servers. I’ve just used a simple Microsoft ISCSI server to map 5 luns to the ESXi host. If multiple hosts are involved you should ensure they have the same LUN ID being mapped across else there will be SCSI reservation conflicts.

Step 2. Rescan the HBAs on all your ESXi servers.
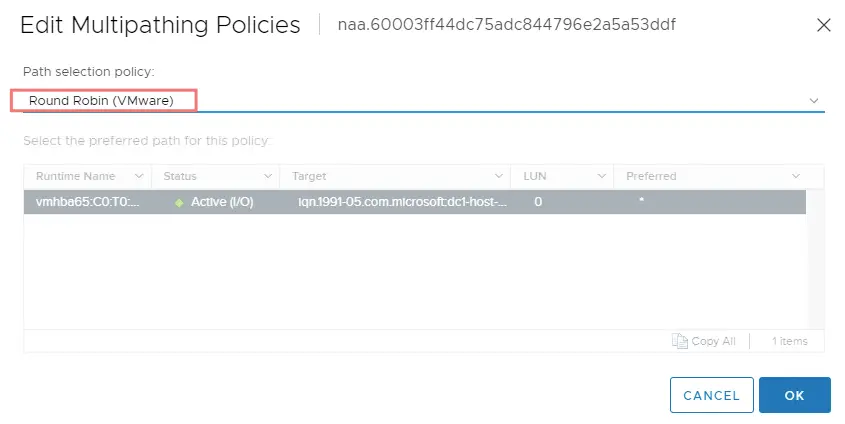
Step 3 – Change multipathing to round-robin
Step 4. Ensure network adapter is set to VMXNet3.

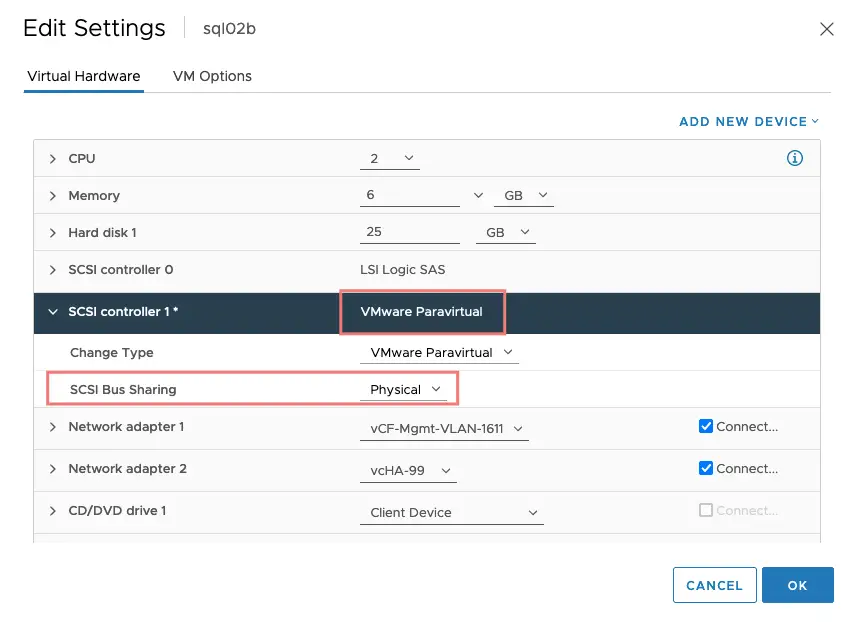
Step 5. Add a new SCSI controller and change disk type to VMware paravirtual, disk sharing to physical
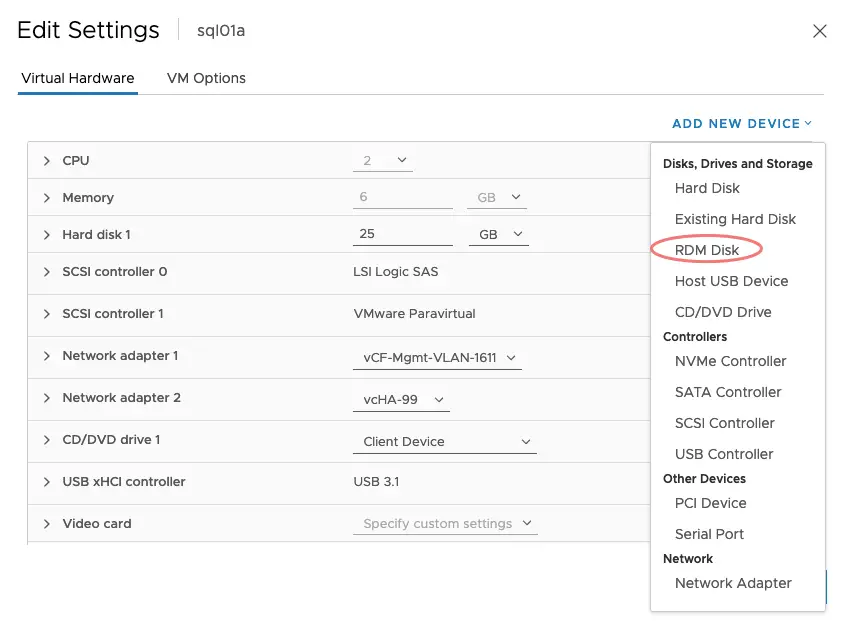
Step 6. Choose the add a new hard drive as RDM Disk
Step 7. Pick a lun from the list
Step 8. For MS Clusters, ensure that Sharing mode is set to No Sharing. Setting it to Multi-writer config is not recommended by VMware and there are several blogs suggesting this setting should be set to multi-writer however this is the wrong approach. Do not set multi-writer on RDMs that are going to be used in a Windows Server Failover Cluster as this may cause accessibility issues to the disk. Windows manages access to the RDMs via SCSI-3 persistent reservations and enabling multi-writer is not required. This sharing option is meant for VMDKs or virtual RDMs (vRDM) only and not for use with physical RDMs (pRDM) as they are not “VMFS backed” so if your environment is utilizing physical RDMs then you do not need to worry about this setting ( Ref Attached below – Pure Storage)

Step 9 – I’ve gone ahead and attached all the remaining RDM’as well.
Step 10 – RDM Disk is added to the first virtual machine successfully so we will log in to our first VM bring the disk online

Step 11– Initialize the disk

Step 12 – Give the volume a name

Step 13 – Run this Powershell command to get the disk layout of the first VM
 Set-PowerCLIConfiguration -InvalidCertificateAction Ignore -Confirm:$false
Connect-VIServer vcenter01.ash.local
Get-VM | Get-HardDisk -DiskType "RawPhysical","RawVirtual" | Select Parent,Name,
     @{N='SCSIid';E={
         $hd = $_
         $ctrl = $hd.Parent.Extensiondata.Config.Hardware.Device | where{$_.Key -eq $hd.ExtensionData.ControllerKey}
         "$($ctrl.BusNumber):$($_.ExtensionData.UnitNumber)"
      }},CapacityGB,DiskType,ScsiCanonicalName,DeviceName,FileName | out-gridview
The output will appear as shown

Step 14. If you wish to map the RDM across to a clustered VM, we got to ensure all the VMs participating in the relationship see each other disks as shown above
Step 15. Add a new SCSI controller and change disk type to VMware paravirtual, disk sharing to physical

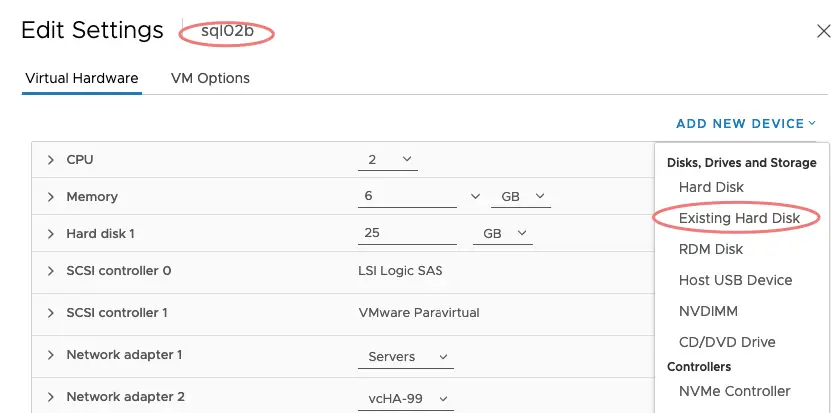
Step 16. On the second server that wish to see our RDM disk, go to add a new device, add a new SCSI controller as we did before and choose Existing Hard Disk
Step 17. Navigate to the location of the disk file for our first server and click Add

Step 18. Ensure we select the same SCSI ID and ensure these attributes are set.

Step 19. Ensure we set Round Robin on each disk as well.
Step 19. Just rescan the windows disks and bring the disk online on 2nd VM. (Do not format the disks)
Step 20. Both our VMs will now see the RDM disks mapped from our array,

Step 20. If you wish to add Microsoft clustering on the VM instances, follow this article
Creating VMware Anti-Affinity rule for the Clustered Windows VM’s
Also ensure, that as you build these Windows clusters, its separated from each using DRS rules
Go to Cluster > Configure > Configuration > VM/Host Rules and Click Add to add DRS rules > Select both the file servers and choose the rule as to Separate Virtual Machines

There is one more setting that needs to be applied at the DRS level to ensure these anti-affinity rules stick so go to Configure > Services > vSphere DRS > Advanced Options tab and type ForceAffinePoweron in the Option and assign a value of 1 and save the changes.

Backing up a VM with RDM Disk Shared
Bus sharing is the usual technique that’s used to build out Microsoft Clusters which in fact are disks mapped as raw device disks in a physical mode that cannot be used in backup, snapshots, or disk consolidation. If you attempt to snapshot a VM that has disks in shared bus mode, you will get an error on the VM as its unable to take a snapshot of the SCSI Bus sharing disk VM.
Solutions to backup these VM include the following
With bus-sharing:
- Use an agent-based backup in the Windows OS to back up the file systems.
- If a VM has any snapshot preventing you to configure bus-sharing, then first delete the snapshot.
Without bus-sharing:
- If a VM already has bus-sharing configured and you want to create a snapshot then we will need to disable the bus-sharing.
References
Check this URL below as well
https://www.vkernel.ro/blog/build-and-run-windows-failover-clusters-on-vmware-esxi
Enabling or disabling simultaneous write protection provided by VMFS using the multi-writer flag

