General Parallel File System (GPFS) is a high-performance object storage clustered file system developed by IBM. It can be deployed in shared disk configurations allowing us to configure high available file system allowing concurrent access from a cluster of nodes thus offering parallelism and guaranteed availability at all times.
All GPFS management utilities are located under the /usr/lpp/mmfs/bin/ directory and commands typically start with mm
Lab Configuration
I’ve deployed a base server edition of Ubuntu 20.04 on all these servers.
NSD Nodes
- 172.16.11.157 nsdnode01.ash.local nsdnode01
- 172.16.11.158 nsdnode02.ash.local nsdnode02
- 172.16.11.159 nsdnode03.ash.local nsdnode03
Protocol Nodes
- 172.16.11.160 protocol01.ash.local protocol01
- 172.16.11.161 protocol02.ash.local protocol02
GUI/Admin Nodes
- 172.16.11.182 client01.ash.local client01
- 172.16.11.183 client02.ash.local client02
Prerequisites
Verify Ubuntu Install
There are a number of steps involved to configure the GPFS system and the first of it the OS installation.
vma@homeubuntu:~$ lsb_release -d
Description:	Ubuntu 20.04.2 LTS
Install all these packages
- apt-get update && apt-get upgrade -y
- apt-get install cpp gcc g++ binutils make ansible=2.9* iputils-arping net-tools rpcbind python3 python3-pip -y
Disable Auto Upgrades
We need to make sure our Ubuntu Server is not automatically upgrading any packages, because Spectrum Scale is kernel independent, and if you automatically upgrade the kernel you may end up with a cluster that stop working unexpected.
Modify the file /etc/apt/apt.conf.d/20auto-upgrades
FROM:
APT::Periodic::Update-Package-Lists "1";
APT::Periodic::Unattended-Upgrade "1";
TO:
APT::Periodic::Update-Package-Lists "0";
APT::Periodic::Download-Upgradeable-Packages "0";
APT::Periodic::AutocleanInterval "0";
APT::Periodic::Unattended-Upgrade "0";
And the file /etc/apt/apt.config.d/10periodic
FROM:
APT::Periodic::Update-Package-Lists "1";
APT::Periodic::Download-Upgradeable-Packages "0";
APT::Periodic::AutocleanInterval "0";
TO:
APT::Periodic::Update-Package-Lists "0";
APT::Periodic::Download-Upgradeable-Packages "0";
APT::Periodic::AutocleanInterval "0";
Reboot your system to make sure everything boots up normal.
Disable firewall
ufw disableSet the path of GPFS commands
cd /etc/profile.d
vim gpfs.sh
GPFS_PATH=/usr/lpp/mmfs/bin
PATH=$GPFS_PATH:$PATH
export PATH


#source /etc/profile.d/gpfs.sh
Configure user access to sudoers

Configure root access to all servers
For us to do root authentication, we will add these parameters into my sshd config file

Configure password-less access auth
We will need to generate a key and share out with the public to all servers in the cluster so as to do passwordless authentication. There needs to be keys generated from the admin nodes and protocol nodes
root@node01:~/.ssh# ssh-keygen
Generating public/private rsa key pair.
Enter file in which to save the key (/root/.ssh/id_rsa):
Enter passphrase (empty for no passphrase):
Enter same passphrase again:
Your identification has been saved in /root/.ssh/id_rsa
Your public key has been saved in /root/.ssh/id_rsa.pub
The key fingerprint is:
SHA256:pE/6PZvq05YR/QmlnCEZMlsYyAxn4moTnSRUcvHAZso root@node01
The key's randomart image is:
+---[RSA 3072]----+
| .+oO=o.+ooo     |
|   B+B+ .=o . .  |
| ..++ . o  + =   |
|  Eo   o  . *    |
|  +   . S  . o . |
| . .   +  .   o  |
|      . .. o     |
|       ...=.     |
|       .+++o     |
+----[SHA256]-----+
root@node01:~/.ssh#
Copy the public key to all our GPFS servers
root@node01:~/.ssh# ssh-copy-id 172.16.11.150
/usr/bin/ssh-copy-id: INFO: Source of key(s) to be installed: "/root/.ssh/id_rsa.pub"
/usr/bin/ssh-copy-id: INFO: attempting to log in with the new key(s), to filter out any that are already installed

/usr/bin/ssh-copy-id: WARNING: All keys were skipped because they already exist on the remote system.
		(if you think this is a mistake, you may want to use -f option)

root@node01:~/.ssh# exit
Ensure the hostname is set correctly
Open /etc/hostname and Change the Hostname
hostnamectl set-hostname new-hostnameOpen /etc/hosts and Change the Hostname
root@protocol01:~# cat /etc/hostname
protocol01
root@protocol01:~# cat /etc/hosts
127.0.0.1 localhost
127.0.1.1 protocol01
Configure Static IP Address on all hosts
This step is necessary to ensure we have a static address on all our servers.
vi /etc/netplan/00-installer-config.yaml network:
version: 2
renderer: networkd
ethernets:
ens160:
dhcp4: no
addresses:
- 172.16.11.182/24
gateway4: 172.16.11.253
nameservers:
addresses: [172.16.11.4]Once done, save the file and apply the changes by running the following command:
sudo netplan applyAdd an Additional IP Address Permanently
Ubuntu allows you to add multiple virtual IP addresses on a single network interface card and we need our protocol nodes to have multiple IP’s on it.
Ansible: Define Ansible Host file
One last thing we need to do is to define all our hosts in the ansible host file with the user name we are planning to use for connectivity so in this case it’s the root.
root@protocol01:/etc/ansible# pwd
/etc/ansible
root@protocol01:/etc/ansible#
root@protocol01:/etc/ansible#
root@protocol01:/etc/ansible# tail hosts
172.16.11.161 ansible_user=root
172.16.11.182 ansible_user=root
172.16.11.157 ansible_user=root
172.16.11.158 ansible_user=root
172.16.11.159 ansible_user=root
172.16.11.183 ansible_user=root
172.16.11.182 ansible_user=root
root@protocol01:/etc/ansible#
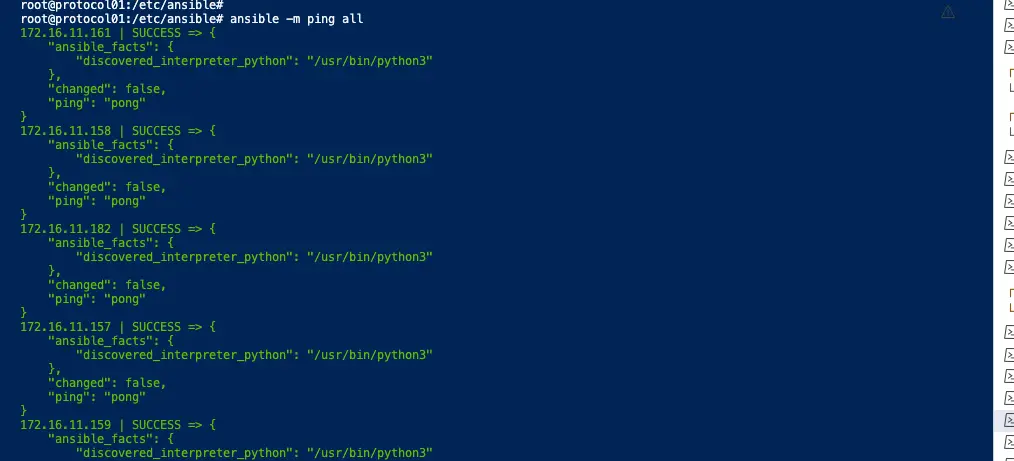
If the configuration is all correct up until now, we should just get validation as success from our ansible ping and this ensure all our ssh keys are as well validated.


