
This blog covers the following topics.
- What are Storage Accounts ?
- Services Available under Storage Accounts
- Types of storage accounts disks
- Azure Storage Accounts – Data Redundancy
- Storage Accounts – Access Tiers
- Storage Accounts – Hot and Cool Access Tier
- What’s a Blob Storage?
- Using Shared Access keys at the Blog level
- Using Shared Access Signatures – At the Storage Account Level
- Azure Storage Accounts – Active Directory Authentication
- Azure Storage Accounts – Lifecycle policies
- Azure File Shares
What are Storage Accounts?
Storage Accounts are management namespaces giving you access to your storage resources such as blobs or files.
They contain all of our Azure Storage data objects: blobs, files, queues, tables, and disks
We will need these details for our Storage Account
- Resource group: Existing resource group
- Storage account name: unique name
- Region: (US) East US 2
- Performance: Standard
- Redundancy: locally-redundant storage (LRS) or globally-redundant storage (LRS)
- Storage Account type as below
RBAC under Storage Accounts
| Storage Blob Data Reader | Users allocated this perm will have data access to storage accounts |
| Reader | Users allocated this perm will view the properties of the storage account but can’t see data. |
Services Available under Storage Accounts


Types of storage accounts disks
| Standard General Purpose v2 | Standard storage for file shares, blobs, tables etc |
| Premium | Supported block and append blobs. Faster access to blobs and better performance for blobs |
| Premium Page Blobs | This is used with page blobs. Stores VHD and if you would like the premium performance we use VHD |
| Premium File Shares | This is used with file shares and offers fast access and high transactional rates to file shares. |
Azure Storage Accounts – Data Redundancy
Multiple copies of your data in the storage account is stored in Azure.
| Locally redundant Storage (LRS) | Three copies are maintained in the same Datacenter. Data will be unavailable during DC outage. |
| Zone redundant Storage (ZRS) | Data is replicated across 3 different AZ so if one AZ goes down data is still available. |
| Geo-redundant storage (GRS) | LRS + data is copied to a single physical location in secondary region. |
| Geo-zone redundant storage | Data is replicated in another location. Three copies are maintained in the local Datacenter via LRS and also three copies are maintained in the secondary Datacenter. |
Storage Accounts – Access Tiers
The pricing of storage accounts depends on the amount of data we store, location, and also access tiers.
- Hot access tier: This tier is used for storing objects that are actively and consistently read from and written to. In addition, hot storage tiers are highly available compared to the cold access tier. Hot tier offers 99.9% availability as opposed to the 99% for the cold storage tier. Hot access tier is the default storage when we create a storage account.
- Cold access tier: Users could use this tier to store data that is not accessed very often. Cold access tier has higher access costs and lower storage costs than the hot access tier.
- Archive Access Tier – This tier has the cheapest storage cost and the highest access cost of the tiers. In order to access objects in this tier, we must first rehydrate them which means moving the object back to an online tier such as cool or hot access before data can be accessed.
| Tier | Purpose | Storage Charges | Retrieval Costs | Used Case |
| Hot access tier (Default) | Data accessed frequently | Expensive | Low | Live Apps |
| Cool access tier | Data accessed infrequently and stored for at least 30 days | Cheap | Expensive | Live Data |
| Archive access tier | Data accessed rarely and stored for at least 180 days | Cheapest | Expensive | Backups |

Create Storage Accounts
1- To create a storage account, navigate to Home > Storage accounts.

2- Choose the subscription and resource group we created.

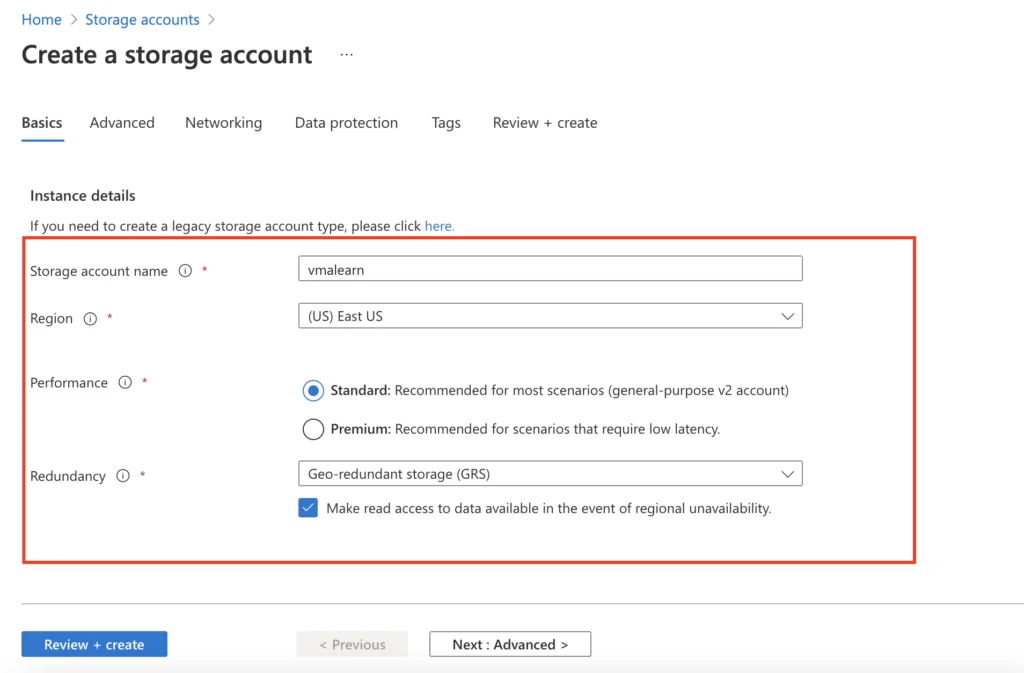
3- Give the storage account a name and choose the region to create the storage account. Select a performance tier – the default tier is Standard. Select replication value, the default replication option is Read-access geo-redundant storage (RA-GRS). It will specify how the storage account will be replicated.
| Redundancy Options | Protection level |
| Local redundant storage | 3 copies of data are made by default across separate storage devices in single datacenter |
| Zone redundant storage | 3 copies of Data are replicated across separate AZ’s so this gives the region-level protection for a location. |
| Geo redundant storage | 3 copies of Data are kept locally as LRS and also data gets replicated to another region eg: US East > US West |
4- Leave everything else as default. After entering all the values, the account will look like the following. If you want to keep the default values for the next section then click on Review + create.

5- Our storage account is thus created under our subscription and the region we choose to deploy it on.
What’s a Blob Storage?
Similar to AWS S3 storage, Azure Blob Storage is Microsoft’s cloud object storage solution which is used to store very large volumes of unstructured data which could be images, photos, videos etc.

What are the types of blobs?
- Block Blobs: Optimized for large blocks of data and can be managed by a single block ID. Storing objects, images, videos etc.
- Page Blobs: used for VHD hard drives for Virtual machines.
- Append Blobs: Composed of block blobs optimized for append operations, new blocks are added to the end of the blob. Updating/deleting are not supported.

How to create a Container?
Once we have a storage account, we will then be able to create a container. It’s in this container we create blobs.
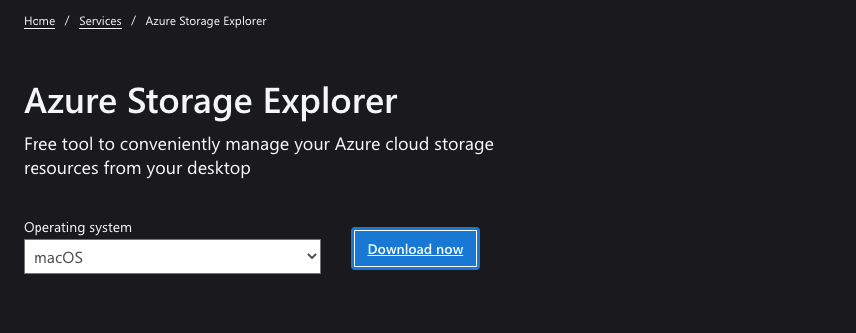
Storage Explorer
1- To create a storage container account, navigate to DataStorage > Containers

2- Give the container a name and create it

3- Our storage container is thus created under our storage account.

4- Uploading a blob using the storage explorer is a fairly straightforward process – Just open the container, select ‘Upload’, select the file to upload, and press Upload.Blob type determines how the blob is optimized and the Access Tier determines storage costs of the blob

5- If we wish to upload to folders, create a folder here. If there is a need for creating a folder structure, we can make use of the datalake Gen2 Storage accounts as that’s built on the blob service itself.

6 – Once the transfer is complete, your file is now stored as a blob.

6 – Access can be authorized as below to the blob service.

Accessing the blob storage
These are accessed via a URL and the format will be.
| FileShare | file.co.uk.windows.container/ containername/objectname |
| Blob | storageaccountname.blob.core.windows.net/containername/objectname |
Access Control to Storage Accounts
Access control to Storage Accounts can be done through one of the following
| Access Keys | Access keys will have access to everything. |
| Shared Access Signatures | For time-bound access to external 3rd parties such as companies etc |
| Azure AD | For role-based assignments via Azure for internal employees. |

Using Shared Access keys at the Blog level
Storage Explorer can be downloaded on our local PC and we can access Azure blobs similar to accessing GoogleDrive, Onedrive etc. Access keys will have access to everything.

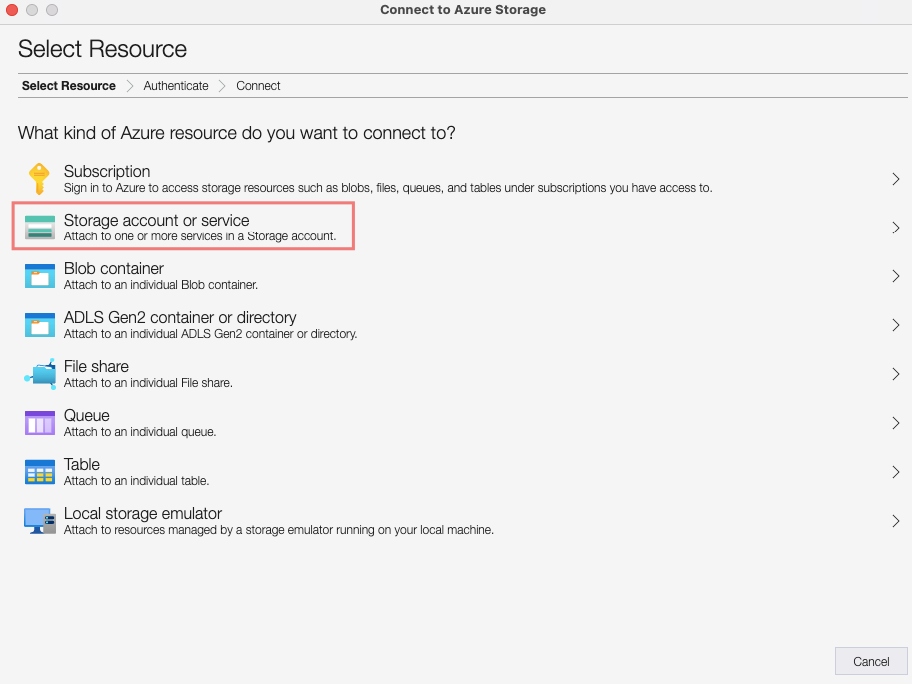
In order to connect to our container or blob, we will need to go to our Storage Account > Access Keys and copy the keys and connection tag.

Choose a storage account or service
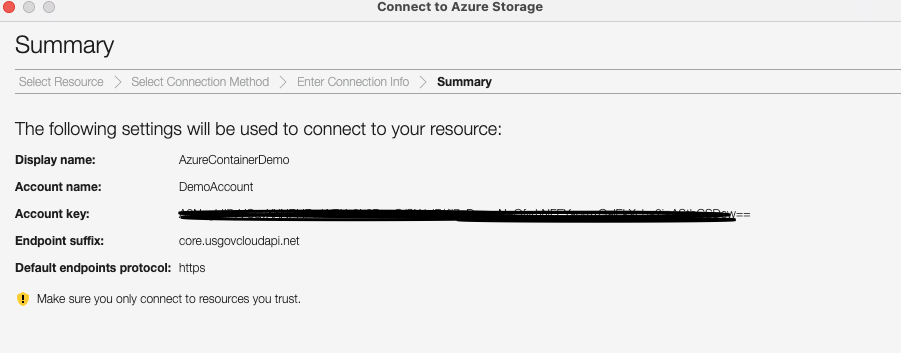
Select the Account name and key

Connect using the key

Click Finish
via the storage explorer, connect the user account and validate access

Detach once done

Using Shared Access Signatures – At the Storage Account Level
Access Keys will grant users access to everything such as blobs, containers, files etc so shared access signatures give us finer control over services in an Azure Storage account. A shared access signature (SAS) is a URI that grants restricted access rights to Azure Storage resources. You can provide a shared access signature to clients who should not be trusted with your storage account key but to whom you wish to delegate access to certain storage account resources. By distributing a shared access signature URI to these clients, you grant them access to a resource for a specified period of time.

I’ll just give read/list permissions here

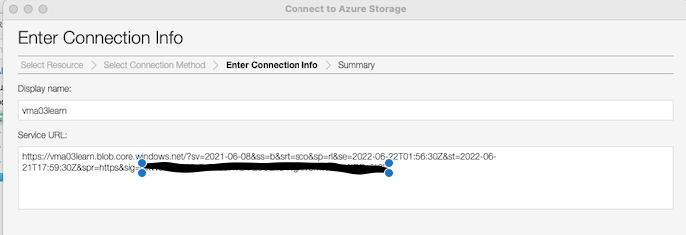
Click on Generate SAS and connection url string

Now we are to access the entire service so we need the Storage explorer.

Enter the Blob service SAS URL
As expected, it has picked up our read/list permissions

As expected we just see the blob only and nothing else as our permissions are denying it.

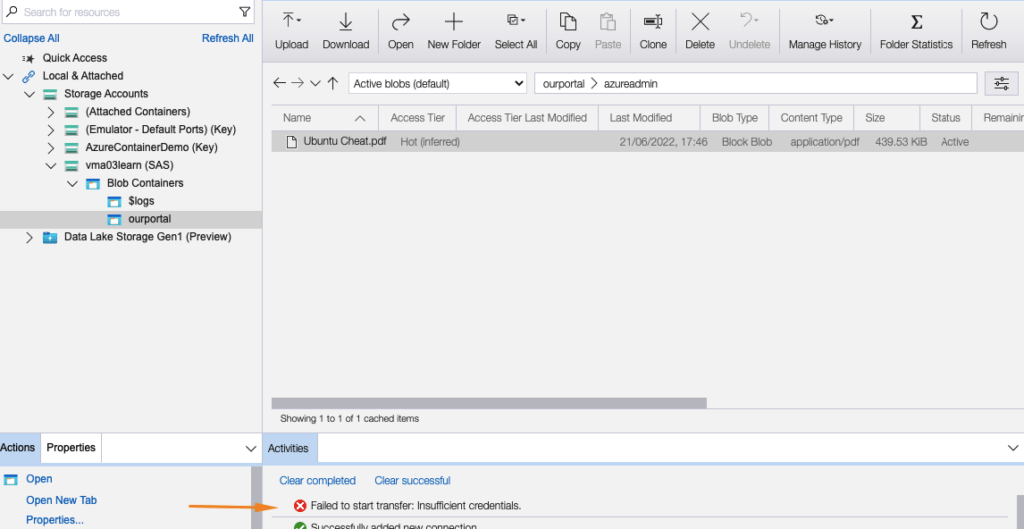
Attempts to upload files will fail because we have only read permissions on the folder
Azure Storage Accounts – Active Directory Authentication
To grant our user02 access to an AD user in our storage account

Under role Click “Reader”

Under Members tab add our user

Give our temp user access to the storage account


Validate access from user02

Storage Accounts – Hot and Cool Access Tier
Access tiers help us to enable life cycle management on the blob storage and this works similarly to AWS S3 life cycle management. Configuring the hot and cold access tier is quite an easy operation and can be done at the storage account level so this now becomes the default.

Switch from the default hot tier to the cold tier as shown

We can see our files have been switched to the cool access tier.

Storage Accounts – Archive Access Tier
Setting the access tier to “Archive” will make your blob inaccessible until it is rehydrated back to “Hot” or “Cool”, which is why costs are high

Azure Storage Accounts – Lifecycle policies
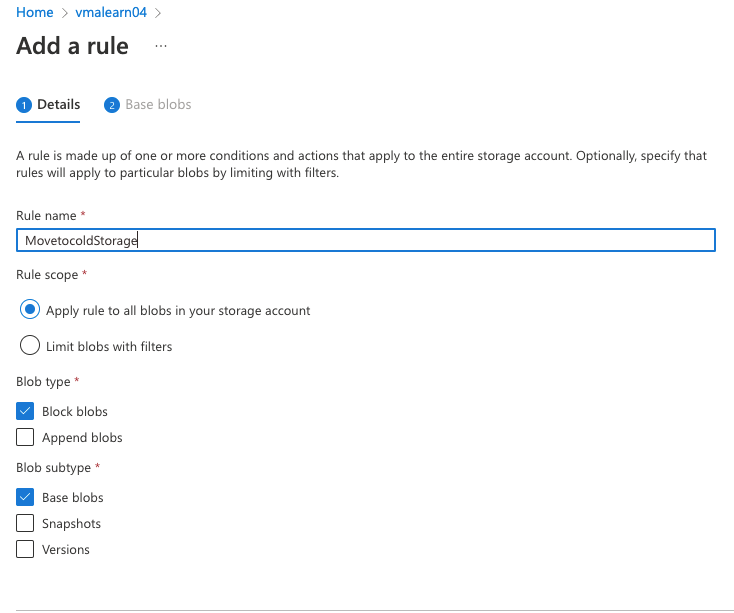
Storage Lifecycle management allows us to move data from our hot storage tier to cold or archive based on the age of the files within to optimize storage utilization and save costs.

Give the rule a name
Move objects over 30 days to Archive storage

Our lifecycle rule is now enabled.

Azure Storage Accounts – Object Replication
Object replication ensures that the objects in a storage account are copied to another storage account for redundancy purposes.
I’ve created two storage accounts in the East US region.

On the vmstg1 storage account the default access tier is Cool

Upload some data to our vmstg1 container.

Go to Data Management > Object Replication to set up replication > Create replication rule
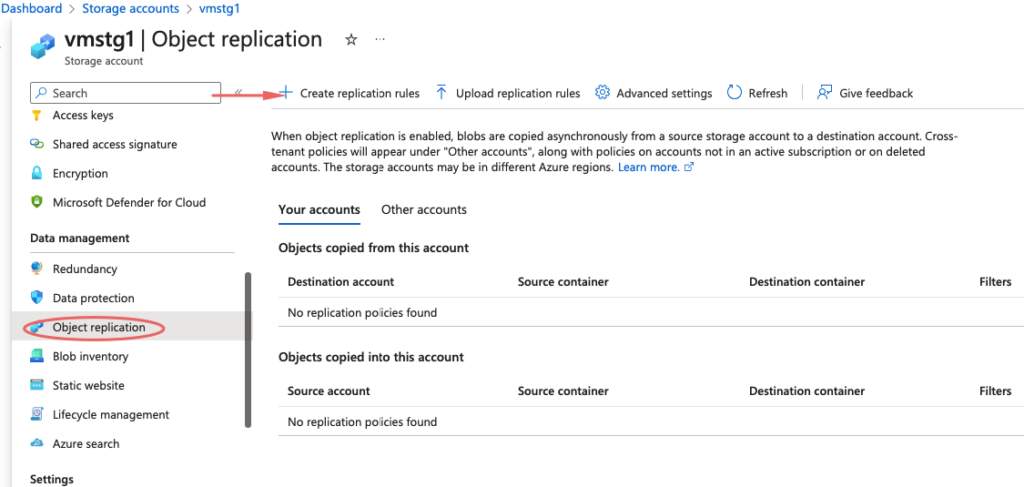
Click Fill in the appropriate details below for the replication rule
- Destination Storage Account
- Source Container – Data 01
- Destination Container – Data 02
- Copy over – Select Everything to copy across

After few moments, we can now see our data has been replicated across.

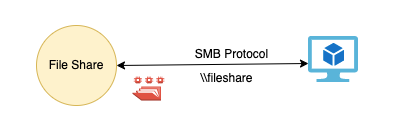
Azure File Shares
These are again part of the storage account and this helps us to create file shares that be mapped as network shares and accessed from virtual machines via SMB protocol.
Every object in the blob storage can be accessed via an https url as we saw earlier but inside file shares, this cant be accessed via url so this is just a file share we access via the network path. There is a 5 TB max limit

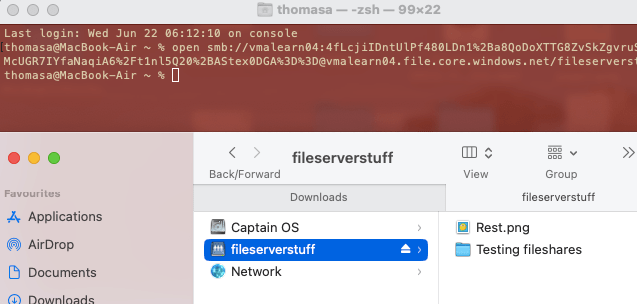
Upload the file

Connect to the share from your OS

Snapshots
Snapshots are read-only copies of blob. For us to create a snapshot of a blob, go to the file and choose the option Create Snapshot

Lets edit the file with some random data

To rollback the file, we will select Snapshots > Promote

Our file has been rolled back to the original copy


Versioning
Blob versioning automatically maintains previous versions of a blob. When blob versioning is enabled, we can restore an earlier version of a blob to recover your data if it’s modified or deleted.
On the storage account > Enable versioning on blobs

Upload some data to our containers

Edit the host file with some odd data

Each blob version is identified by a unique version ID, for us to switch back to old version select the Version tab > Select the version id >Choose Make current version

Our file is now reverted back to original

Firewall Configuration
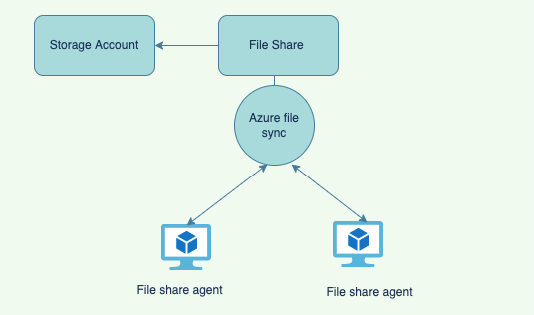
Azure File Sync Service – Setup
The file is synced across the servers via the flesync servers making use of the central file storage for sharing with us. This is quite a handy feature when we wish to have files synced across both servers.
I’ve added a new file share as shown

Azure file sync is a seperate service that needs to be added as well


We will deploy two VM’s – file 01 an file 02 and both these servers will need the Azure file sync agent installed.
https://www.microsoft.com/en-us/download/details.aspx?id=57159

Download the product

Click Next to continue


We will now need to connect to our Azure account to complete the server registration.

Choose our subscription and the Appsync service we created here.

Back to our appsync, we will create a new syncgroup as shown

Our two file servers will appear in here

Choose both servers and the path

Our server endpoints are shown below

Now as we add folders into the C:\data directory we will see files synced on both servers.