To install an Ubuntu 22.04 virtual machine on KVM
[root@rhev-01 images]# wget https://releases.ubuntu.com/22.04.1/ubuntu-22.04.1-live-server-
Connecting to old-releases.ubuntu.com (old-releases.ubuntu.com)|91.189.91.124|:443... connected.
HTTP request sent, awaiting response... 200 OK
Length: 1474873344 (1.4G) [application/x-iso9660-image]
Saving to: ‘ubuntu-22.04.1-live-server-amd64.iso’

ubuntu-22.04.1-live-server-amd64.iso        61%[=====================================================>                                   ] 865.64M  5.87MB/s    eta 88s
To create a virtual machine (VM) on your RHEL 9 host using the virt-install utility, follow this example.
[root@rhev-01 ~]# virt-install --name demo-guest3 --memory 2048  --disk path=/datavol03/guest03/disk.qcow2,size=8 --vcpus 2 --os-type linux --network bridge=virbr0 --location /var/lib/libvirt/images/ubuntu-18.04.6-live-server-amd64.iso --extra-args 'console=ttyS0,115200n8 serial'
WARNING  --os-type is deprecated and does nothing. Please stop using it.
WARNING  Graphics requested but DISPLAY is not set. Not running virt-viewer.
WARNING  No console to launch for the guest, defaulting to --wait -1

Starting install...
Retrieving 'vmlinuz'                                                                                                                                                                 | 8.1 MB  00:00:00
Retrieving 'initrd'                                                                                                                                                                  |  58 MB  00:00:00
Allocating 'disk.qcow2'                                                                                                                                                              | 8.0 GB  00:00:02
Creating domain...                                                                                                                                                                   |         00:00:00

Domain is still running. Installation may be in progress.
Waiting for the installation to complete.
In the Virtual Machines interface of the web console, click Create VM.
Enter the basic configuration of the VM you want to create.
- Name – The name of the VM.
- Connection – The level of privileges granted to the session. For more details, expand the associated dialog box in the web console.
- Installation type – The installation can use a local installation medium, a URL, a PXE network boot, a cloud base image, or download an operating system from a limited set of operating systems.
- Operating system – The guest operating system running on the VM. Note that Red Hat provides support only for a limited set of guest operating systems.
- Storage – The type of storage.
- Storage Limit – The amount of storage space.
- Memory – The amount of memory.
- Installation Source- The default location to copy your iso images is /var/lib/libvirt/images/ but in this example we’ve just put the ISO image in / directory and given it full permissions.
Go to the Virtual Machines menu, and select Create VM from the right part of the screen and provide all the details

Once we Create and Run, our VM begins the installation

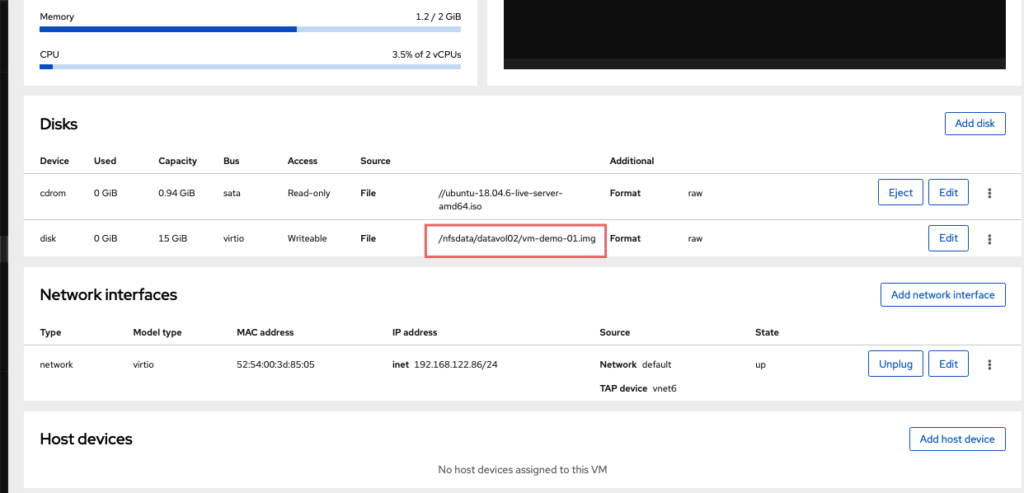
If we expand VM properties we can see under the disks section our base OS system disk listed under our NFS directory.

Connecting to a virtual machine using SSH
- The
libvirt-nsscomponent is installed and enabled on the VM’s host. If it is not, do the following:- Install the
libvirt-nsspackage:# dnf install libvirt-nss - Edit the
/etc/nsswitch.conffile and addlibvirt_guestto thehostsline:[…] passwd: compat shadow: compat group: compat hosts: files libvirt_guest dns [..
- Install the
[root@rhev-01 ~]# ssh thomasa@192.168.122.86
thomasa@192.168.122.157's password:
Welcome to Ubuntu 18.04.6 LTS (GNU/Linux 4.15.0-213-generic x86_64)

 * Documentation:  https://help.ubuntu.com
 * Management:     https://landscape.canonical.com
 * Support:        https://ubuntu.com/advantage

  System information as of Thu Nov 30 19:27:54 UTC 2023

  System load:  1.84              Processes:             115
  Usage of /:   40.1% of 8.76GB   Users logged in:       0
  Memory usage: 7%                IP address for enp1s0: 192.168.122.157
  Swap usage:   0%
Snapshot a VM from CLI
For us to snapshot a VM, the VM will need to be shutdown
# To obtain a list of VMs on your host:
[root@rhev-01 ~]# virsh list --all
 Id   Name                     State
-----------------------------------------
 -    ubuntu18.04-2023-11-30   shut off

# Command stops the VM and saves its configuration.
root@rhev-01 ~]# virsh managedsave ubuntu18.04-2023-11-30
Domain 'ubuntu18.04-2023-11-30' state saved by libvirt

#  List the VMs that have managed save enabled.
[root@rhev-01 ~]# virsh list --managed-save --all
 Id   Name                     State
--------------------------------------
 -    ubuntu18.04-2023-11-30   saved

#  To start the VM
root@rhev-01 ~]# virsh start ubuntu18.04-2023-11-30
Domain 'ubuntu18.04-2023-11-30' started
To start a VM from the command line
virsh start ubuntu18.04-2023-11-30To obtain a list of VMs on your host
[root@rhev-01 ~]# virsh list --all
 Id   Name                     State
----------------------------------------
 2    ubuntu18.04-2023-11-30   running
To obtain basic information about a specific VM
root@rhev-01 ~]# virsh dominfo ubuntu18.04-2023-11-30
Id:             2
Name:           ubuntu18.04-2023-11-30
UUID:           c8996a22-ed18-4f2b-9410-c9b59dcbfe90
OS Type:        hvm
State:          running
CPU(s):         2
CPU time:       205.8s
Max memory:     2097152 KiB
Used memory:    2097152 KiB
Persistent:     yes
Autostart:      enable
Managed save:   no
Security model: selinux
Security DOI:   0
Security label: system_u:system_r:svirt_t:s0:c408,c432 (enforcing)

[root@rhev-01 ~]#
root@rhev-01 ~]# virsh domblklist ubuntu18.04-2023-11-30
 Target   Source
-----------------------------------------------------------
 vda      /nfsdata/datavol02/ubuntu18.04-2023-11-30.qcow2
 sda      -
List all virtual network interfaces on your host
[root@rhev-01 ~]# virsh net-list --all
 Name                   State      Autostart   Persistent
-----------------------------------------------------------
 default                active     yes         yes
 Isolated Network - 1   inactive   no          yes
That’s all there is to Red Hat Virtualization on RHEL 9. Now you have a better understanding of it, which will hopefully prepare you for the upcoming blog on OpenShift.

