It’s via the Interconnects that we get the N-S traffic which comes from the Nexus / MDS and the E-S traffic which is coming via the IO modules.
The fabric interconnects or FI is deployed as a pair and are used to up the bandwidth from the chassis to the upstream switch.
We have deployed our UCS and our fabric interconnect is now ready to receive connections from the chassis (E-W) and also connectivity to the uplink to the MDS/Nexus above for N-S traffic.

Configuring Fabric Interconnect FIA-1
Once the fabric interconnect is connected as above, we will log in to the interconnects A and B
1- via ssh and run the following
This setup utility will guide you through the basic configuration of<br>the system. Only minimal configuration including IP connectivity to<br>the Fabric interconnect and its clustering mode is performed through these steps.

Type Ctrl-C at any time to abort configuration and reboot system.<br>To back track or make modifications to already entered values,<br>complete input till end of the section and answer no when prompted<br>to apply the configuration.
2. Here we will be configuring the initial part of the Fabric Interconnect via console
Enter the configuration method. (console/gui) ? console3. As this is a new install, we will run setup
Enter the setup mode; set up newly or restore from backup. (setup/restore) ? setup4. Select Yes to set up a new Fabric Interconnect.
You have chosen to setup a new Fabric interconnect. Continue? (y/n): y5. Enter in an admin password
6. We arent configuring standalone fabric interconnect so we wil select yes here.
Is this Fabric interconnect part of a cluster(select ‘no’ for standalone)? (yes/no) [n]: yes7. We will choose our first switch here
Enter the switch fabric (A/B) []: A8. Give our ucs cluster a name
Enter the system name: ucs-demo-vi9. Give the ip address of our first interconnect.
Physical Switch Mgmt0 IPv4 address : 172.16.11.170
Physical Switch Mgmt0 IPv4 netmask : 255.255.255.0
IPv4 address of the default gateway : 172.16.11.253
10. Give the cluster VIP IP as well.
Cluster IPv4 address : 172.16.11.17111. Add our DNS info
Configure the DNS Server IPv4 address? (yes/no) [n]: y
DNS IPv4 address : 172.16.11.4
Configure the default domain name? (yes/no) [n]:n
13. Validate all settings
Switch Fabric=A
System Name=ucs-demo-vi
Physical Switch Mgmt0 IP Address=172.16.11.170
Physical Switch Mgmt0 IP Netmask=255.255.255.0
Default Gateway=172.16.11.253
DNS Server=172.16.11.4
Cluster Enabled=yes
Cluster IP Address=172.16.11.111
Apply and save the configuration (select ‘no’ if you want to re-enter)? (yes/no): yes
The fabric interconnect will now reboot
Configuring Fabric Interconnect FIB-2
Once the first fabric interconnect is created and powered on, connect to the console port of Fabric Interconnect 2 and power on fabric Interconnect 2.
The configuration of fabric interconnect 2 is similar to that of fabric interconnect 2
14. Once again select console.
Enter the configuration method. (console/gui) ? consoleThis time the setup wizard detects the presence of Fabric Interconnect 1 and our fabric interconnect 2 switch will be added to the cluster.
Installer has detected the presence of a peer Fabric interconnect. This Fabric interconnect will be added to the cluster. Continue (y/n) ? y16. Enter the admin password we created while setting up Fabric Interconnect 1. This switch will now connect to the fabric and retrieve the config from Fabric Interconnect 1.
Enter the admin password of the peer Fabric interconnect:
Connecting to peer Fabric interconnect… done
Retrieving config from peer Fabric interconnect… done
Peer Fabric interconnect Mgmt0 IP Address: 172.16.11.170
Peer Fabric interconnect Mgmt0 IP Netmask: 255.255.255.0
Cluster IP address : 172.16.11.171
17. Give the management IP we needed for fabric interconect2
Physical Switch Mgmt0 IPv4 address : 172.16.11.17218. Apply and save the configuration (select ‘no’ if you want to re-enter)? (yes/no): yes
That completes all the config and we can now login via the management IP.
Validate by running show cluster state

Configure Chassis Discovery
The Cisco UCS Chassis is not automatically discovered by the Fabric Interconnect. All ports will be unconfigured as shown. We have to do 1 small thing before it appears in the UCS manager. This is set to 1 link & set to port channel.

Configure Chassis Server Ports
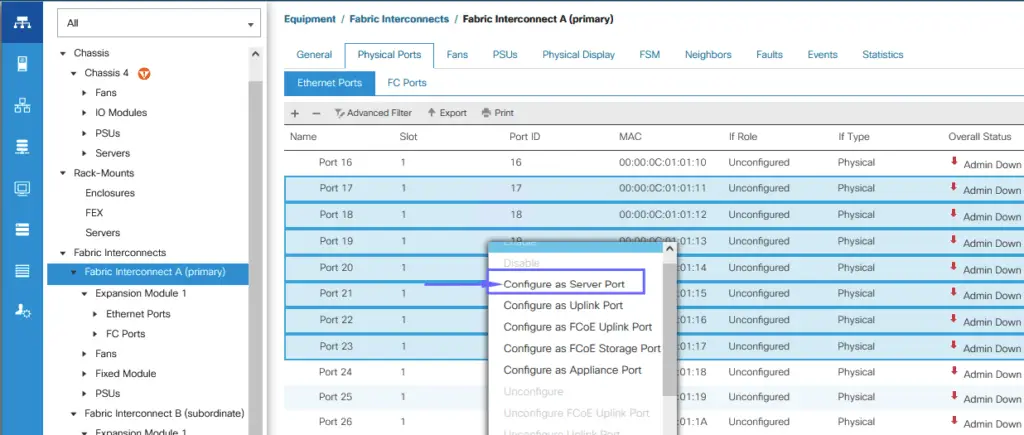
In order for us to add my new chassis, we will now define some ports on the UCS fabric connects as Server Ports. On the Equipment Tab, Fabric Interconnects > Fabric Interconnect A& B> Fixed Module > Unconfigured Ethernet Ports > Right Click > select Configure as Server Port.

Our server ports are now up which would now mean we can see our Chassis is being registered on the UCS manager.

Our chassis now seen on the UCS manager

Configure IO Module Network Ports
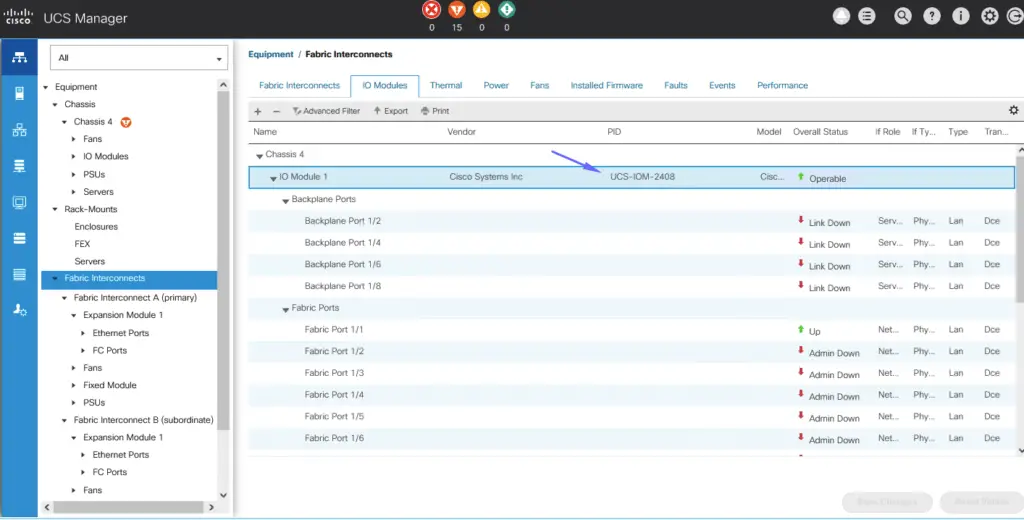
IO Modules will be configured as network ports and these are the connections to our fabric interconnects. I’ve added a 2408 module and this means, this is a 2nd generation 08 port IOM
Concept of IO Modules
For a 2204 module, it has 4 links and can generate 40 GB inside our blade server.

A 2208 module, it has 8 links and can generate 80 GB inside our blade server.


Assign Ports 17-23 as network ports

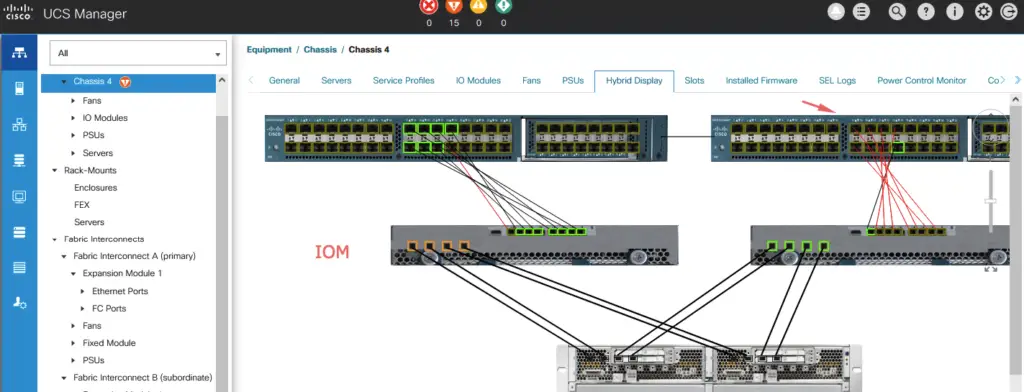
The Chassis Hybrid Display will show the connections.

Verification
Connect to the FI’s and execute the command
1) connect nxos
2) show fex detail
3) show int trunk
