

VMware Cloud Foundation 9.X provides a unified software-defined platform to extend the private cloud to the public cloud. It is a fully integrated software-defined data centre that is virtualized with computing, network, and storage—the procedure to deploy VCF 5. X is the same as the article in which we ran the deployment on VCF 5.X
If you are trying this in the lab, the deployment will take around 400 GB of RAM. This entire VCF solution was installed on a single physical ESXi server
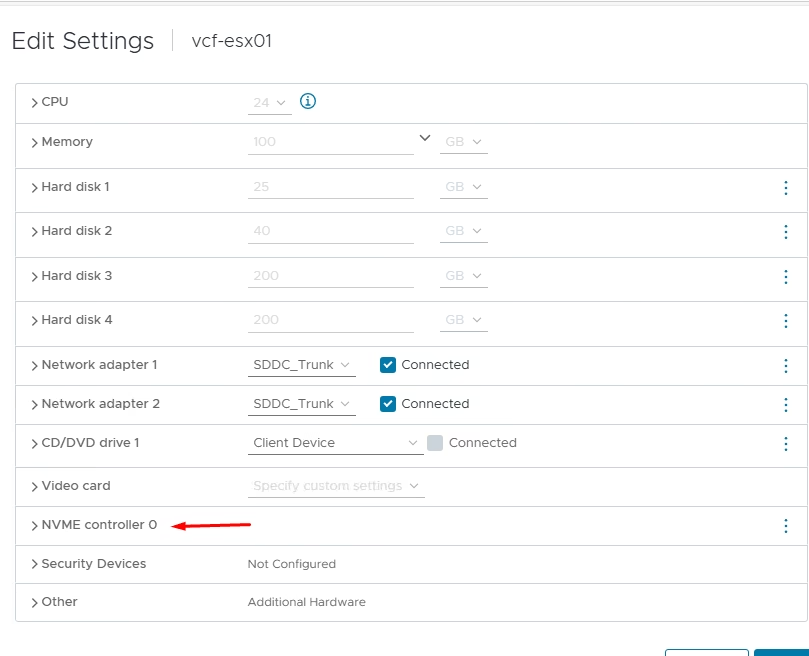
4 nested ESXi VMs are deployed as per the following specifications on a HP ProLiant DL380 Gen10 with a total of 756 GB memory on it .
| Component | Specification |
| vCPU | 24 with HW virtualization turned on |
| Memory | 100 GB |
| Disk | 900 GB 1×25 GB NVMe for ESXi installation 1×40 GB NVMe for vSAN Cache 2×200GB NVMe for vSAN Capacity |
| Network | 2×10 GBPS connected to trunk port group |
What’s new with VCF9?
- vSphere 9.0 Update 1
- vSAN 9
- NSX 9
Release Notes
Check out the release notes of the vCF on the VMware site
Nested Lab Configuration
Network Requirements: Jumbo frames (MTU 9000) are recommended on all VLANs or a minimum of 1600 MTU is required for NSX-T to function. These are the port groups we will be setting up for the vCF deployment

A nested vCloud Foundation deployment requires multiple virtual networks to be in place before we can start the deployment. As part of this deployment, we’ve bgp configured on the vyOS tor routers.
| Network Type | VLAN | PortGroup |
| Management Network | 1611 | pg-mgmt-1611 |
| vMotion Network | 1612 | pg-vMotion-1612 |
| vSAN Network | 1613 | pg-vSan-1613 |
| NSX-T-Host Overlay | 1634 | pg-host-overlay-1634 |
| NSX-T-edge-uplink-1 | 2711 | pg-nsx-t-edge-overlay |
| NSX-T-edge-overlay | 2713 | pg-nsx-t-edge-overlay |
| SDDC-vcF-TRUNK | 4095 | Trunk Port |
AD & DNS Requirements: In our case, DC is connected to 1611 VLAN on VyOS. These DNS records should be in place before we start with the installation.
I have configured the following DNS records.
| Name | IP Address | Purpose |
| vcf-deployer | 172.16.11.65 | VCF 9 Installer |
| vcf-esx01 | 172.16.11.101 | Mgmt Domain ESXi 01 |
| vcf-esx02 | 172.16.11.102 | Mgmt Domain ESXi 02 |
| vcf-esx03 | 172.16.11.103 | Mgmt Domain ESXi 03 |
| vcf-esx04 | 172.16.11.104 | Mgmt Domain ESXi 04 |
| sfo-m01-vc01 | 172.16.11.62 | vCenter Server |
| sfo-m01-nsx01 | 172.16.10.65 | Mgmt Domain NSX Virtual IP |
| sfo-m01-nsx01a | 172.16.10.66 | Mgmt Domain NSX node 01 |
| sfo-m01-nsx01b | 172.16.10.67 | Mgmt Domain NSX edge 01 |
| sfo-m01-nsx01c | 172.16.10.68 | Mgmt Domain NSX edge 02 |
| vcf9-ops | 172.16.11.71 | VCF Operations appliance |
| vcf9-flt | 172.16.11.72 | VCF Fleet Manager appliance |
| vcf9-cp | 172.16.11.80 | VCF Fleet Collector appliance |
Pre-installed ESXi Configuration.
- A minimum of 4 physical servers with preinstalled VMware ESX ESX 9.0.1.0a hypervisor is required
- Hardware virtualization must be enabled on the base host
- Generate host certificates and host names correctly
- Static IP Address assigned to the Management interface (vmk0)
- All ESXi must have ‘VM network’ and ‘Management network’ VLAN id of mgmt configured.
- NTP server address should be in place on all ESXi and set to sync to Active Directory
- Ensure that your software depot is configured
- SSH & NTP and activity directory service to be enabled to start with the host
- vSAN ESA Disk & HCL workaround for VCF 9.0 followed by a host reboot
- Ensure the cloud builder/vcf installer appliance NTP sync works correctly.
- A DHCP server to configure the IP address for the VTEP on each ESXi hosts
- An NVMe controller replaces the SCSI controller and this is required for vSAN ESA
All ESXi must have ‘VM network’ and ‘Management network’ VLAN id of mgmt configured.

VCF Installer
In the past, we deployed an OVA appliance called Cloud Builder to build the VCF environment. It allowed us to upload a parameter file and automate the entire deployment, taking us from a spreadsheet to a full SDDC.
In VCF 9, this has been replaced with a new OVA called the VCF installer.
For this setup, we will deploy the installer appliance on VLAN 1611 so it can access the domain controller and all ESXi servers.
Download and deploy the OVA from the VMware portal. The process is the same as any standard OVA deployment. Note that the appliance requires an admin password with at least 15 characters.
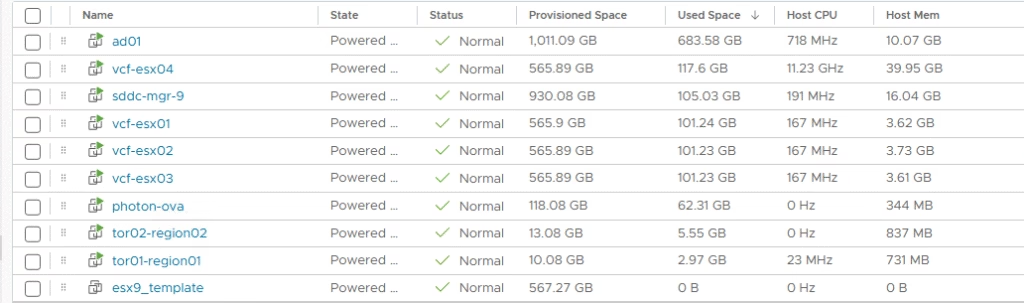
Below is my base ESXi host and the list of VMs currently running on it.
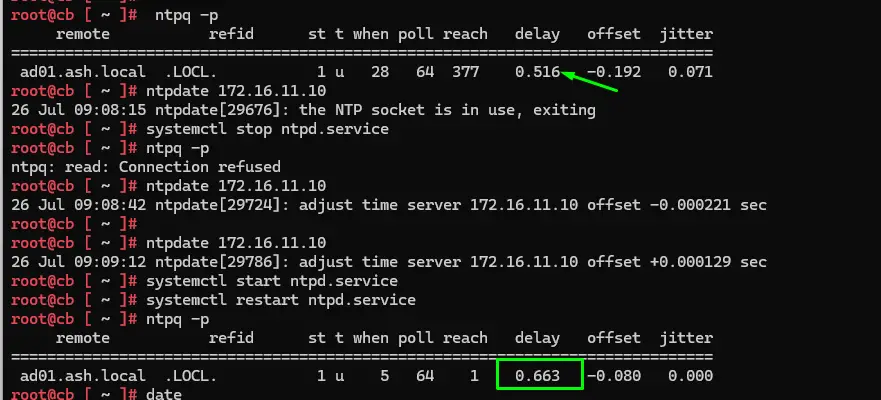
Verify that time synchronization is configured correctly.
A common issue with Cloud Builder is NTP drift. If the time between Cloud Builder and the ESXi hosts drifts too far, the deployment can fail. You can avoid this by manually syncing the time as shown, ensuring the drift stays below 30 seconds.
Log in to the Cloud Builder VM using the web UI and click Next on the initial screen.
https://vcfinstaller.ash.local
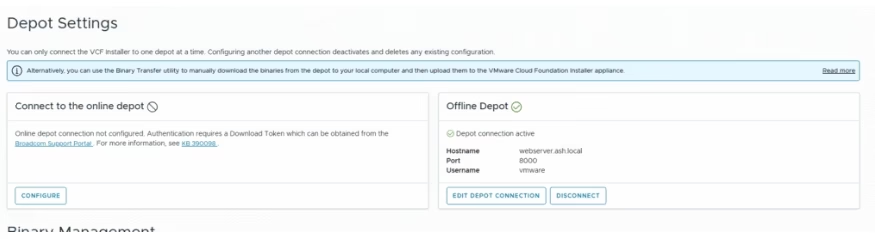
Software downloads require either a configured download token in the depot settings or an offline depot. If you haven’t generated a token yet, you can create one by following the instructions provided in here.
Navigate back to the home screen to launch the deployment wizard. Depending on your use case, you can choose to deploy either VMware Cloud Foundation or vSphere Foundation.
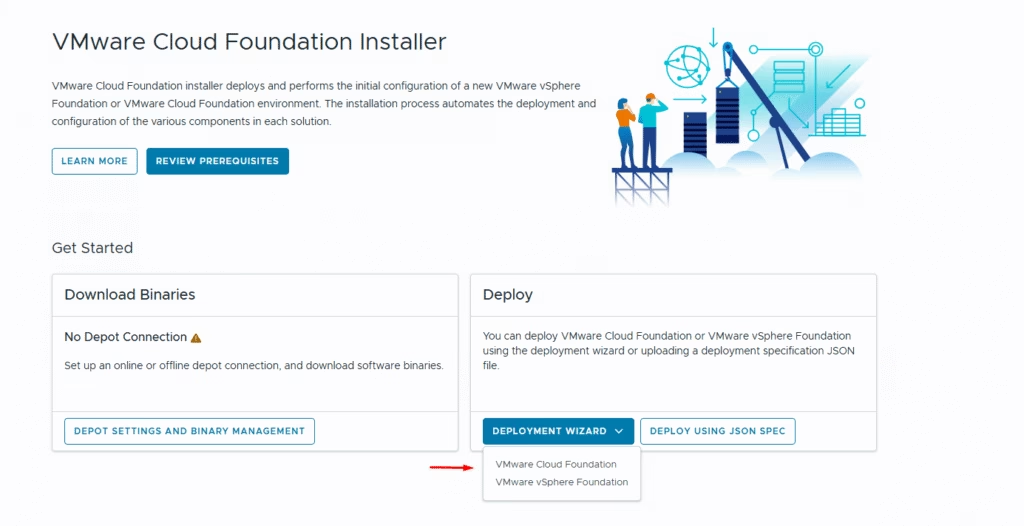
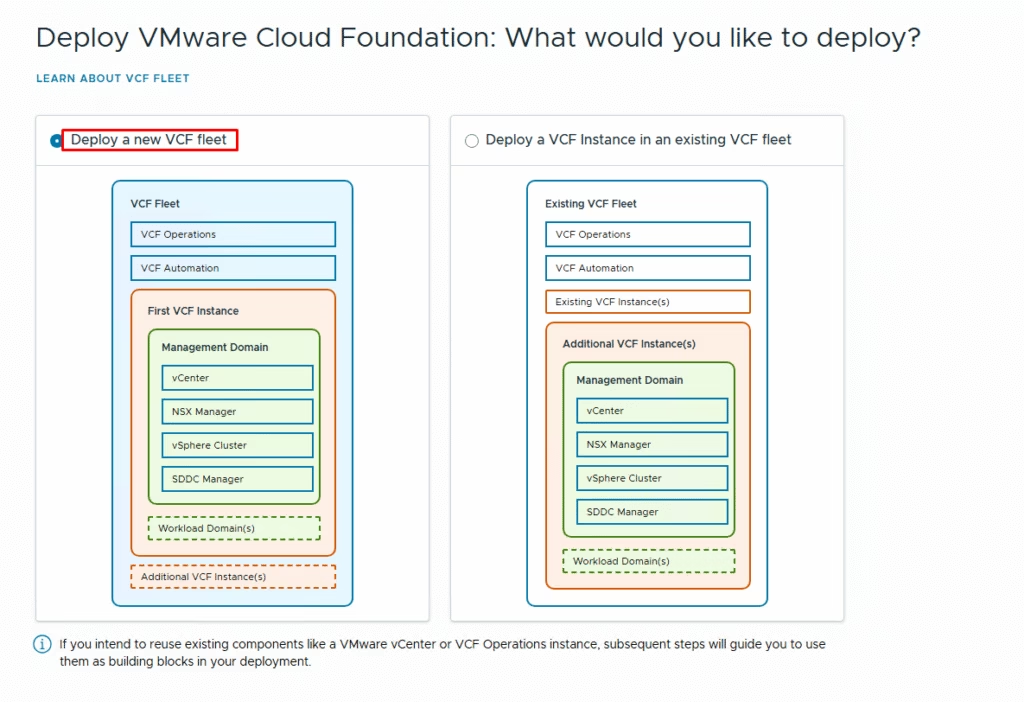
Since I am performing a greenfield deployment, I selected the first option to deploy a new VCF fleet. If you already have an existing VCF fleet and want to scale your environment, choose the second option to deploy an additional VCF instance into the existing fleet.
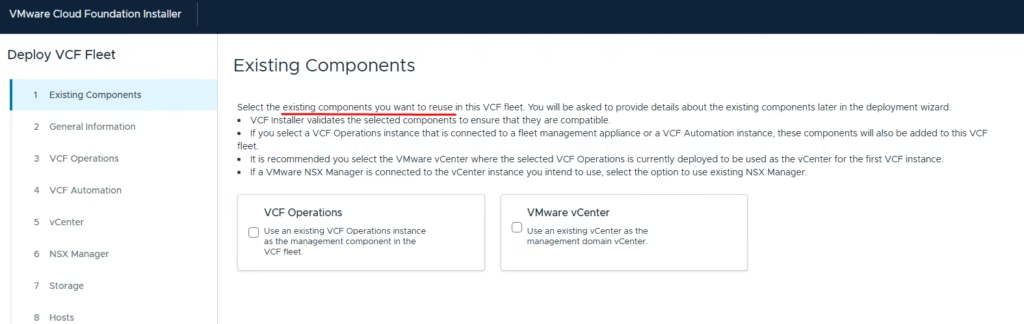
If you are performing a brownfield deployment and need to import VCF Operations or VMware vCenter, select the corresponding option.
Once you have completed this sheet, upload it to Cloud Builder on this page. We are now ready to start the configuration.
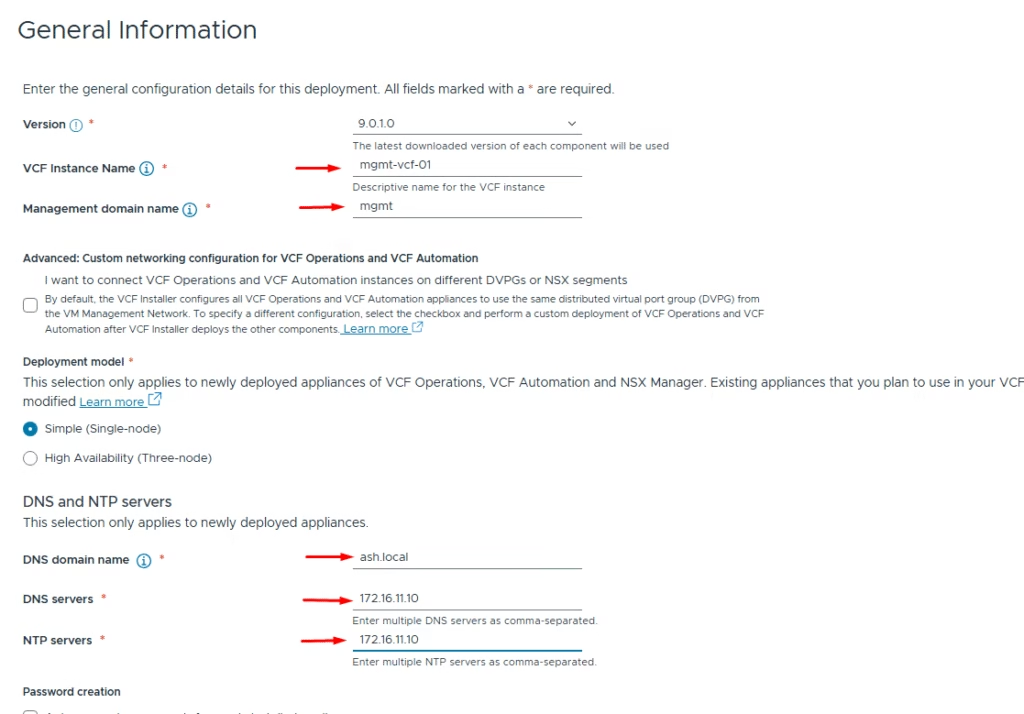
Enter the following information:
- VCF version
- VCF instance name
- Management domain name
- Deployment model – single or high availability (for this lab, I selected single)
- DNS domain name
- DNS servers
- NTP servers
Enter the values for the VCF Operations appliance:
- Operations appliance size
- Administrator and root password
- Fleet Management Appliance FQDN
- Operations Collector Appliance FQDN
You can choose to use the same password for the Fleet Management and Collector appliances as the Operations appliance.

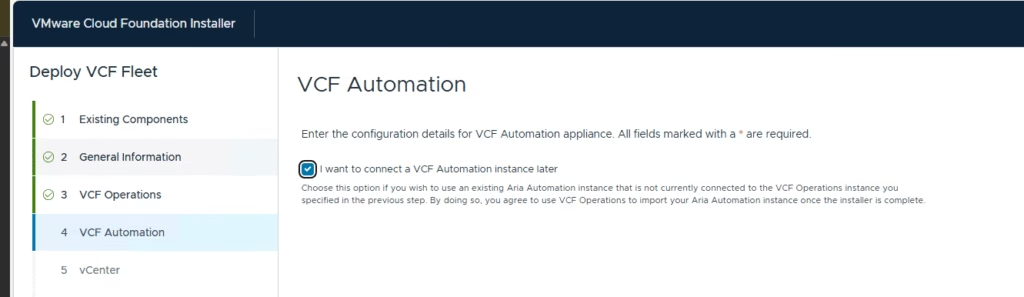
Skipped deploying the VCF Automation appliance for now
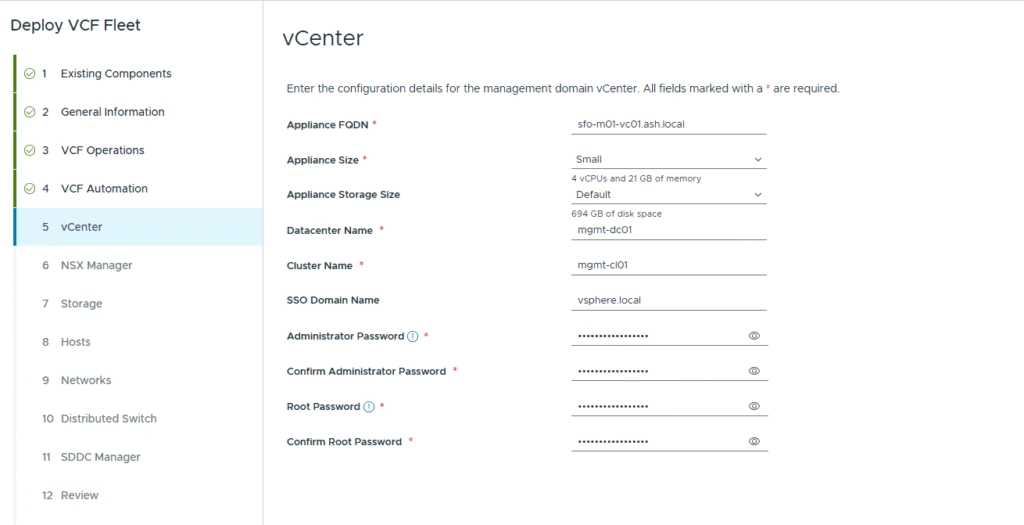
Enter the vCenter Server details and proceed to the next screen.
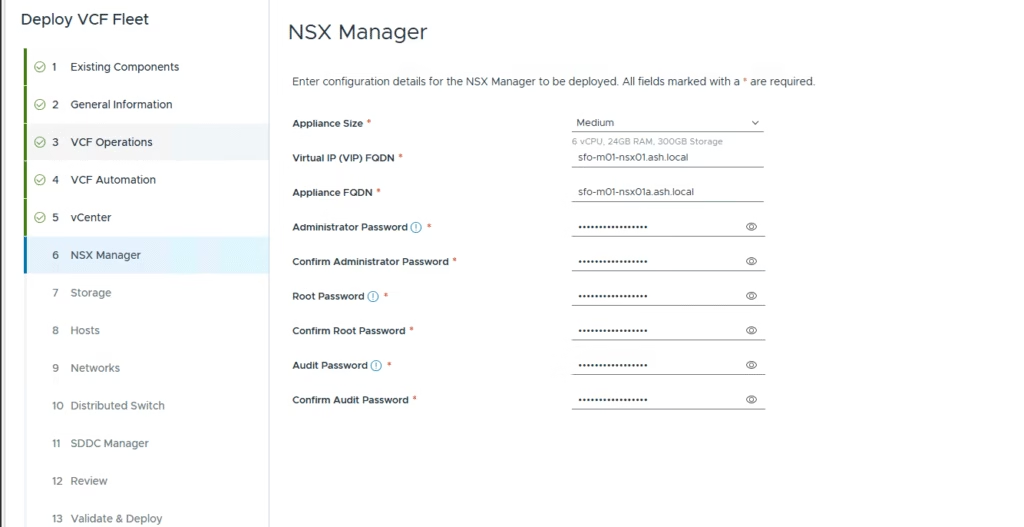
Enter the NSX manager details and proceed to the next screen.
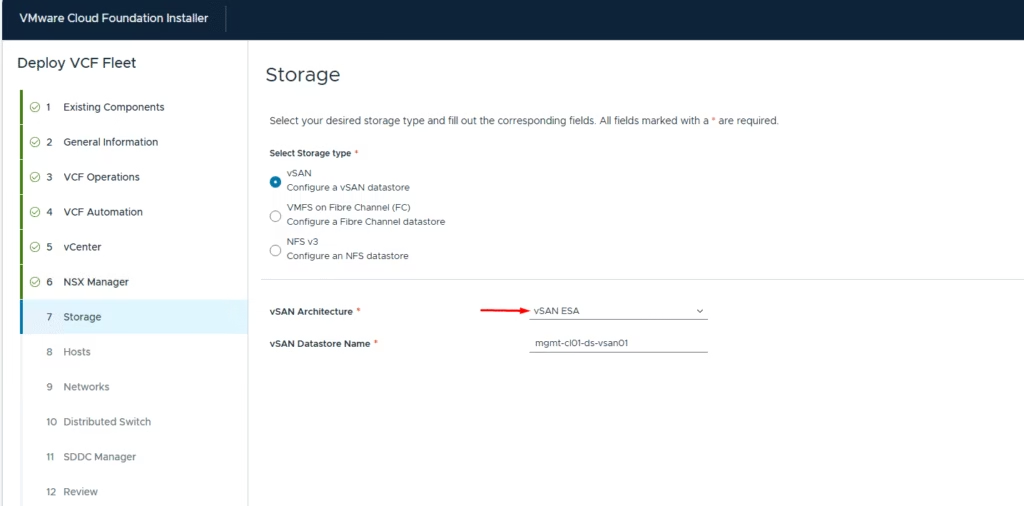
Enter the storage configuration values:
- Select principle storage type: vSAN, VMFS on Fibre Channel, or NFS v3.
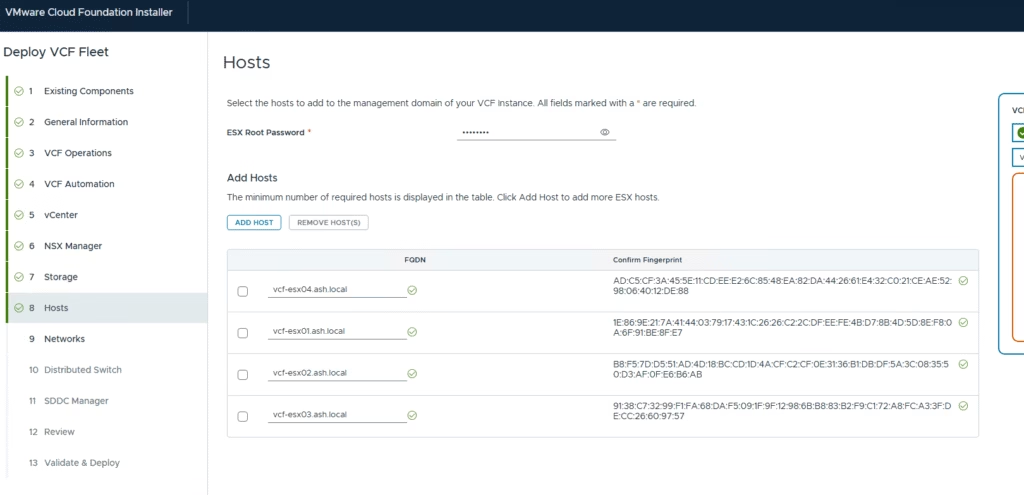
Enter the root password and FQDN for each ESXi host in the management domain.
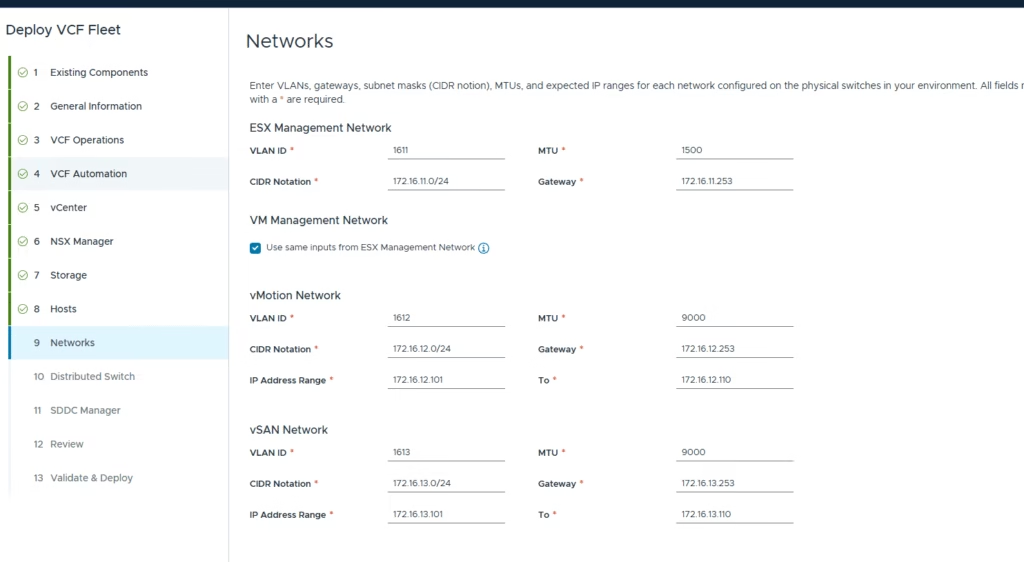
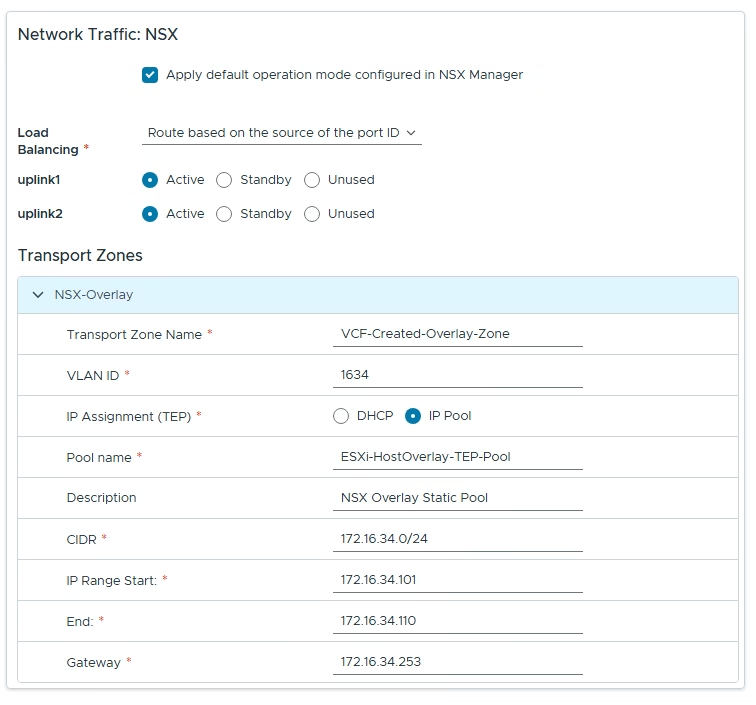
Configure the networking settings as per the VLANs
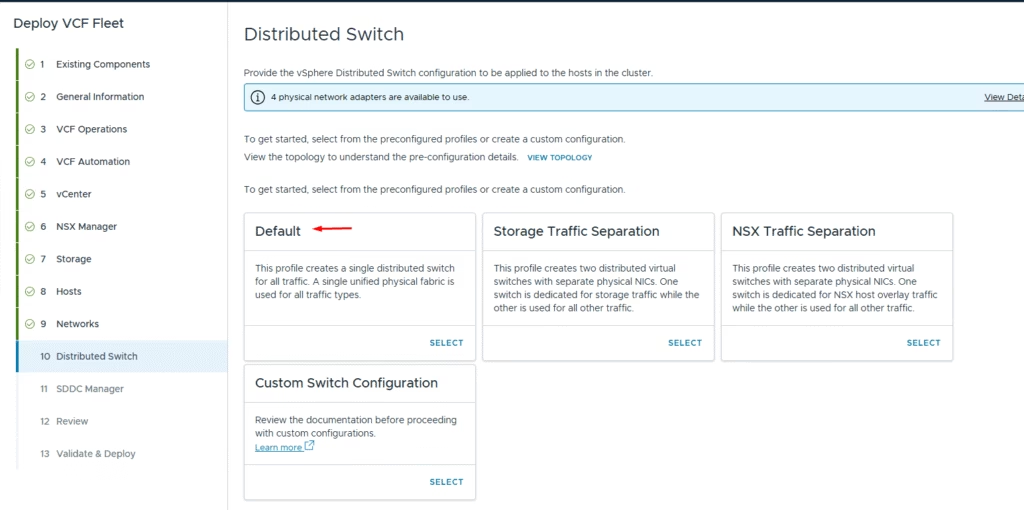
Configure the distributed switch. The default profile works for environments where each host has 2 pNICs, with all traffic (VLAN and overlay) flowing over these two NICs.
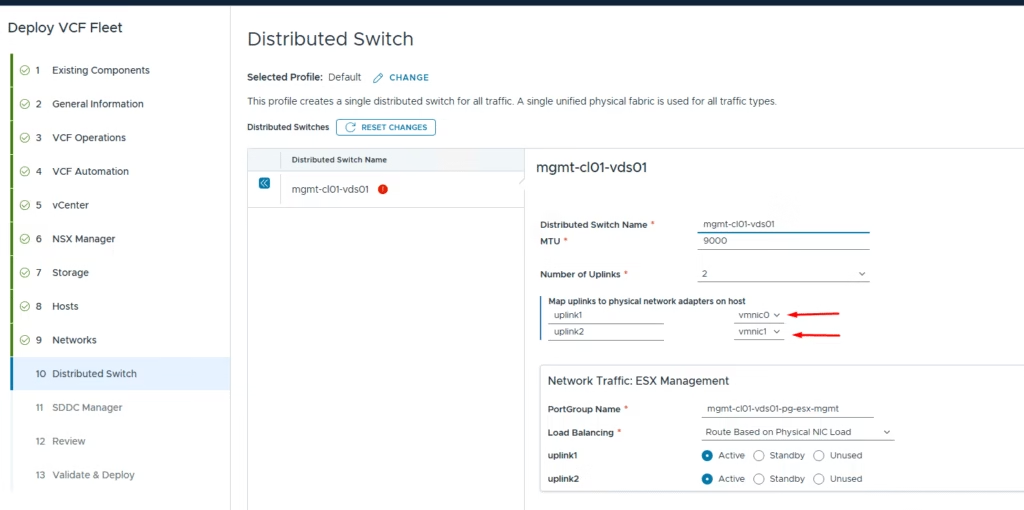
Since my nested hosts have only 2 NICs, I went with the default distributed virtual switch setup and choose the MTU 9000 . Set up the vMotion and vSAN networks, then move on to the next configuration settings.
Set up the NSX overlay network accordingly
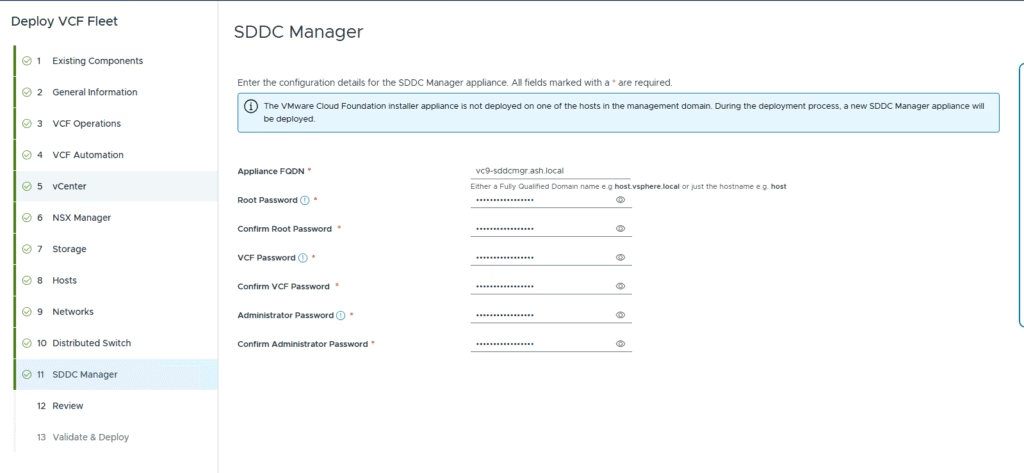
Enter the details for the SDDC Manager appliance
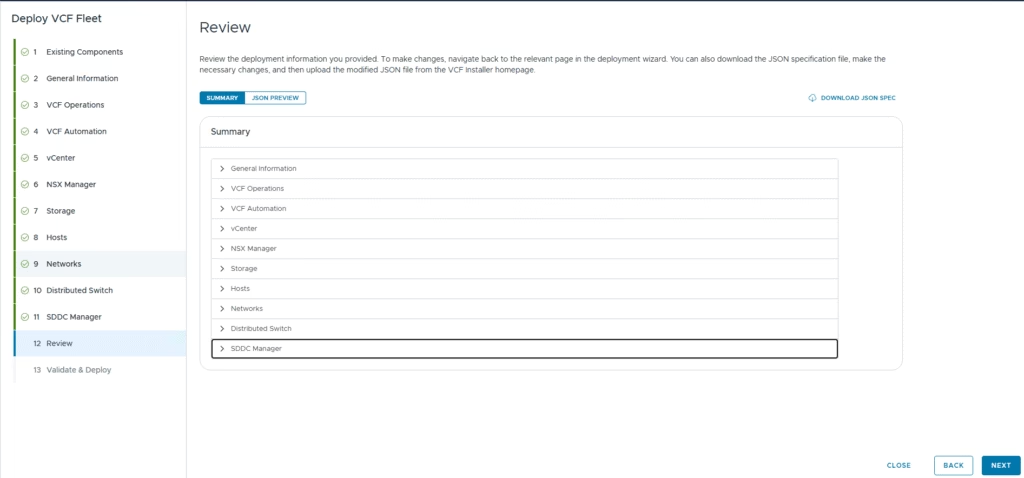
Review all settings
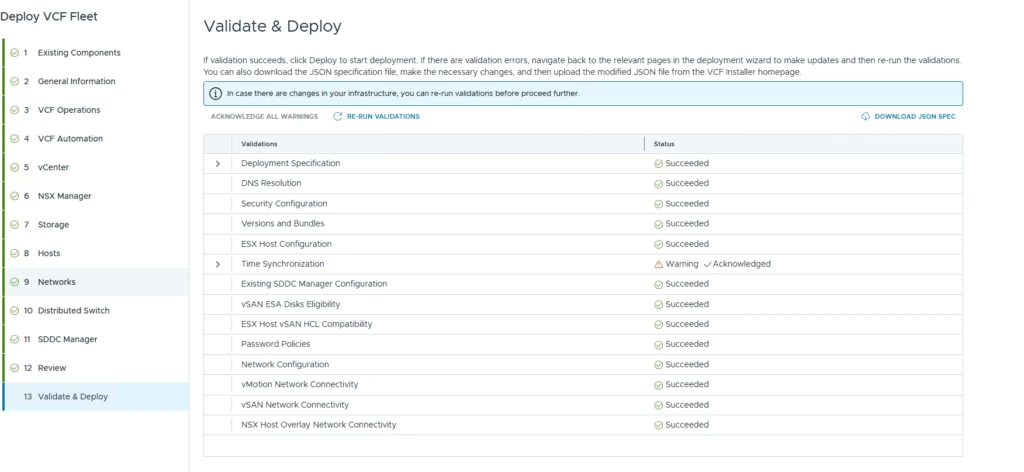
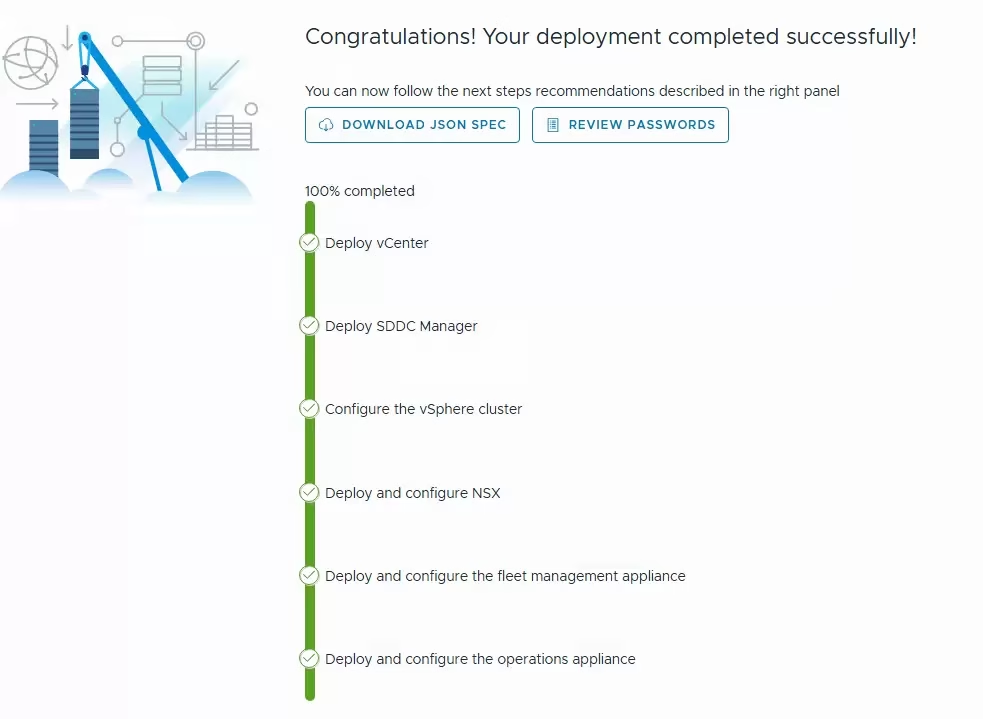
Once everything is validated, click Deploy to start the deployment.
Download the JSON specification. Having this JSON file allows you to quickly redeploy the VCF instance if the installation fails and a redeployment becomes necessary.
After successful validation click deploy to start the deployment. The deployment takes few hours to complete.
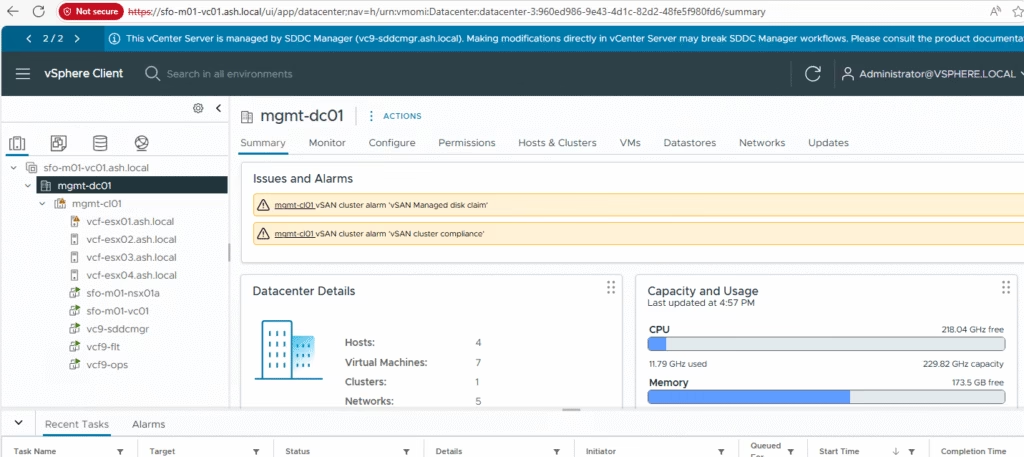
Verify the vCenter inventory
vCF Build Logs
The location of the log file is ‘he location of the log file is ‘/opt/vmware/bringup/logs/’ in the cloud builder VM. This file will give you a live update of the deployment and any errors if any
