In this blog, we will configure the vSAN storage on our single-site cluster.
Blog Series
- Configure vSAN in Single Site
- Create vSAN SSD Disks from HDD
- Remove an esx node from the vSAN cluster
- Scaling vSAN by adding a new esx node
- Two nodes vSAN7 Configuration
- Convert 2-Node vSAN to 3-node configuration
- VMware vSAN Stretched Cluster
Components of vSAN VM
vSAN is object-based storage that has the following parts from a VM’s perspective
- Name Space – Config file ( VMX ), VM Name, and log files
- VMDK – OS Disk
- vSWP – This is used by the VM during memory contention
- Snapshot – Point in time copy a VM at a time
- Mem Snap – Point in-time copy of a VM memory state at a given time
vSAN Cluster Best Practices
Four or more vSphere ESXi servers with the below config and a vSAN license are required for a vSAN configuration. We could scale up vSAN to up to 64 nodes.
- Verify vSAN compatibility mode
- Keep ESX OS RAM at 16 GB
- Use a 10 Gbps Network card in hybrid mode and 25 GB for all flash configs.
- 1 SSD for the cache disk and 1 SSD for the capacity disk for hybrid mode or all SSD for all flash config. Size the cache disk to at least 10 % of the total capacity.
- A distributed switch is required if we wish to take advantage of NIOC.
- vSAN runs on a dedicated vMkernel so use NIC teaming where possible.
- Consider the number of failures to tolerate.
- Maintain Slack Space ( ie: 25 % free space ) for rebuilding operations
- Ensure the vSAN Storage Controller cache is set to pass-thru / HBA mode or in other words disable the write cache and assign the cache disks to only read operations.
Verify vSAN compatibility mode
Ensure the hosts you are building are compatible with the vSAN version and this can be verify via the compatibility guide.

vSAN Storage Controller Cache – Pass through vs RAID 0
As a best practice, always ensure there are two storage controllers on the vSAN host so if one is to fail it wouldn’t take down the entire host with it.
In both the modes, the hard disk is visible to the vSAN however as a best practice it’s always seen deployed as pass-through mode than the RAID0 mode.
When the storage controller is deployed In a RAID-0 mode, the traditional way of deploying ESX hosts, data is mirrored and if a hard disk is to fail just the failed, we would put the host in maintenance mode to evacuate all the VMs on it and finally shut the host down to replace the failed disk and boot back the host.
When the storage controller is deployed In a pass-through mode, the striking difference is that if an ESX disk was to fail, we don’t need to bring the host down to replace the disk. The disk can be replaced on the fly.
Lab Configuration
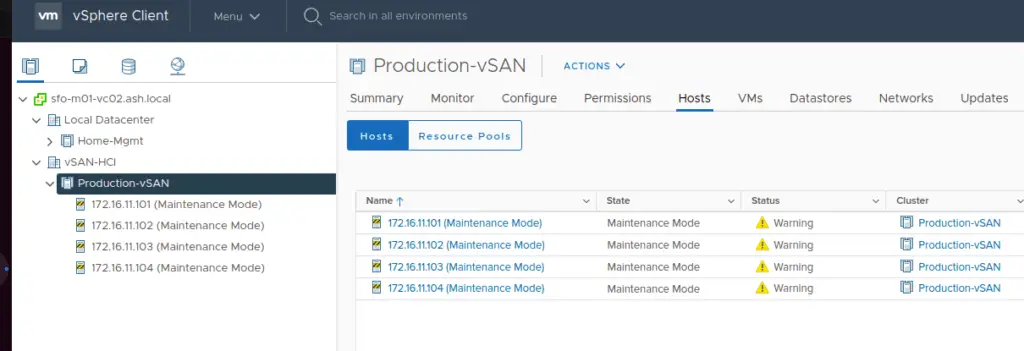
We have 4 ESXi hosts deployed in our environment and I’ve placed all the hosts in maintenance mode ready to be joined to the Cluster
| vCenter | 7.0.3 |
| ESX01 | 7.0.2 |
| ESX02 | 7.0.2 |
| ESX03 | 7.0.2 |
| ESX04 | 7.0.2 |
| NSX-T-01 | 3.2 |
We’ve now deployed ESXi 7.1 on all our ESXi hosts and have vCenter is now on 7.3. Hosts are connected to a distributed switch with vDS v7.0 with MTU 9000 across.

Prerequisites for vSAN
- Hosts runnings on ESX 7. X and vCenter is on 7. X
- MTU > 1600
- All vnic’s should be attached to vDS

The current config is as below and we will make some changes to this to configure to our used case.

Network Config- Teaming & Failover
On the distributed switch, vmnic 3 and vmnic4 will be used for data traffic and vmnic1 and vmnic2 will be used for management traffic.
| Adapters | Use | Uplink |
| VMNIC0 | Active – Mgmt+vSAN+vMotion | vmnic0 |
| VMNIC1 | Standby – Mgmt+vSAN+vMotion | vmnic1 |
| VMNIC2 | left for NSX ( data traffic ) | vmnic2 |
| VMNIC3 | left for NSX ( data traffic ) | vmnic3 |
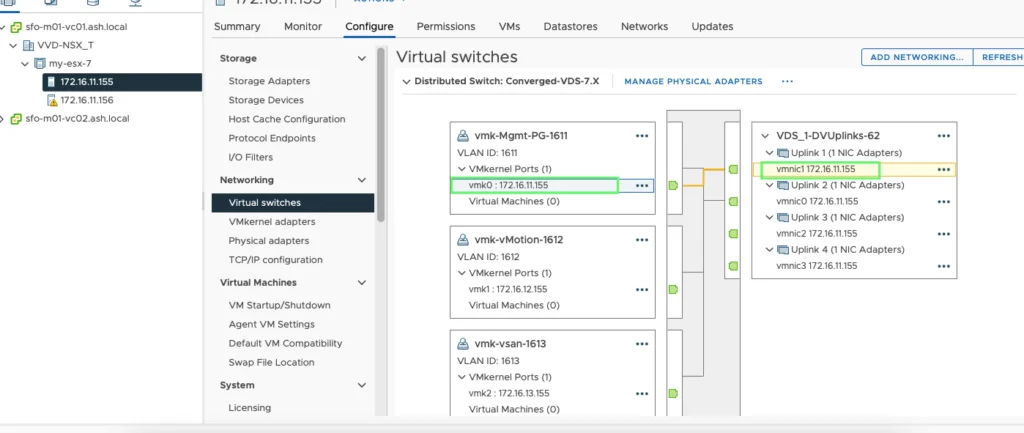
Our configuration for Mgmt vmk will be

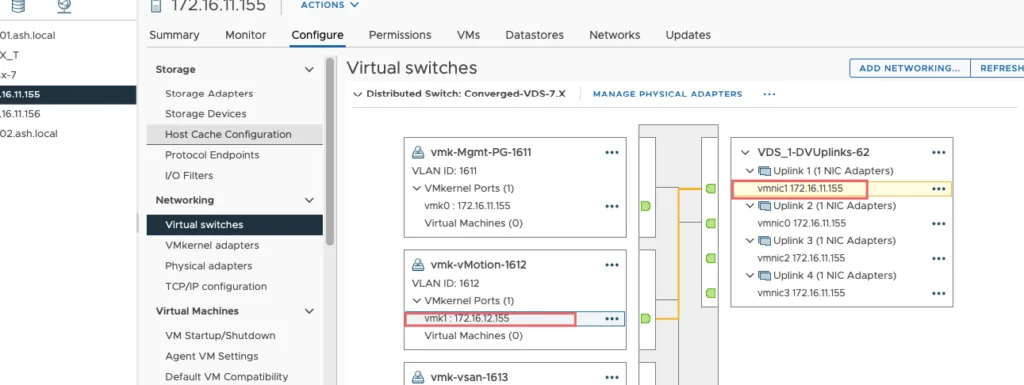
Our configuration for VMotion vmk will be

For vSAN vmk, will use uplink 2 (vmnic2) as the active interface because we need dedicated bandwidth for vSAN so just a reverse of what’s on mgmt and vSAN VMkernel.

Mgmt- vDS Config
vMotion – vDS Config
vSAN – vDS Config

Creating vSAN Cluster
1. Login with VMware vSphere client, Select Datacenter, select the Menu tab and then click on New Cluster.

2. At the time of VSAN cluster creation, do not enable the vSphere HA, vSphere DRS features as these can be enabled after the completion of the VSAN configuration.

3. Under Cluster Actions – Choose Add hosts to the cluster.

4. Select all four hosts for VSAN cluster.

5. Once the wizard is completed, you can see the cluster summary as shown. Select the Finish button to add hosts to the cluster.

6. We can now see all our hosts added to the cluster
7. For vSAN to work, we will need a dedicated vmkernel adapter to enable vSAN services. Go to our distributed switch to create a dedicated vmkernel port group for vSAN if it’s not done yet.

8. Create a new port group on the respective VLAN. I’ve created this port group above and configured NIC team and failover

9. Right-Click the port group, and select Add VMkernel Network adapter.

10. Choose vSAN as our Service to be enabled on the vmkernel adapter
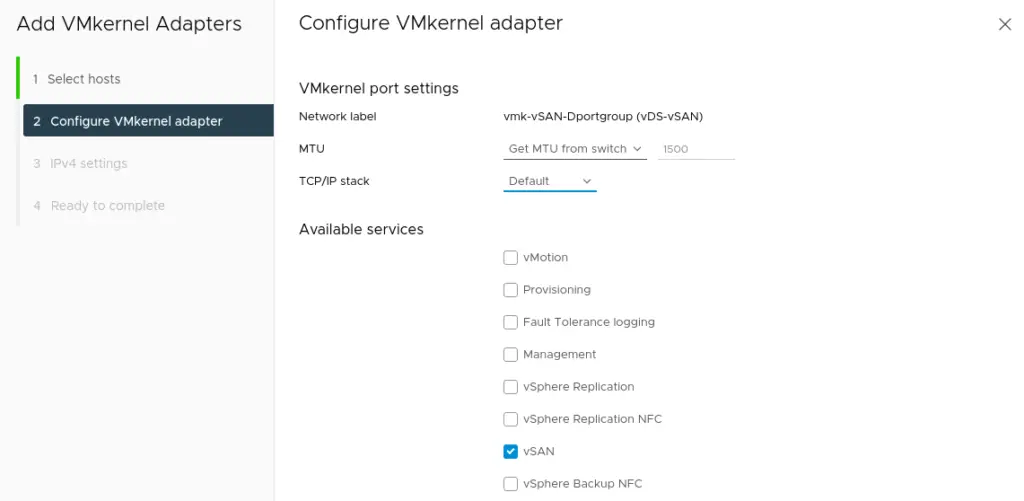
11. Provide network addresses for the VMware vSAN network and click Next to proceed
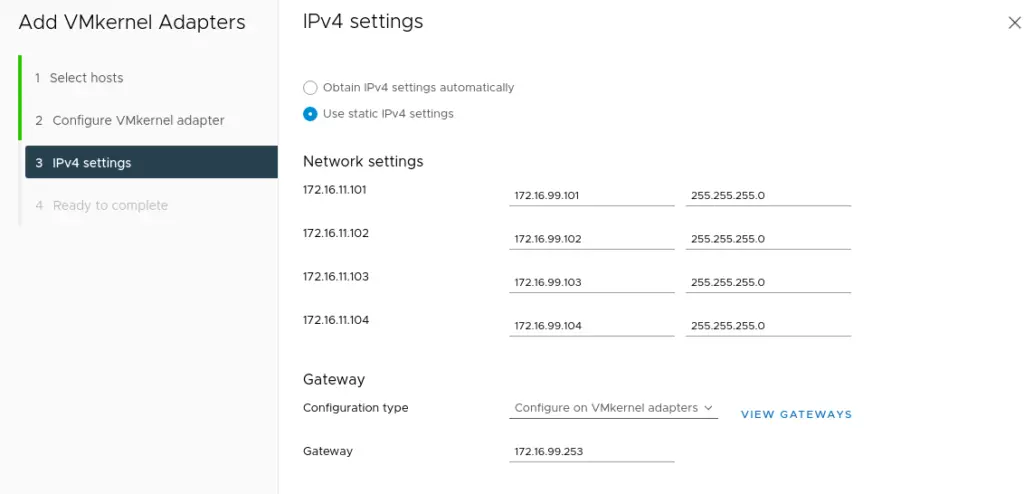
12. Once the vmkernel adapters are added, we can revisit our host and we can see vSAN service is enabled on the network interface

13. Take the host out of maintenance mode

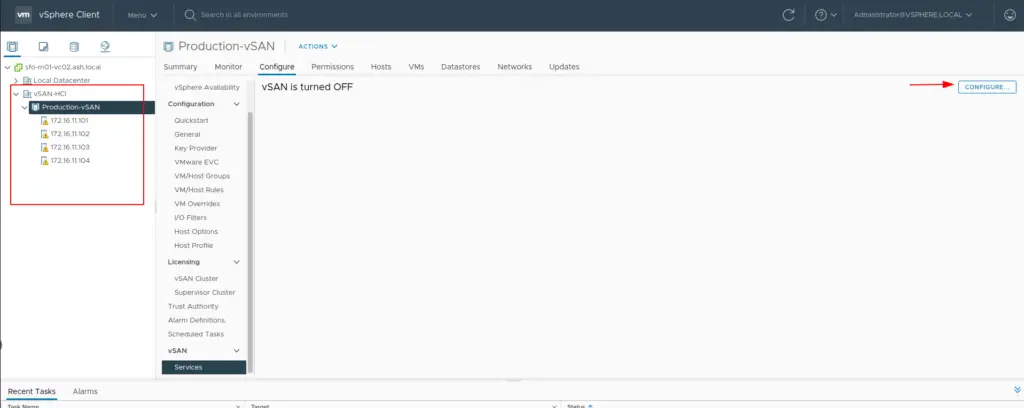
14. To turn on vSAN, select the Cluster – Navigate to Configure tab – vSAN Services and Click Configure
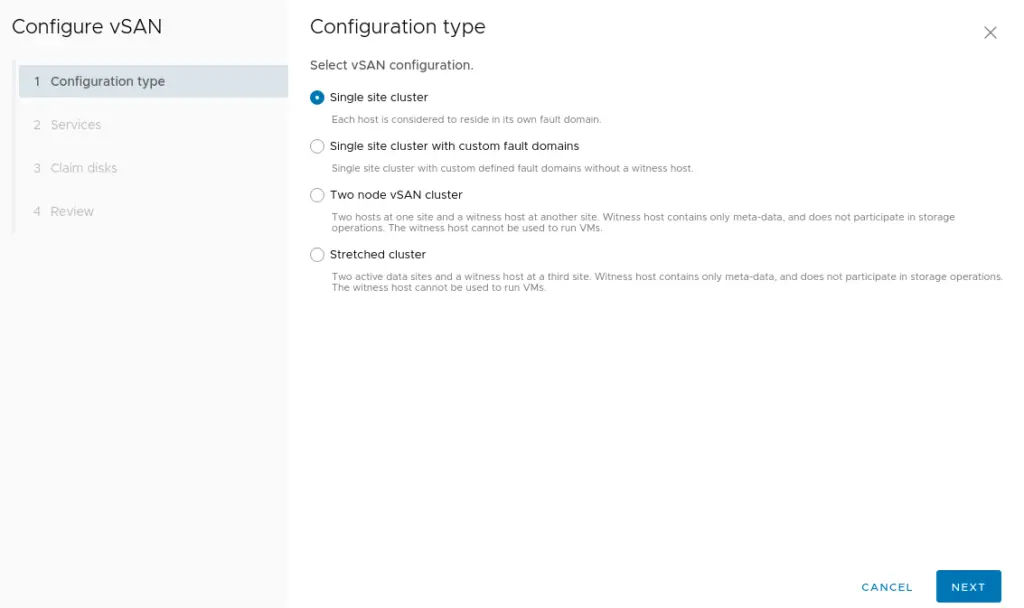
15. Choose the vSAN configuration as Single site cluster
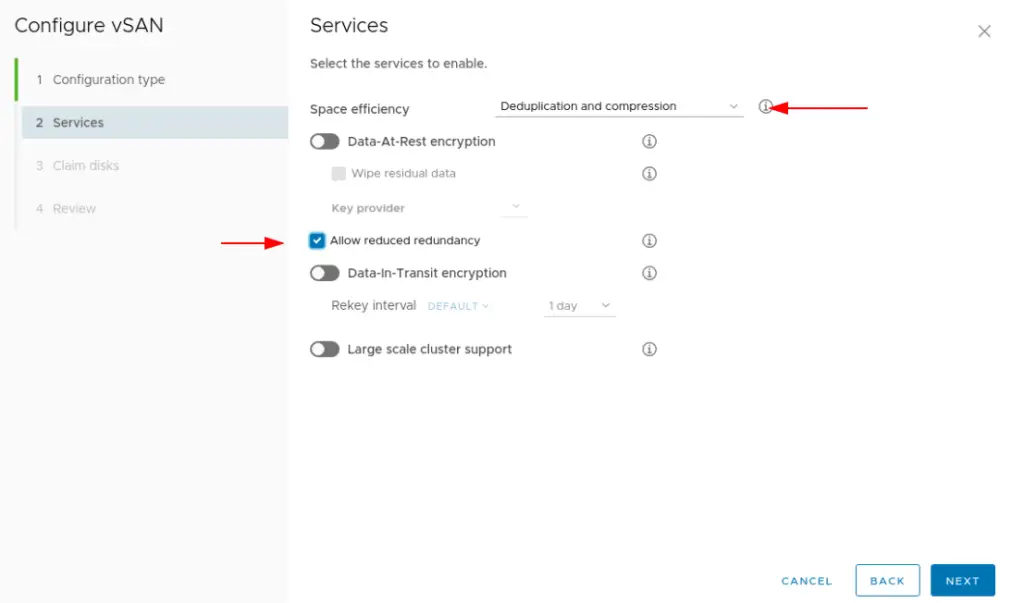
16. In the next screen, we have an option of enabling the following services on the vSAN datastore
- Compression only: Compression improves the total cost of ownership by reducing the data stored on your physical disks.
- Deduplication and compression: Deduplication and compression improve the total cost of ownership by reducing the data stored on your physical disks. Deduplication and compression only work for all-flash disk groups. Creating hybrid disk groups is not allowed when deduplication and compression are turned on.
- Allow Reduced Redundancy: By selecting this option, you agree that vSAN can reduce the protection level of your VMs, if needed, during the operations of changing deduplication and compression or Encryption state.
- Large Scale Cluster Support: By default, the vSAN cluster can only grow up to 32 nodes. But by setting this option, the vSAN cluster is allowed to grow up to a large scale, at a maximum of 64 nodes. If this setting needs to be applied to post the initial configuration of the vSAN cluster all hosts in the cluster will need to be rebooted.
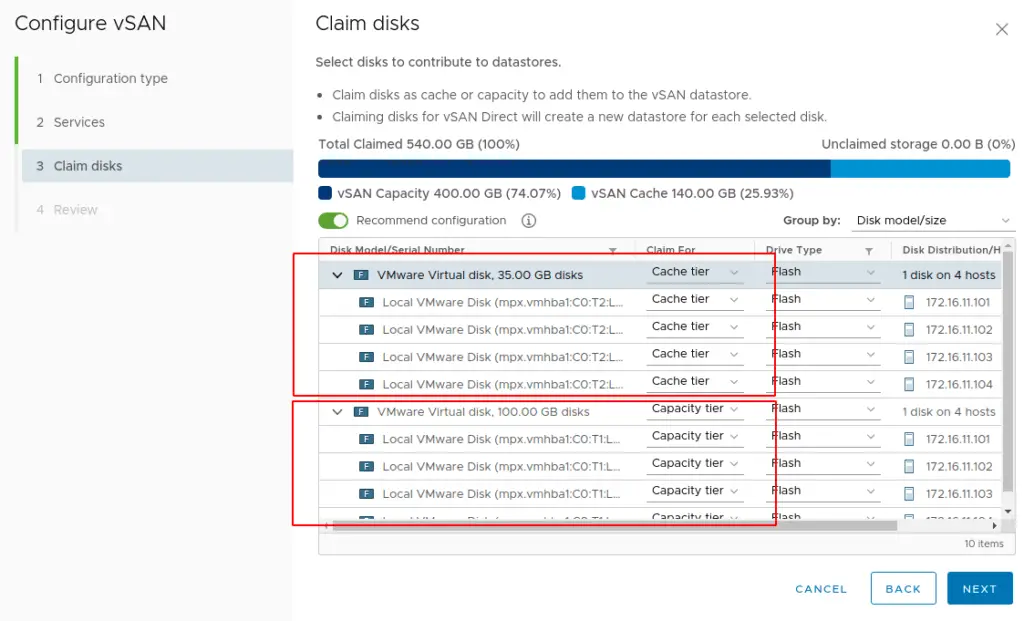
17. Choose to claim disks (cache and capacity tier) that will contribute to the vSAN datastore and then click next.
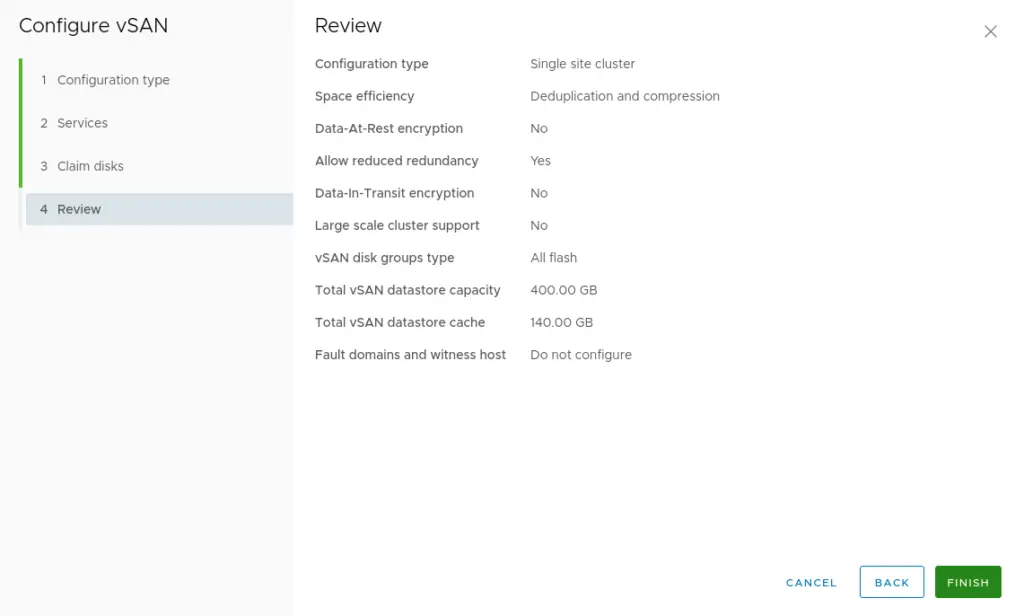
17. Review the vSAN cluster settings and then click finish.
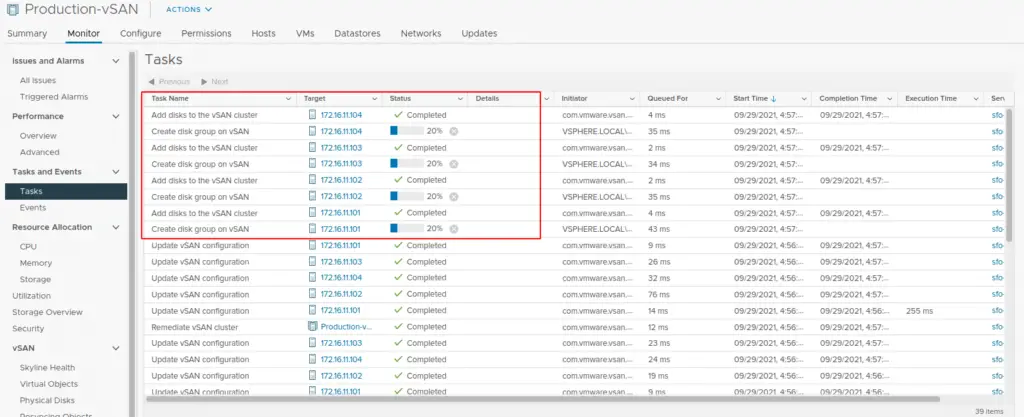
18. vSAN cluster creation tasks can be viewed under the events section
19. Once the vSAN Cluster creation is done, we can see on our host’s side that two disks on the host are participating in the vSAN datastore

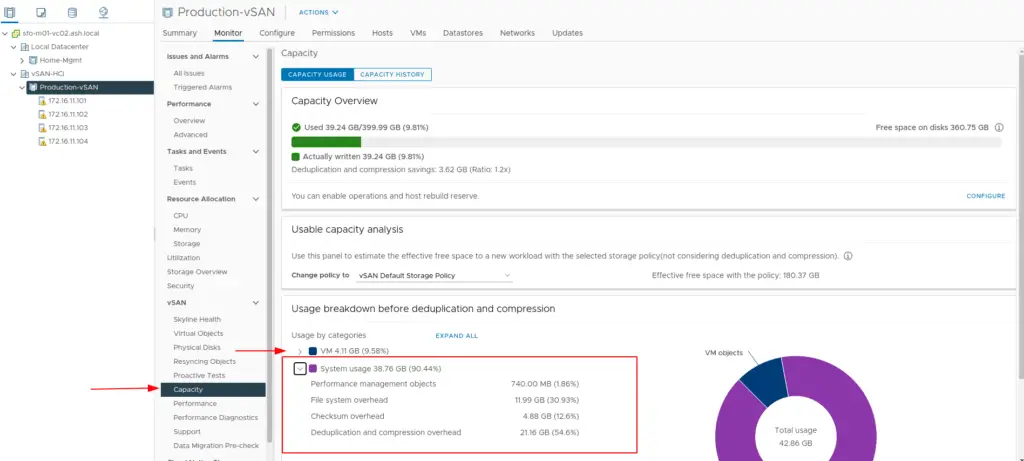
20. vSAN Status can be monitored via the Monitor tab which shows the Capacity used and the Capacity reserved for vSAN Metadata
21. Now you can turn ON DRS

22. Likewise, we can now turn ON VMware HA as well.

We have successfully configured the VSAN cluster. The next step would be adding additional disks and nodes to scale up the capacity of our vSAN datastore.

