
VMware NSX‑T is VMware’s flagship SDN solution, designed to bring networking and security into the software layer. Its biggest advantages are micro‑segmentation, cloud‑native app support, and end‑to‑end security visibility. With NSX‑T, you get a single view of the entire network, making it easier to apply consistent security rules and troubleshoot connectivity issues quickly.
How NSX‑T Moves Traffic
NSX‑T uses the Geneve protocol to encapsulate traffic — similar to VXLAN, but more flexible. Because encapsulation adds overhead, you’ll need jumbo frames (MTU > 1600). The physical switches don’t see what’s happening inside the overlay; they just forward packets, while NSX handles the virtual network identifiers (VNIs) at the software layer.
Core NSX‑T Concepts (the ones that matter day‑to‑day)
VTEP (Tunnel Endpoint)
Every transport node has a VTEP interface. It’s the IP that encapsulates/decapsulates Geneve traffic, turning L2 into L3 and back again. Without VTEPs, the overlay doesn’t exist. As soon as NSX is installed on a host, we get to see the vmk10 and vmk50 , these are the host tep.
Transport Node
This is any hypervisor host (ESXi, KVM) or NSX Edge that’s been prepared for NSX‑T. Once it’s a transport node, it participates in the overlay fabric — meaning it can send/receive Geneve‑encapsulated traffic.
Edge Node
These are special VMs that provide north‑south services: NAT, VPN, load balancing, and edge firewalling. They’re the bridge between your overlay and the physical network.
Segments
A segment is simply an overlay Layer 2 broadcast domain — the NSX‑T equivalent of a VLAN, but defined in software. Workloads connected to the same segment can talk at Layer 2 regardless of which host they’re on.
Transport Zones
These define the scope of segments. A transport zone tells NSX‑T which transport nodes a segment can span. Overlay transport zones are for Geneve encapsulated networks; VLAN transport zones map directly to physical VLANs.
Tier‑0 and Tier‑1 Gateway
Logical routers in NSX‑T. Tier‑0 connects to the physical network (north‑south), while Tier‑1 connects to workloads (east‑west). This router separation makes routing scalable and keeps tenant traffic isolated.
NSX-T Architecture
| Management + Control Plane | NSX-T manager , vCenter etc |
| Data Plane | Transport Node – ESXi, KVM, Edge node |
NSX-T Deployment Types
Single Site Deployment vs Multisite Deployment
Single Site: All NSX managers live in one cluster alongside workload domains.

Multisite: Managers are distributed across sites, with <10 ms latency required between them. In a two‑site setup, one site hosts two managers, the other hosts one, ensuring quorum.

Licensing
NSX‑T comes in tiers:
- Standard: Switching, routing, DNS/DHCP, basic firewall
- Professional: Adds cloud integration
- Advanced: IPv6, AD integration, container networking, multi‑vCenter, VRFs, load balancing
- Enterprise Plus: Federation and NSX Intelligence
NSX-T Components
NSX-T Manager
The core component of NSX-T is the NSX manager and it’s deployed as an OVA. It has a management component and a control plane and always NSX-T is deployed in a cluster of three for redundancy.
The manager maintains the ARP table, MAC table, TEP table
If we lose 2 nodes, we can’t move things around because the controllers are down so we don’t know VTEP traffic. Even if all 3 are down, VM will be up but it won’t move anything around because the control plane is down.
Here are the relevant web links
- NSX and ESXi Compatibility Matrix (Transport Node)
- NSX and vCenter Server Compatibility Matrix ( Compute Manager )
- NSX Upgrade Path Matrix
NSX-T Concepts
- VTEP: The tunnel endpoint that converts L2 traffic into L3 and back again, enabling overlays.
- Transport Zones: Define the scope of segments across clusters.
- Overlay Segments: Logical L2 broadcast domains, VLAN‑like but decoupled from physical fabric.
NSX-T Deployment
We’ve now deployed esx 7.0 on all our esx hosts and have vCenter is now on 7.0. Hosts are connected to a distributed switch with vDS v7.0.
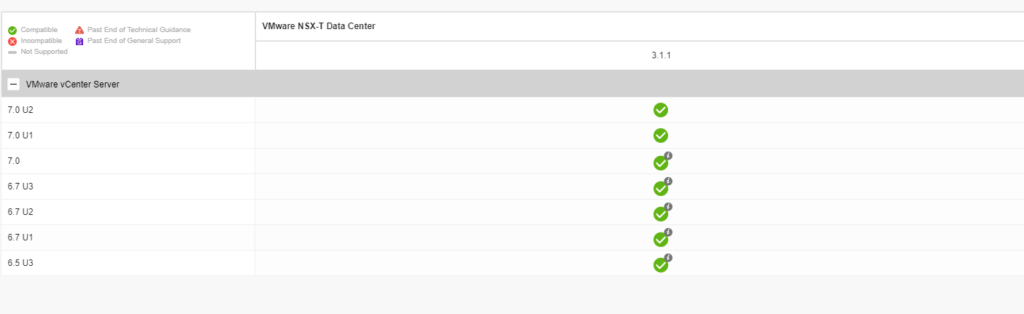
The table shows if compute manager is compatible with NSX-T
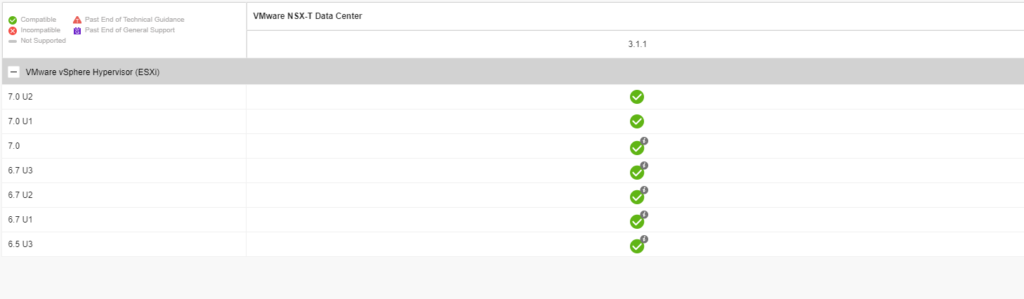
The table shows if the version of the transport node is compatible with NSX-T
NSX-T Deployment Prerequisites
- Ensure storage and network latency between these managers is under 10 ms
- Place all NSX-mgrs in the same cluster
- DNS, NTP, 4 free IPs
In this blog, we will add 3 NSX-T appliances to our environment. We begin by creating DNS records for the appliances and a management VIP record.

NSX Manager provides a web-based UI to manage your NSX-T env. Let’s check the NSX Manager VM form factor and its compute requirements.

NSX can be deployed as
- NSX Manager – Default
- NSX Edge appliance – controls to and fro from ESX
- NSX Public Cloud Gateway – Sits in Azure / AWS
We’ve now deployed esx 7.0 on all our esx hosts and have vCenter is now on 7.0. Hosts are connected to a distributed switch with vDS v7.0. For NSX-T we require an MTU of more than 1500.

Installation Workflow

The OVA deployment of the appliance is similar to any other appliance deployment on vCenter


Give the VM a name

Select a compute host

Review settings and click Next

Select deployment size as per your requirement

Choose disk type as thin provision

Select the network as a management network

Choose the IP address details and under role, name choose NSX Manager. NSX Global Manager is used for federation

Skip everything under the internal properties section.

Click Finish

The deployment will take around 10 mins and once done login via https://NSX_mgrIP

Navigate to System – Licenses – Add a license before you use NSX-T


Summary
Installing an NSXT 3/4X is a process that does require careful planning. In the next post, we will show you how add additional NSX-T appliances and Configure VIP