During VCF 4.2 deployment in a nested esx enviornement, you will run into this issue.
Despite my esx hosts being set up correctly and name resolution, NTP all works well the deployment via Cloud Builder still fails to pass through.When vCF validates the spreadsheet we are hit with this error
Error connecting to ESXi host sfo01-m01-esx01.ash.local. SSL Certificate common name doesn’t match ESXi FQDN
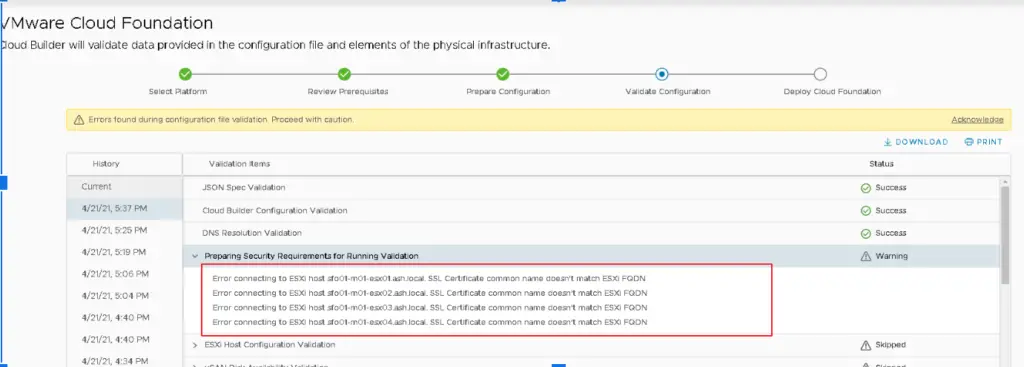
The cause of the above issue is during the installation of ESXi, the installer generates a self-signed certificate for each ESXi host but the process is performed prior to the ESXi identity being configured. This means all ESXi hosts have a common name in their self-signed certificate of localhost.localdomain.
What does this above statement mean?
If you notice my esx host it has CN set to sfo01-m01-esx02 so it should just work with vCF validation but it doesn’t happen. This CN would be picked up when you did the esx installation

1 – Generate new ESXi host certificates
This error can be prevented at times by generating an ESX Host certificate however this may or may not work so here is the write-up to cover that.
This is a very straight foward and well known method to replace esx certificates
Establish an ssh session to the esx host
Set the hostname and fdqn as shown from CLI
[root@sfo01-m01-esx02:~] esxcli system hostname set –host=sfo01-m01-esx02
[root@sfo01-m01-esx02:~] esxcli system hostname set –fqdn=sfo01-m01-esx02.ash.local
Navigate to /etc/vmware/ssl directory
The two files we are interested are rui.crt and rui.key – The cert and key file
[root@sfo01-m01-esx02:~] ls -ltr /etc/vmware/ssl/rui*
-r——– 1 root root 1704 Apr 21 17:23 /etc/vmware/ssl/rui.key
-rw-r–r– 1 root root 1411 Apr 21 17:23 /etc/vmware/ssl/rui.crt
[root@sfo01-m01-esx02:~]
I’m just to back up the cert and key file just in case if it’s needed
[root@sfo01-m01-esx02:/etc/vmware/ssl] cp -a rui.* /cert-backup/
[root@sfo01-m01-esx02:/etc/vmware/ssl] ls -l /cert-backup/
total 8
-rw-r–r– 1 root root 1411 Apr 21 17:23 rui.crt
-r——– 1 root root 1704 Apr 21 17:23 rui.key
To regenerate new certificate on esx, just run the command as shown
/sbin/generate-certificates
Restart hostd and vpxa services by executing the following command:
/etc/init.d/hostd restart && /etc/init.d/vpxa restart
Restart the host
rebootThis is enough to continue with the VCF Deployment.
We use another technique to fix this issue with vCF just in case if the above task doesnt resolve it
2 – Regenerate Self-signed Certificate using Open SSL and Certificate Authority
This post assumes you have an Active directory CA installed and web enrollment working as we will need it to complete the exercise
Generating a certificate key using OpenSSL
Download and install OpenSSL
Go to C:\Program Files\OpenSSL-Win64\bin and open openssl.cfg
Delete everything from this file and replace it as shown below
Here is my sample file, you will need copy this file as such and edit all the highlighted sections with your server info
[ req ]
default_bits = 2048
default_keyfile = rui.key
distinguished_name = req_distinguished_name
encrypt_key = no
prompt = no
string_mask = nombstr
req_extensions = v3_req
[ v3_req ]
basicConstraints = CA:FALSE
keyUsage = digitalSignature, keyEncipherment, dataEncipherment
extendedKeyUsage = serverAuth, clientAuth
subjectAltName = DNS:sfo01-m01-esx02, IP:172.16.11.102, DNS:sfo01-m01-esx02.ash.local
[ req_distinguished_name ]
countryName = US
stateOrProvinceName = California
localityName = Palo Alto
0.organizationName = ash.local
organizationalUnitName = computers
commonName = sfo01-m01-esx02.ash.local
To generate a certificate request key for an ESXi server using OpenSSL
Go to C:\Program Files\OpenSSL-Win64\bin and run the command to create the keys
openssl req -new -nodes -out rui.crt -keyout rui-orig.key -config openssl.cfg To get the key in an RSA format, input the below command
openssl req -new -nodes -out rui.crt -keyout rui-orig.key -config openssl.cfg 
The output from the above command produces 2 files as shown.

Generating a certificate from Central CA dc.ash.local
Go to chrome browser and browse to your web enrollment page as shown
http://localhost/certsrv/
Click Request certificate

Submit an advanced certificate request.
Open the file C:\Program Files\OpenSSL-Win64\bin\rui.cert using notepad and paste the contents of notepad into saved request tab as shown
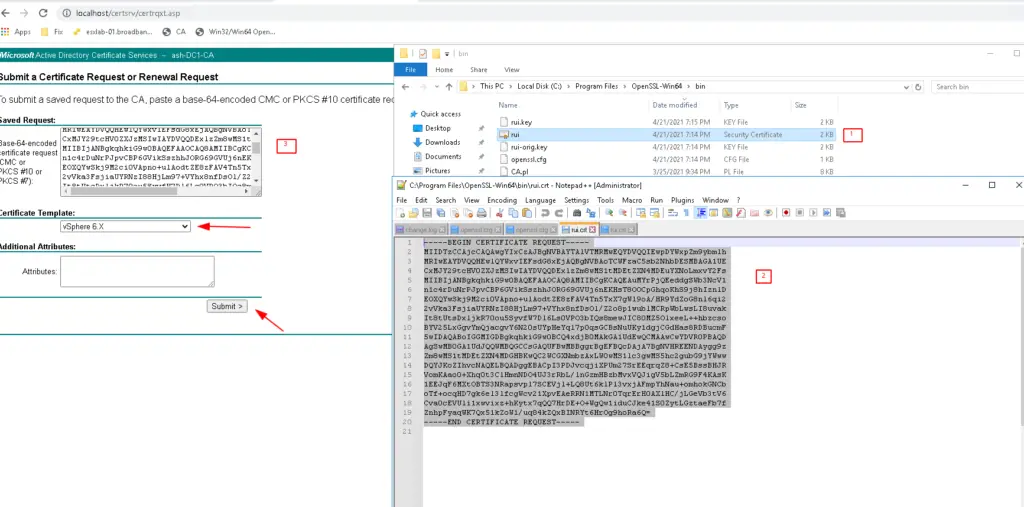
Click Download Certificate

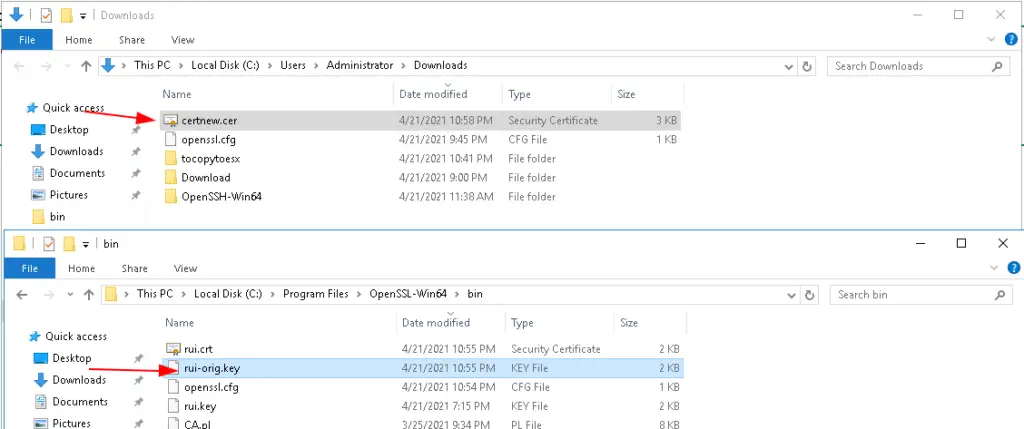
Now we will be having two files – first one, the CA generated by dc1.ash.local & second, the key generated by Open SSL
Installing the Certificate on ESX
We will be copying these two files onto the /etc/vmware/ssl path on esx server to replace the certificates
Establish an ssh session to the esx host and navigate to /etc/vmware/ssl directory
The two files we are interested in are rui.crt and rui.key.
[root@sfo01-m01-esx02:~] ls -ltr /etc/vmware/ssl/rui*
-r——– 1 root root 1704 Apr 21 17:23 /etc/vmware/ssl/rui.key
-rw-r–r– 1 root root 1411 Apr 21 17:23 /etc/vmware/ssl/rui.crt
[root@sfo01-m01-esx02:~]

Regenerate a New Certificate on esx
In this exercise we will just overwrite the rui.crt and rui.key available on esx host with the files we prepared
Rename the file certnew in the above picture to rui.crt and rui-orig.key to rui.key and copy these two files into a new folder
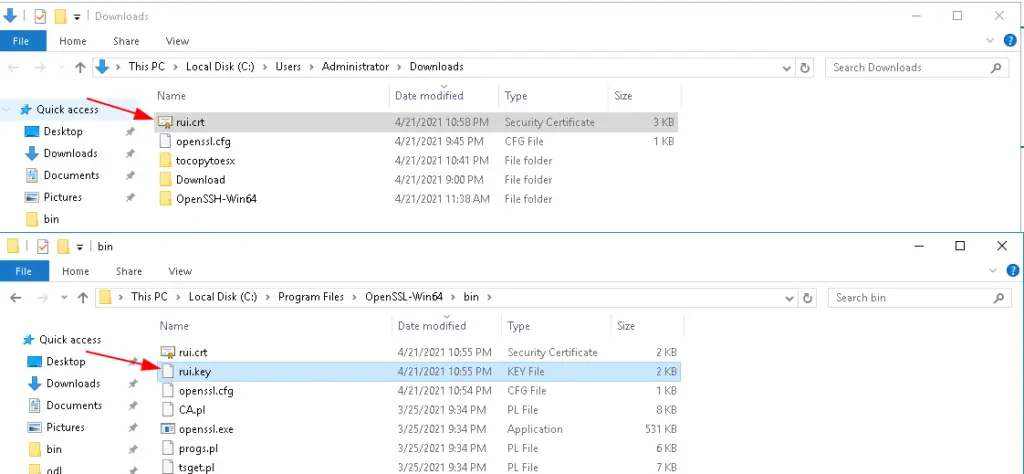
I’ve copied the files to a new folder

Overwrite rui.crt and rui.key on the esx from files our desktop to esx server using scp or filezila
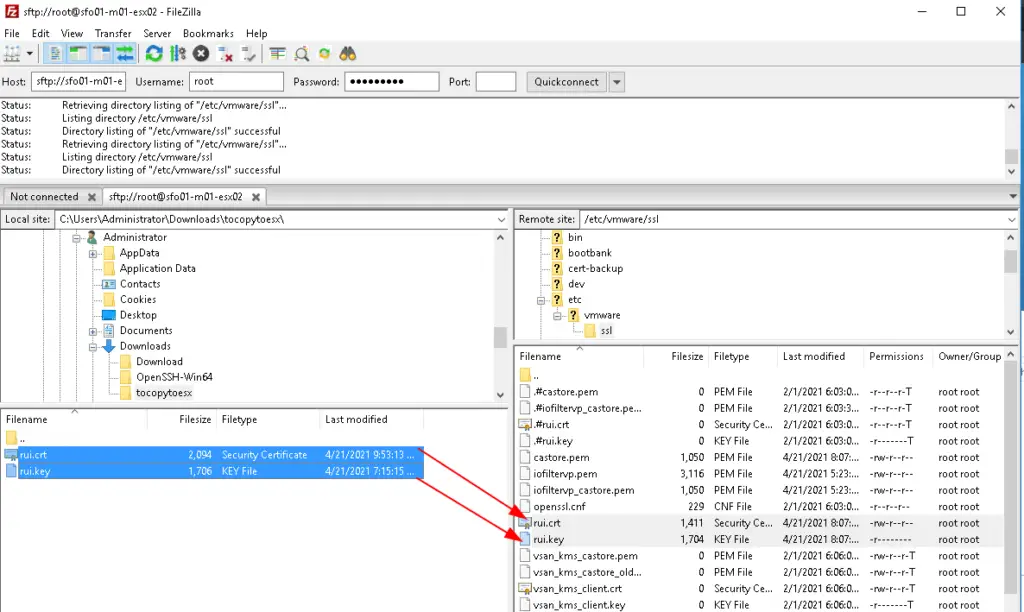
During this copy, there is a chance that special characters could be added to the file rui.crt
Open rui.crt using vi editor as shown

Delete everything in file

Open rui.crt from our desktop in notepad and copy all contents to vi editor as shown
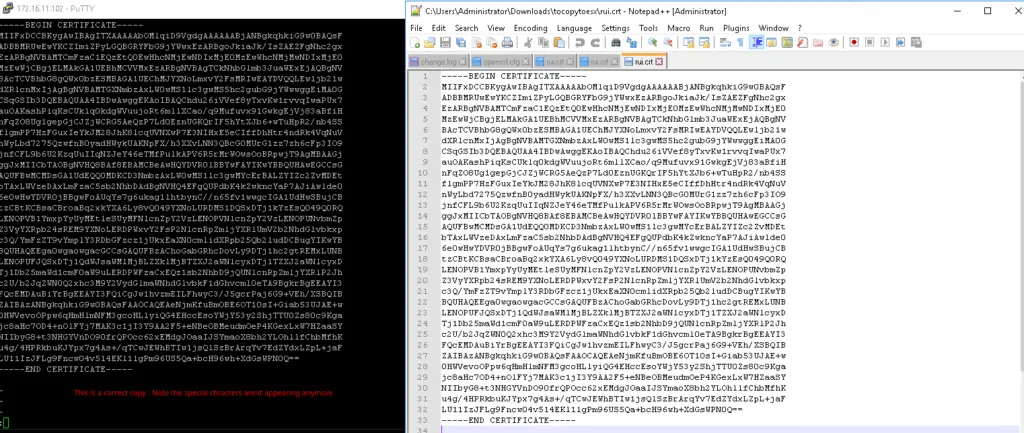
Restart hostd and vpxa services by executing the following command:
/etc/init.d/hostd restart && /etc/init.d/vpxa restart
watchdog-hostd: Terminating watchdog process with PID 1050267
hostd stopped.
hostd started.
watchdog-vpxa: Terminating watchdog process with PID 1050602
vpxa stopped.
vpxa started.
[root@sfo01-m01-esx02:/etc/vmware/ssl]
Restart the host
rebootAt this stage you would expect vCF to pass validation but most likely it wont as you still will get the same error as shown above
Adding to Trust Root Certificate
There is one more step we need to do now to ensure the certificate we generated using OpenSSL is trusted by our Trust Root Certificate and this happens as below.
To fix that, we go back to the rui.crt and clck install certificate as shown
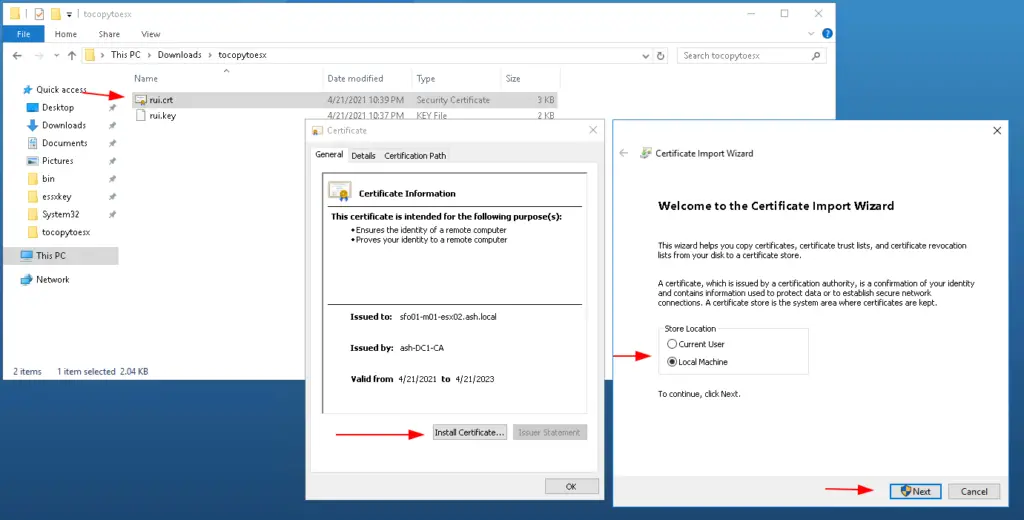
Place the certficate into Trusted Root Cert
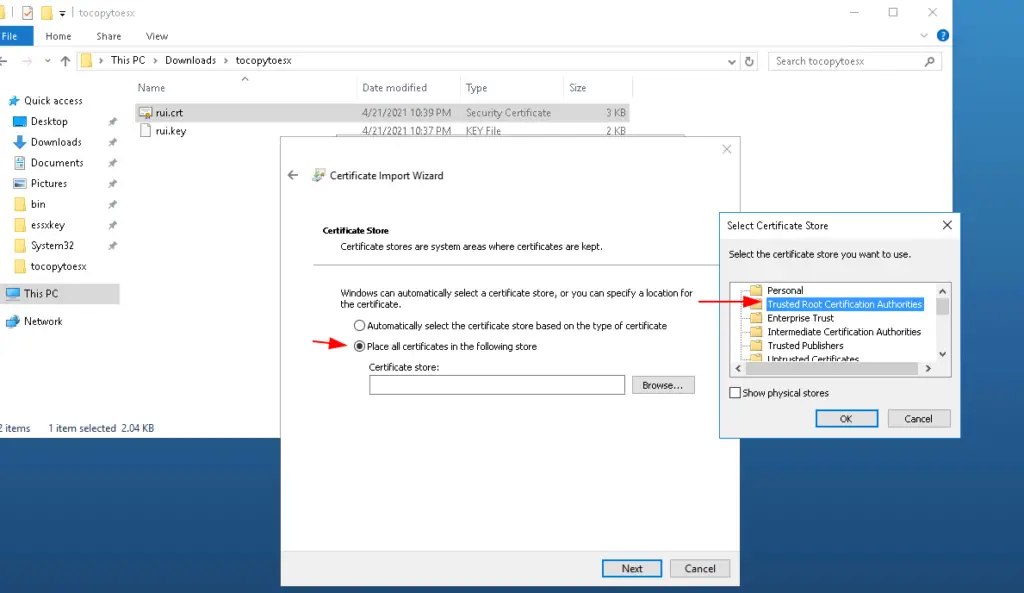
Finish the wizard

Click Ok to finish

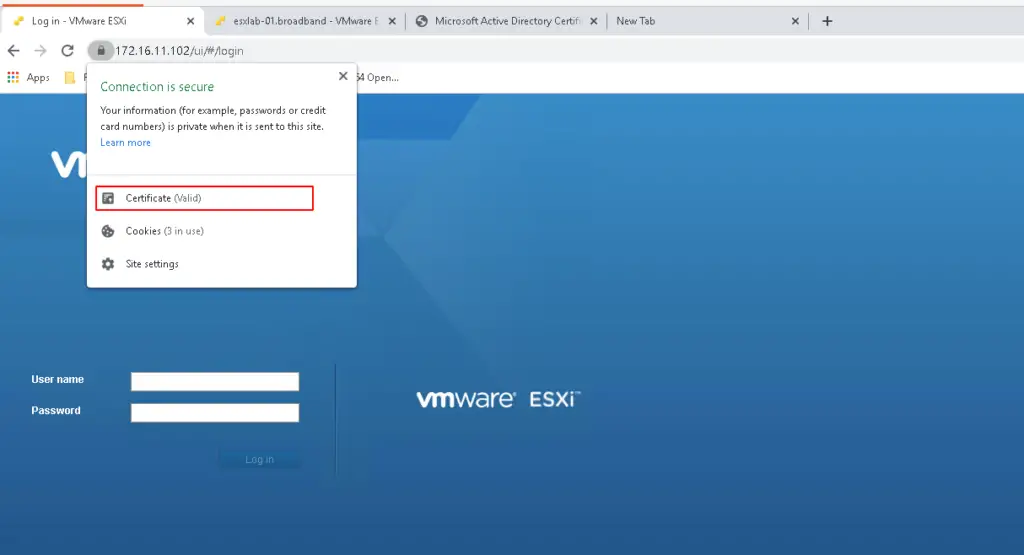
Now our certificate is valid and trusted.
Lets now kick off the vCF Cloud Builder once again to see if it passes through and finally we made it.


