
This is a full-blown guide to cover the setup and configuration of Azure Backups. Azure Backups can be used for protecting backups of VM’s on-prem and on the cloud onto a Recovery Services Vault
We can use it for Azure-hosted virtual machines (VMs) and on-premises. Backup is founded on the MARS (Microsoft Azure Recovery Services) agent and uses a Backup Service Vault, connected to Azure storage services.
Azure Backup is often used combined with Azure Site Recovery. Site Recovery is a service we can use to duplicate your data across regions for disaster recovery. Together, Backup and Site Recovery can help us create a comprehensive data loss protection plan.
Advantages of Azure Backup
- Pay as you go storage model & pay per Protected Instance
- Automatic storage management
- Unlimited scaling
- Application-consistent backup
- Each and every recovery point it has information for what it needs to go back to the recovery point
- Data encryption both in-rest and in-transit
- Unlimited data transfer
- Long-term retention without any time limit
Recovery Services Vault
This is the area in Azure that’s used to hold data such as backup copies, Azure file shares, recovery points, and backup policies. The recovery services vault needs to be in the same region as the VM it backup.
Benefits of Recovery Services Vault
- Both Azure VMs and on-prem backups can be stored.
- Minimizes management overhead
- Recover anywhere
- Role-Based Access Control (RBAC)
- Offers numerous recovery points
- MARS agent can be installed on our on-prem VM to backup data to Azure
Workflow of an Azure Backup
- The recovery services vault and the Azure VM to protect must be in the same region so create a recovery services vault.
- An extension is first installed on the VM – Linux and Windows is supported
- A snapshot of the managed disk is taken via the Azure Backup tool.
- The snapshot is copied across to the Recovery Services vault for long time retention.
- The snapshot is then removed once data is transferred to the recovery services vault and the snapshot is removed.
Creating Recovery Services Vault
Search for Recovery Services Vault in Azure and click Create button

Choose our subscription, resource group, and give our vault a name as vma-vault-1 for example

Our recovery services vault is this created in the East US region

The first backup will be a full backup and backups will happen even if VM is powered off. First backup happens at US east time

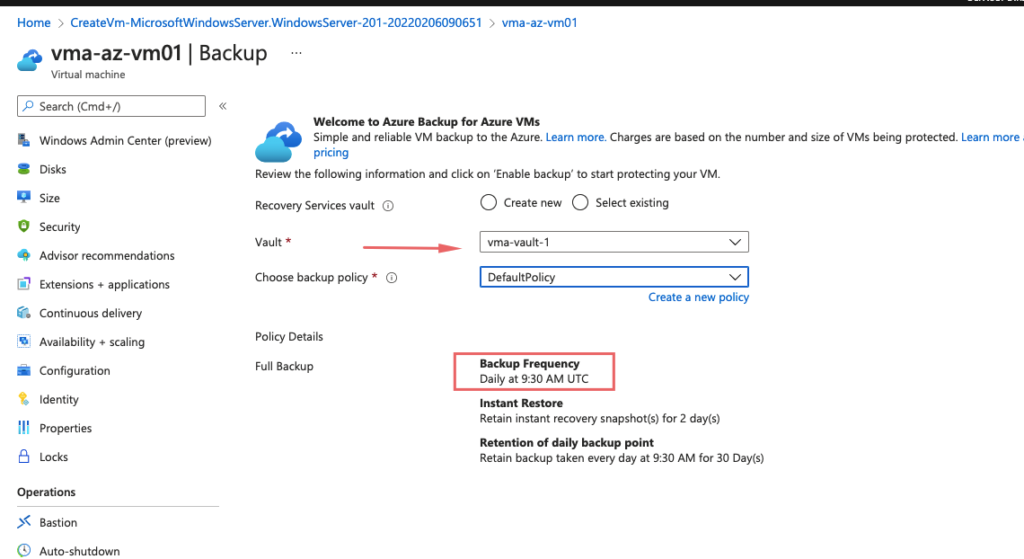
Setting Backup Retention Policy in Vault
Retention in Backup would mean how long an image in the recovery storage vault should be kept. Custom Backup policies can be created as we require.

Choose what we wish to store – In this example we will just pick Azure Virtual Machine.

Choose the backup frequency and give the policy a friendly name

Our backup policy is created and available for use.

Creating Backups on Azure
The recovery vault must be in the same region as our VM. The initial backup is full followed by diff
Click Create to begin the first backup of our VM in Azure


The status of the jobs can be viewed under the recovery services vault

Once the backups are complete, we can see a window as shown

Backups at Scale
Backing up at a scale is via the recovery services vault as shown

Add all the VMs to be added for backups

Restoring VM
We could restore a VM In its entity using Azure snapshots or recover individual files if needed


Restore an Entire VM
Restoring a VM is quite an easy process. I’ve now deleted VM01 and I’ll just restore it back to my resource group.
Workflow of an Azure Restore.
- Backed up data is copied from the Recovery Services to a staging location mapped to a storage account.
- A new VM is created from the staging location.
Go to the recovery services vault and find the VM as Click Restore VM

We have two options here,

Option 1 – Create new
Pick the recovery point from the list. Choose the option under restore configuration to Create New and select a Storage Account and Click Restore

Restore progress can be viewed as shown

VM recovery is quick and once done, the VM will be powered on automatically.

Option 2 – Replace VM
Pick the recovery point from the list. Choose the option under restore configuration to Replace Existing and select a Storage Account and Click Restore

File Recovery using Azure Backup
Select the File recovery option

Choose a restore point and download the executable file. Make a note of the password
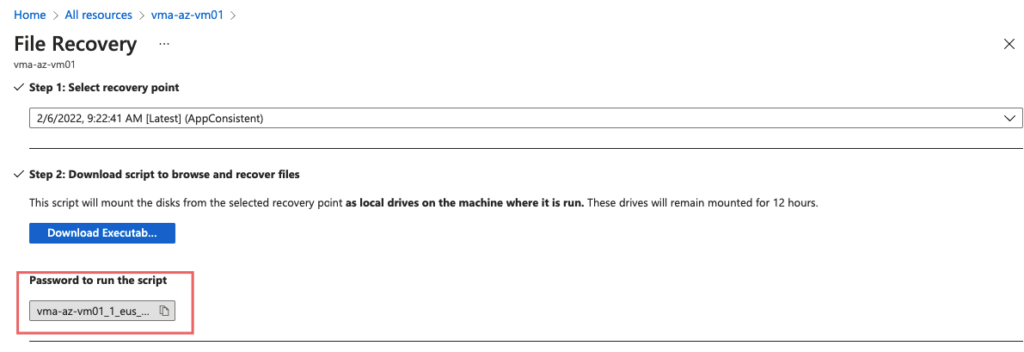
Run this downloaded exe file on the machine where you want to copy the files. When promoted, provide the password

Our recovery ISCSI mount is attached here and from here you can just copy the missing files

Our final task will be to unmount disk

From our vault, we can as well the VM’s we protect under the Manage > Backup Infrastructure tab


As seen our on-prem backup server is shown as mars-azbr which is protecting two servers

Configure Azure Backup Reports
It’s possible for us to gain insights into the frequency of backups taken, our recovery storage group storage consumption, etc using Azure Backup reports. The backup reports are sent to a Log Analytics workspace before we can generate those reports

Steps to enable Azure backup reports
- Go to the recovery services vault > Diagnostic settings

Enable the logs needed and choose a log analytic workspace.

Backup reports can be run after a few backup cycles.