In this blog, we are going to install vCSA 7.0 in our environment.
Step by Step Instructions for deploying VCSA 7
Prerequisites
- Read Release Notes
- Refer VMware compatibility guide
- An NTP server
- A working DNS server
Host A Record – Forward Lookup
1- We will need an A record and a PTR record to be created in DNS in order for the name resolution to work. An A record ensures we can call a system by a friendly name and that name can translate into IP addresses.
Open your DNS Manager console – Select our domain name – Expand Forward Lookup Zones – Create new Host A record

2- Add the hostname and IP address of our new vCenter

3- Once the entries are created, we will have a record in our DNS as below

Host PTR Record – Reverse Lookup
Similarly for the IP address above we also need a PTR record so IP addresses can translate into DNS names
4- Open your DNS Manager console – Select our domain name – Expand Reverse Lookup Zones – Right-click and select New Zone

5- Choose to create a primary zone

6- Choose to replicate info to all DNS servers in the domain

7- Create an IPV4 Zone

8- Specify the network ID as for example 172.16.11

9- Once it’s done, click finish
10- Open your DNS Manager console – Expand Reverse Lookup Zones – Select the reverse lookup zone we created and create a PTR record

VMware vCenter Server 7 Deployment Procedure
1-Download VMware vCenter 7 from www.vmware.com
2-Mount the ISO image

3- Browse to cd path – F:\vcsa-ui-installer\win32 and launch Installer.exe

4- Once the installer launches, choose the option Install a new vCenter

5- The External Platform Services Controller deployment has been deprecated in vCenter 7.0 so just ignore this warning and click Next to continue

6- Accept the terms of the license agreement and click Next

7- In this next screen, it’s asking us to point where to install the vCenter to. You could choose to install it to an esxi server or if there is a vCenter environment existing you could as well just pick the vCenter to make things easy.
In my lab, I’ve a home vCSA so I am going to install my new vCenter onto my existing vCenter inventory than choosing an ESXi host

8- Accept the certificate warning

9- From the inventory that’s displayed, choose a location to store the VM

9- If we had multiple hosts, we would have seen several ESXi servers here allowing us to choose where we wish to deploy our new vCenter to. In this case, we’ve just one server so we select that

10- Give our new vCenter the DNS name we created earlier and punch in a password. This password is the root account password for our vCenter appliance

11- Choose the size of our vCenter deployment. Typically this is just a T-shirt menu with some sample sizes and is based on the number of hosts in our vCenter environment. These settings can be changed post-deployment.

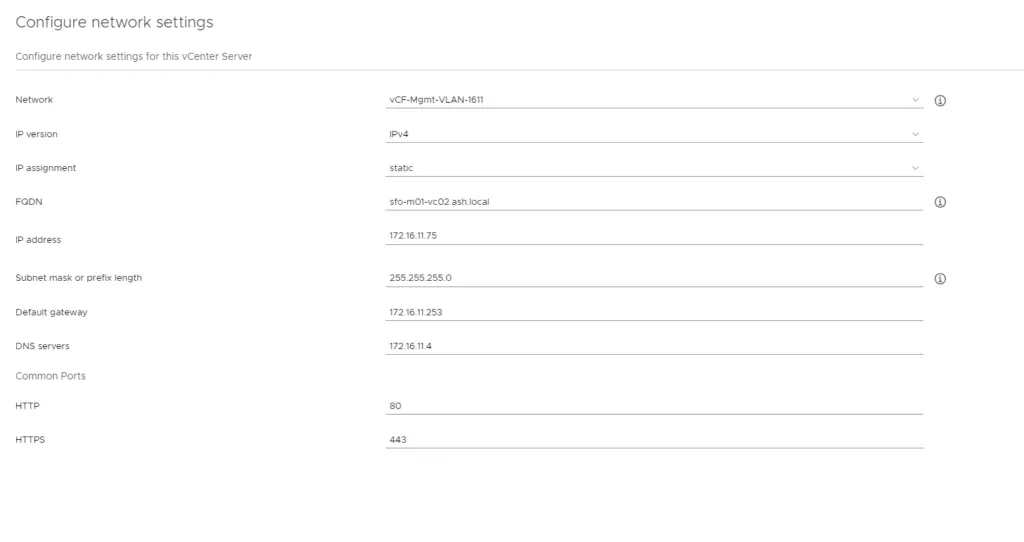
12 – Now we need to specify the following settings
- Network or vLAN segment we’ve chosen to deploy of VM ( Check out my vYOS Lab config )
- IP version as IPV4
- IP assignment as Static
- FQDN as vCentername.domain
- IP Address
- Subnet Mask
- Default Gateway
- DNS Servers
- Ports 80 and 443 for web traffic

13- Review settings and click finish

14- Stage 1 will take around 10 mins deploy

15- Once Stage 1 is complete, click Continue to proceed

16- Ensure we add in an NTP server here and set time synchronization mode has been set to synchronize with an NTP server

17- In this section, it asks us to configure an SSO domain that is a mechanism vCenter us access into the vCenter once deployed.
- Choose a Single-Sign on domain – Any name will do
- Choose a SSO username
- Choose a password
Note: If your domain name is ash. local for example, don’t configure your SSO as ash. local. Doing so will not allow joining the vCSA to Active Directory domain

18- If you have multiple vCenters and should you wish to have a centralized way of managing all the vCenters, we could choose the option to join this new vCenter to an existing vCenter Server that already has an SSO domain configured to it.


- Join an existing SSO domain – I’ve used sfo-m01-vc01.ash.local as that’s my home vCenter
- vCenter Server
- HTTPS port
- Single Sign-On domain name
- Single Sign-On user name
- Single Sign-On password
19- Click next to proceed which starts validating the type of the external node we are joining this vCenter to
20- Join the CEIP program if needed

21- Review Settings and finish

22- vCenter Server setup takes around 20 mins to complete for Stage 2

23- After few minutes, we will get the message as our deployment as succesful

24- Open the link via browser

25-Login with our account administrator@vsphere.local & password we set earlier
26- As expected, we now see both our vCenters in one single view.


