

A SharePoint list is a structured way to store information in SharePoint, similar to a table in a database or a spreadsheet in Excel. Multiple people can work with it at the same time, permissions can be controlled, and it can be connected to other Microsoft tools like Power Pages, Power Automate, and Power Apps.
Because of this, SharePoint lists are often used as the data source behind forms, websites, and simple business applications. They are commonly used for things like blog posts, events, support requests, internal tracking, and approvals.
Create a new List
- Go to the SharePoint site where you want to create the list. Lists are always created inside a site.
- Once the site opens, click Site contents from the left navigation or from the settings menu. This page shows all existing lists and libraries on the site.
- On the Site contents page, click + New at the top and select List from the menu.
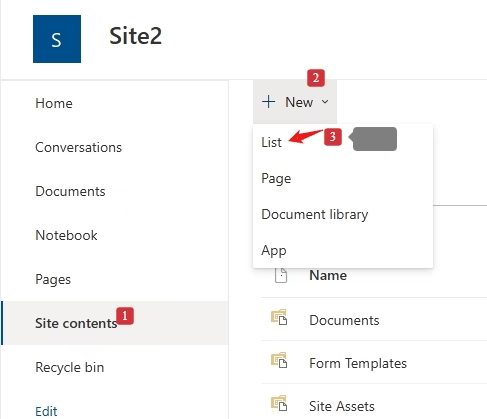
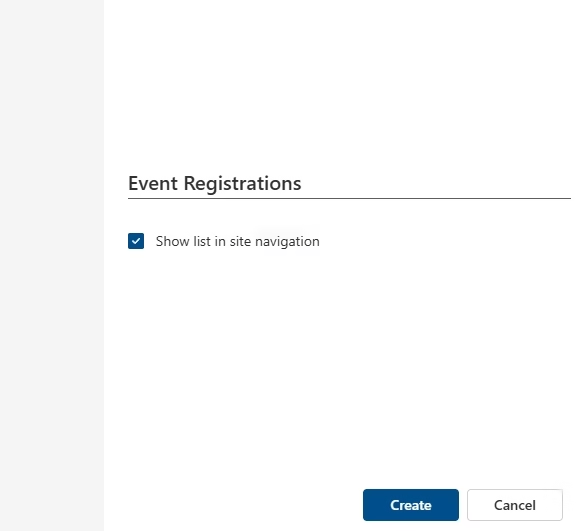
- Enter a Name for your list. This name will be visible to users across the site and in connected tools.
- Click Create. SharePoint will now create the list and open it automatically.
Create the columns
The list comes with a default Title column. You can rename it to Registration ID or keep it as Title. Then add the following columns:
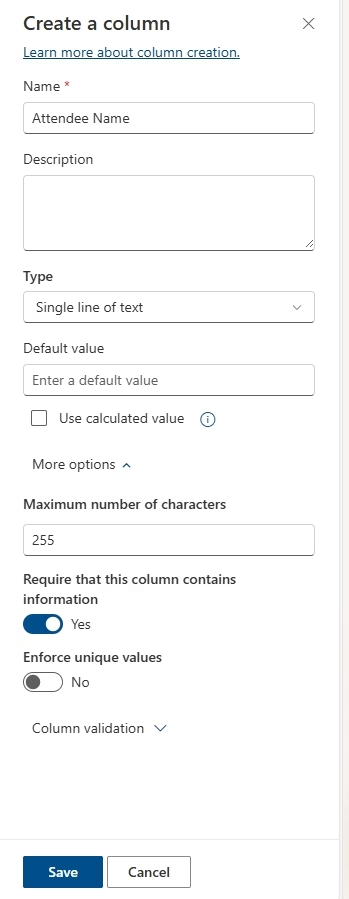
Next, add columns to the list. At the top of the list, click + Add column. Select the column type you need, such as Single line of text, Choice, or Date and time. Enter the column name, adjust any settings like required fields or default values, and click Save.
Attendee Name
- Click + Add column → choose Single line of text.
- Enter Column name:
Attendee Name. - Turn on Require that this column contains information.
- Click Save.
Attendee Email
- Click + Add column → choose Single line of text.
- Enter Column name:
Attendee Email. - Make it required.
- Click Save.
Event Date
- Click + Add column → choose Date and time.
- Enter Column name:
Event Date. - Make it required.
- Click Save.
Attendance Status
- Click + Add column → choose Choice.
- Enter Column name:
Attendance Status. - In Choices, enter:
- Registered
- Attended
- Cancelled
- Set the Default value to
Registered. - Make it required.
- Click Save.
Add New items
Click + New at the top of the list to add a new item. Fill in the fields and click Save. For example:
Item 1:
- Registration ID: Reg-001
- Attendee Name: John Smith
- Attendee Email: john.smith@email.com
- Event Date: 01/15/2026
- Attendance Status: Registered
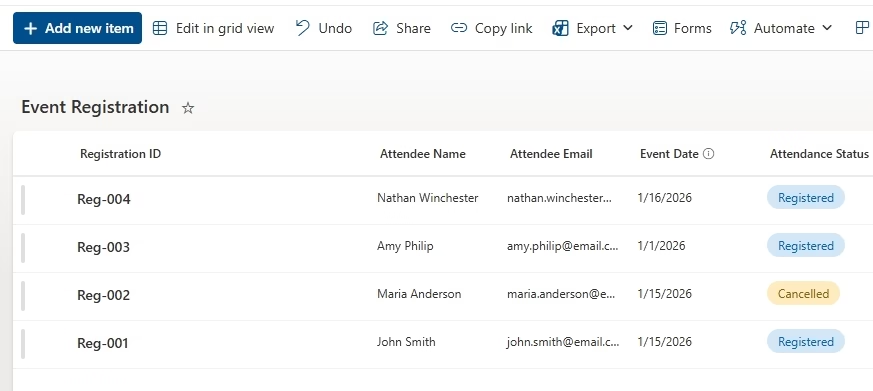
Your Event Registrations list now has columns and sample data. You can click All items at the top to sort or filter records.