Setting up PowerShell for SharePoint Online Administration involves several steps to ensure you can manage your SharePoint Online environment from the command line. PowerShell is a powerful scripting language that allows administrators to automate tasks and manage SharePoint Online more efficiently.
Blog Series
- Part 1 – Getting Started with SharePoint Online
- Part 2 – Set up PowerShell for SharePoint Online Administration
- Part 3 – Create and Remove SharePoint Sites
- Part 4 – Configure Storage Limits on SharePoint Sites
- Part 5 – Configure External Sharing for SharePoint and OneDrive for Business
- Part 6 – Enable File Requests in SharePoint Online and OneDrive for Business
- Part 7 – Managed Metadata with SharePoint Term Store
For SharePoint Online, you will typically use the SharePoint Online Management Shell or the PnP PowerShell module. The SharePoint Online Management Shell is a Windows PowerShell module that lets you run command-line operations.

Download and install the SharePoint Online PowerShell Module (Microsoft.Online.SharePoint.PowerShell) from PowerShell Gallery To verify if you already have the SharePoint Online Management Shell installed, run this command in administrative mode
Install-Module -Name Microsoft.Online.SharePoint.PowerShellTo verify if you already have the SharePoint Online Management Shell installed, run this command in administrative mode
Get-Module -Name Microsoft.Online.SharePoint.PowerShell -ListAvailable | Select Name, VersionConnect to the SharePoint Online Admin Center
Connect-SPOService -Url https://grandvm02-admin.sharepoint.com/You can test it by retrieving a list of SharePoint Sites
Get-SPOSiteTo get the list of OneDrive for Business sites (Personal SharePoint Sites) as well, use the below command:
Get-SPOSite -IncludePersonalSite $trueTo get the list of just OneDrive Sites, use the below command:
Get-SPOSite -IncludePersonalSite $true -Limit all -Filter "Url -like 'https://grandvm02-my.sharepoint.com/personal/' " | Select Url,StorageUsageCurrentNow, we are going to install PnP PowerShell and Microsoft Graph.
PnP PowerShell is a powerful cross-platform PowerShell module designed to work with Microsoft 365 environments. Here are the key points about it:
- Functionality: PnP PowerShell provides over 650 cmdlets that allow you to interact with various Microsoft 365 products and services, including:
- SharePoint Online
- Microsoft Teams
- Microsoft Planner
- Microsoft Flow
- And more!
- Cross-Platform: It runs on Windows, Linux, and MacOS, making it versatile for different operating systems.
Install and Register PnP.PowerShell module using the below commands:
#Note: You need PowerShell 7.2 or later to use PnP PowerShell.
Install-Module -Name PnP.PowerShell
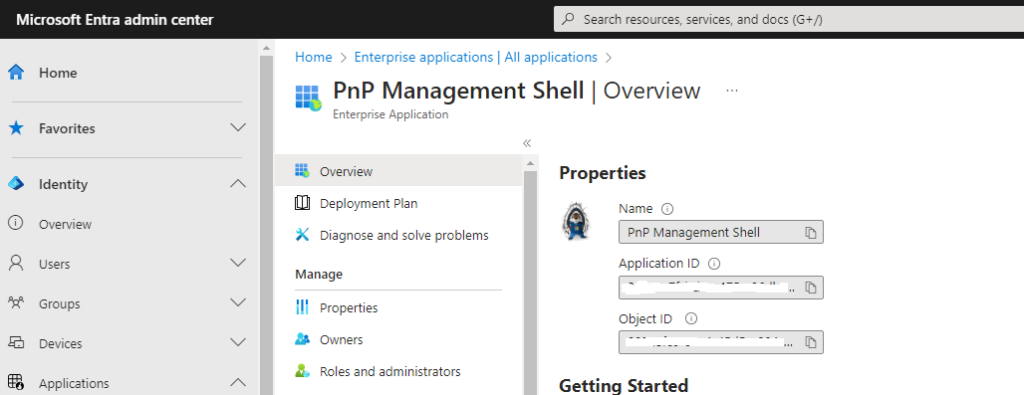
Register-PnPManagementShellAccess
Once registered, you can view the PnP Management Shell Application from the Microsoft Entra Admin Center.
Use the Connect-PnpOnline cmdlet to connect to the SharePoint Admin Center
Connect-PnPOnline -Url https://grandvm02-admin.sharepoint.com/ -InteractiveRun Get-PnPSite, to get the current information on the Site

Microsoft Graph PowerShell is a powerful tool that acts as an API wrapper for the Microsoft Graph APIs, allowing you to interact with various Microsoft 365 services directly from PowerShell. Here’s what you need to know:
- Functionality: The Microsoft Graph PowerShell SDK exposes the entire Microsoft Graph API set for use in PowerShell. It provides over 650 cmdlets that allow you to manage identities at scale, automate administrative tasks, and work with Microsoft 365 services such as:
- SharePoint Online
- Microsoft Teams
- Microsoft Planner
- Microsoft Flow
- And more!
- Cross-Platform: On a Windows, Linux, or MacOS, you can use Microsoft Graph PowerShell to streamline your administrative workflows.
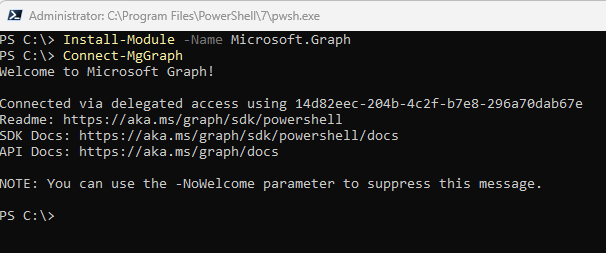
Install the Module Microsoft Graph and connect to MgGraph as shown below:
Install-Module -Name Microsoft.Graph

Connect-MgGraph
Output is as shown;