

Nginx is a very popular and commonly used open-source web server that can run on both Linux and Windows operating systems. In this blog, we will build a very basic static Nginx website
Lab Server Setup:
Hostname: nginx01.ash.local
Operating System: Redhat 9.2
Packages and Config files required for the Nginx server
- nginx – The package installs the Nginx web server.
- links – Optional package for text-based web browser
Default ports: 80 and 443 (SSL)
These are the main folders storing Nginx config files
| Purpose | Location |
| Version | nginx -v |
| Check if config is correct | nginx -t |
| Default Parent Directory | /usr/share/ |
| Main Nginx root configuration directory. | /etc/nginx |
| Additional Nginx configuration files or directives( additional website config file ) | /etc/nginx/conf.d |
| Main Configuration file | /etc/nginx/nginx.conf |
| Contains log files ( SymLink to /etc/httpd/logs) | /etc/log/nginx |
| Main web document root directory | /var/www |
| Access Logs | /var/log/nginx/access.log |
| Error Logs | /var/log/nginx/error.log |
Concept of Master and Worker Process
| Master Process | Evaluates the Config files |
| Worker Process | Responsible for serving web content |
Step 1 – Set up the host file
[root@lnx03 ~]# cat /etc/hostname
lnx03
[root@lnx03 ~]# cat /etc/hosts
127.0.0.1   localhost localhost.localdomain localhost4 localhost4.localdomain4
::1         localhost localhost.localdomain localhost6 localhost6.localdomain6

[root@lnx03 ~]#
Step 2– Check the Nginx daemon(httpd) install
[root@nginx01 ~]#
[root@nginx01 ~]#  dnf list nginx
Updating Subscription Management repositories.
Last metadata expiration check: 0:02:48 ago on Mon 30 Oct 2023 06:24:38 GMT.
Installed Packages
httpd.x86_64                                                          2.4.53-11.el9_2.5                                                          @rhel-9-for-x86_64-appstream-rpms


[root@nginx01 ~]# yum list nginx
Updating Subscription Management repositories.
Last metadata expiration check: 0:03:15 ago on Mon 30 Oct 2023 06:24:38 GMT.
Installed Packages
httpd.x86_64                                                          2.4.53-11.el9_2.5                                                          @rhel-9-for-x86_64-appstream-rpm
Step 3– Install Nginx
[root@nginx01 ~]#
[root@nginx01 ~]# yum install nginx -y
Updating Subscription Management repositories.
Last metadata expiration check: 0:13:04 ago on Sun 12 Nov 2023 11:00:21 GMT.
Dependencies resolved.
==============================================================================================================================================================
 Package                              Architecture             Version                               Repository                                          Size
==============================================================================================================================================================
Installing:
 nginx                                x86_64                   1:1.20.1-14.el9_2.1                   rhel-9-for-x86_64-appstream-rpms                    40 k
Installing dependencies:
 nginx-core                           x86_64                   1:1.20.1-14.el9_2.1                   rhel-9-for-x86_64-appstream-rpms                   574 k
 nginx-filesystem                     noarch                   1:1.20.1-14.el9_2.1                   rhel-9-for-x86_64-appstream-rpms                    11 k
 redhat-logos-httpd                   noarch                   90.4-2.el9                            rhel-9-for-x86_64-appstream-rpms                    18 k

Transaction Summary
Step 4 – Enable the Nginx service with either nginx using the below command
# To Manage httpd deamon
# systemctl start|stop|status nginx

# To Stop and Disable Service
systemctl enable |disable nginx

# To Ensure service stays peristant during reboots
chkconfig nginx on

# To Show status of httpd
systemctl list-unit-files | grep nginx

Optionally, services can be restarted as
/etc/init.d/nginx | stop | start
[root@nginx01 ~]#  systemctl start nginx.service
[root@nginx01 ~]#  systemctl enable nginx.service
[root@nginx01 ~]#  systemctl status nginx.service
● nginx.service - The nginx HTTP and reverse proxy server
     Loaded: loaded (/usr/lib/systemd/system/nginx.service; enabled; preset: disabled)
     Active: active (running) since Sun 2023-11-12 11:17:40 GMT; 1min 42s ago
   Main PID: 9516 (nginx)
      Tasks: 2 (limit: 10930)
     Memory: 2.0M
        CPU: 1.785s
     CGroup: /system.slice/nginx.service
             ├─9516 "nginx: master process /usr/sbin/nginx"
             └─9517 "nginx: worker process"

Nov 12 11:17:36 nginx01 systemd[1]: Starting The nginx HTTP and reverse proxy server...
Nov 12 11:17:38 nginx01 nginx[9492]: nginx: the configuration file /etc/nginx/nginx.conf syntax is ok
Nov 12 11:17:38 nginx01 nginx[9492]: nginx: configuration file /etc/nginx/nginx.conf test is successful
Nov 12 11:17:40 nginx01 systemd[1]: Started The nginx HTTP and reverse proxy server.
Step 5 – Check the version of Nginx installed.
[root@nginx01 ~]# nginx -v
nginx version: nginx/1.20.1
Step 6 –Verify that port 80 is open
nginx version: nginx/1.20.1
[root@nginx01 ~]# netstat -tulpn | grep :80
tcp        0      0 0.0.0.0:80              0.0.0.0:*               LISTEN      9516/nginx: master
tcp6       0      0 :::80                   :::*                    LISTEN      9516/nginx: master

As shown below,master process runs as root and worker process runs as nginx user

[root@nginx01 ~]# ps -ef --forest | grep nginx
root       18506    2102  0 11:22 pts/0    00:00:00              \_ grep --color=auto nginx
root        9516       1  0 11:17 ?        00:00:00 nginx: master process /usr/sbin/nginx
nginx       9517    9516  0 11:17 ?        00:00:00  \_ nginx: worker process
[root@nginx01 ~]#
Step 7 –Allow HTTP and HTTPS traffic in our firewall if enabled.
Configure Firewall for Port 80 and 443
firewall-cmd --permanent --add-service=http --add-service=http
firewall-cmd --permanent --add-service=http --add-service=https
# firewall-cmd --reload

On the old RHEL, we would use iptables to set the config as shown


# Allow a subnet to pass port 80
 iptables-A INPUT -m state --state NEW -m tcp -p tcp -s 192.168.1.0/24 --dport 80 -j ACCEPT
 iptables -A INPUT -m state --state NEW -m tcp -p tcp --dport 80 -j ACCEPT
 iptables -A INPUT -m state --state NEW -m tcp -p tcp --dport 443 -j ACCEPT
 service iptables save
 service iptables restart
[root@nginx01 ~]# firewall-cmd --permanent --add-service=http --add-service=https

success
[root@nginx01 ~]#
[root@nginx01 ~]# systemctl status firewalld
● firewalld.service - firewalld - dynamic firewall daemon
     Loaded: loaded (/usr/lib/systemd/system/firewalld.service; enabled; preset: enabled)
     Active: active (running) since Sun 2023-11-12 10:39:14 GMT; 41min ago
       Docs: man:firewalld(1)
   Main PID: 820 (firewalld)
      Tasks: 2 (limit: 10930)
     Memory: 40.1M
        CPU: 4.956s
     CGroup: /system.slice/firewalld.service
             └─820 /usr/bin/python3 -s /usr/sbin/firewalld --nofork --nopid

Nov 12 10:39:12 nginx01 systemd[1]: Starting firewalld - dynamic firewall daemon...
Nov 12 10:39:14 nginx01 systemd[1]: Started firewalld - dynamic firewall daemon.
[root@nginx01 ~]#
[root@nginx01 ~]#
[root@nginx01 ~]# firewall-cmd --reload
success
[root@nginx01 ~]# firewall-cmd --list-all
public (active)
  target: default
  icmp-block-inversion: no
  interfaces: ens160
  sources:
  services: cockpit dhcpv6-client http https ssh
  ports:
  protocols:
  forward: yes
  masquerade: no
  forward-ports:
  source-ports:
  icmp-blocks:
  rich rules:
[root@nginx01 ~]#
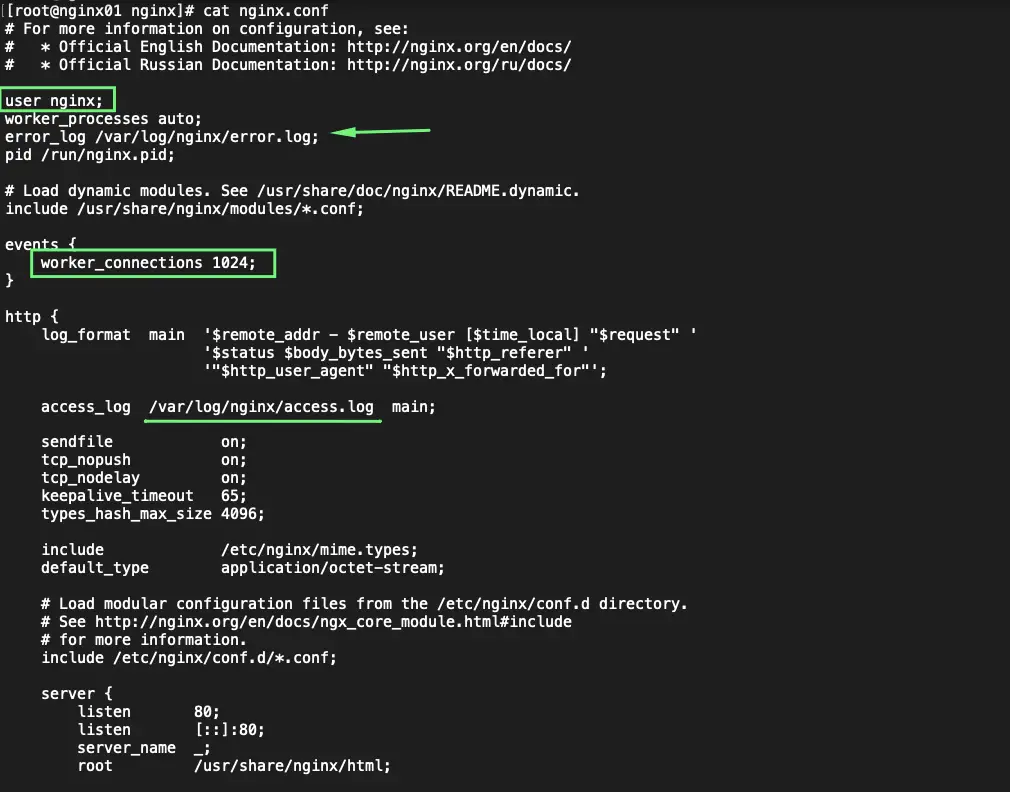
Step 8 – The main Nginx configuration file is located at /etc/nginx/nginx.conf. This file contains directives that affect the entire Nginx server. Directives are used to link a file to this config file when we have multiple websites or config’s that need to be loaded are defined under /etc/nginx/conf.d directory
- The user that runs is Nginx
- The error_log is located in /var/log/nginx/error.log
- The worker connections would imply the max amount of connections the web server can take at a time
- The Access_log is located in /var/log/nginx/access.log
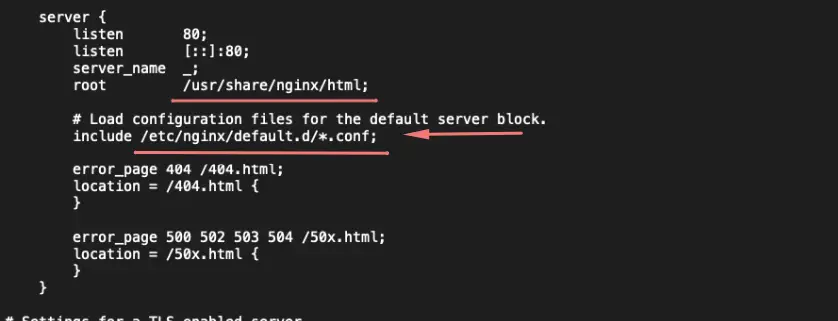
Our web store is in this path. Additional config files are kept in the /etc/nginx/default.d/ directory.
Step 8 – Let’s create some web content under /usr/share/nginx folder for RHEL.
[root@nginx01 html]# echo This is my webserver $HOSTNAME > /usr/share/nginx/html/index.html
[root@nginx01 html]#
[root@nginx01 html]# cat /usr/share/nginx/html/index.html
This is my webserver nginx01
[root@nginx01 html]#
Step 9 – Test the config file
[root@nginx01 html]# nginx -t
nginx: the configuration file /etc/nginx/nginx.conf syntax is ok
nginx: configuration file /etc/nginx/nginx.conf test is successful
[root@nginx01 html]#
Step 10 – Verify the webpage
[root@nginx01 html]# curl 127.0.0.1
This is my webserver nginx01
[root@nginx01 html]#
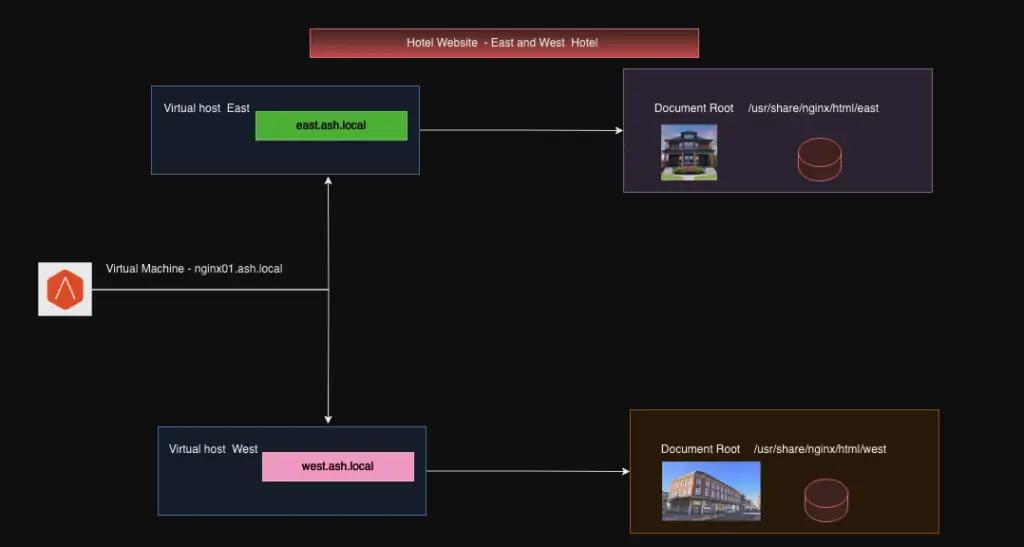
Configure Multiple Websites on Nginx
Nginx uses multiple server block configurations to run multiple websites – ie: Shared Website Hosting.
The default server block is good for single website hosting but if we need multiple websites needs to be hoisted from the same server, we use multiple server blocks which are also known as Virtual Servers.
The objective of a server block host entry in Nginx config is to handle multiple websites from a single IP address on our Nginx VM so that a single massive VM can serve a ton of websites from it which is the principle of Shared Website Hoisting.
We will aim to set up our two hotel websites running from a single web server as shown below – www.east.ash.local and www.west.ash.local from our single server which has a single IP address of 192.168.0.17, so we must have DNS names resolving to this machine IP address or make an entry in /etc/hosts file. Each hotel branch will have its own URL as shown.
Set up the host file
root@lnx03 ~]# cat /etc/hosts
127.0.0.1   localhost localhost.localdomain localhost4 localhost4.localdomain4
::1         localhost localhost.localdomain localhost6 localhost6.localdomain6
127.0.0.1    east   east.nginx01.ash.local
127.0.0.1    west   west.nginx01.ash.local
For multiple websites, to be hoisted, create a dedicated directory for each website file and keep all the website content on those directories respectively as shown below. In this example, my east and west website files are kept separately.
For East Website, we will create the following
# Configure Directory and files for East Website
[root@lnx03 conf]# mkdir -p /usr/share/nginx/html/east/index.html
[root@lnx03 conf]# echo This is my east webserver $HOSTNAME > /usr/share/nginx/html/east/index.html
[root@lnx03 conf]# mkdir -p /var/log/nginx/east/error_log
[root@lnx03 conf]# mkdir -p /var/log/nginx/east/access.log


# Configure Directory and files for West Website
[root@lnx03 conf]# mkdir -p /usr/share/nginx/html/west/index.html
[root@lnx03 conf]# echo This is my east webserver $HOSTNAME > /usr/share/nginx/html/west/index.html
[root@lnx03 conf]# mkdir -p /var/log/nginx/west/error_log
[root@lnx03 conf]# mkdir -p /var/log/nginx/west/access.log
Open the main configuration file /etc/nginx/conf.d, we will now create two directives one for west and east and make the below changes
[root@nginx01 conf.d]# ls -l
total 12
-rw-r--r--. 1 root root  310 Nov 11 16:03 east.conf
-rw-r--r--. 1 root root 2656 Nov 11 12:45 nginx.conf.default
-rw-r--r--. 1 root root  310 Nov 11 16:03 west.conf


# Configuration file for East Website
[root@nginx01 conf.d]# pwd

/etc/nginx/conf.d
[root@nginx01 conf.d]# cat east.conf
 server {
        listen       80;
        listen       [::]:80;
        server_name  east.nginx01.ash.local;

        location = / {
        root         /usr/share/nginx/html/east;
	index	     index.html;
	access_log  /var/log/nginx/east/access.log;
	error_log   /var/log/nginx/east/error.log;

	}

# Configuration file for West Website
[root@nginx01 conf.d]# cat west.conf
 server {
        listen       80;
        listen       [::]:80;
        server_name  west.nginx01.ash.local;

        location = / {
        root         /usr/share/nginx/html/west;
	index	     index.html;
	access_log  /var/log/nginx/west/access.log;
	error_log   /var/log/nginx/west/error.log;

	}

    }
Test the config file
[root@nginx01 conf.d]# nginx -t
nginx: the configuration file /etc/nginx/nginx.conf syntax is ok
nginx: configuration file /etc/nginx/nginx.conf test is successfulSyntax OK
Test the east and west website page
[root@nginx01 conf.d]# curl east.nginx01.ash.local
This is my east webserver nginx01
[root@nginx01 conf.d]
[root@nginx01 conf.d]# curl west.nginx01.ash.local
This is my west webserver nginx01
[root@nginx01 conf.d]