In this blog, we are assuming that the vCenter is running on the vSAN cluster and we will attempt to power down a vSAN 8 ESA-enabled cluster safely.
vSAN being a software-defined storage, we do have to do this in a particular order to ensure we can safely shut down the vSAN cluster.
By referring to a controlled shutdown, we are assuming the vSAN is currently in a healthy state and we are just to shut down the whole vSAN due to some planned activities such as the data centre shutdown. In this approach, we don’t need to perform any kind of data evacuation from the hosts participating in the vSAN cluster.
With vCenter running on the vSAN Cluster, the procedure to shut the vSAN Cluster in an automated fashion is no longer possible and all tasks will need to be done manually, so here is the walk-through for it.
vSAN Data Migration Options
Three vSAN data migration options when we place a vSAN ESXi host into maintenance mode: Full data migration, Ensure accessibility, and No data migration
–> Ensure accessibility – The default option, ensures that all the virtual machines on this host can be accessible. This option is recommended if you want to place the ESXi host into maintenance mode for a short period of maintenance activity, such as upgrading the host or installing patches, memory module replacement etc.
–> Full data migration – If the ESXi host will be permanently removed from the vSAN cluster, the Full data migration option is advisable because all the data from the host will be migrated to other ESXi hosts in the vSAN cluster. This evacuation mode results in a large amount of data transfer, as all the components on the local storage of the selected host will be migrated elsewhere in the cluster.
–> No data migration – vSAN will not evacuate any data from the host. The objects that will become non-compliant with the storage policy will be listed.
For a shutdown, we will stick with option 3 – No data migration
How do we shut down the vSAN cluster with vCenter not available?
Step 1 – Check vSAN health service to confirm that the cluster is healthy.
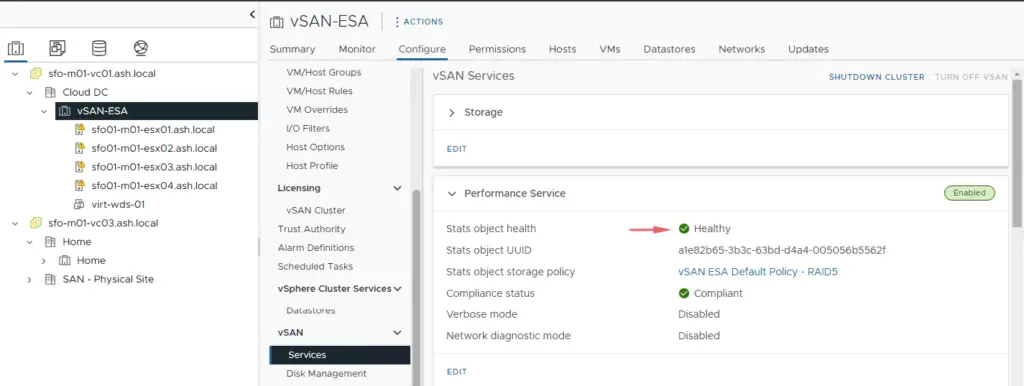
Step 2 – Migrate vCenter and DNS to the first ESXi host.

Step 3 -Go to Monitor > vSAN > Resyncing Components to verify if all resynchronization tasks are complete.
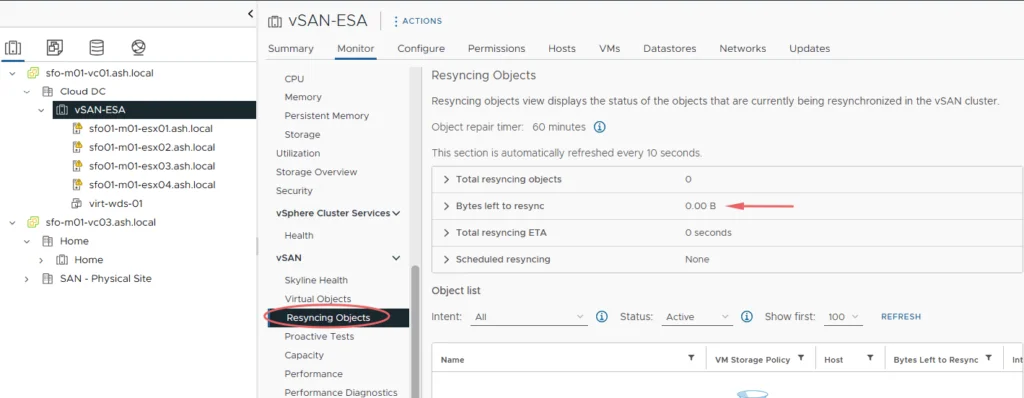
Step 5 For vSAN to not detect the host shutdown as failure events, disable HA on the vSAN cluster.

Step 7 – Open the vCenter VAMI and Shut Down the vCenter appliance. If there are any other guest OS running on the vSAN cluster it needs to be shut down as well.
Step 8 – Shut down the DNS and NTP server if it’s running on the vSAN Cluster.
Step 9 – Log on to each host participating in the vSAN cluster via SSH, and disable cluster member updates from the vCenter Server by running the following command. I am on my Linux host using SSH pass to pass in the commands quickly, you will need to manually login to each host else to execute this command or set up passwordless authentication if that’s easier.
ssh root@192.168.11.76 esxcfg-advcfg -s 1 /VSAN/IgnoreClusterMemberListUpdates
ssh root@192.168.11.77 esxcfg-advcfg -s 1 /VSAN/IgnoreClusterMemberListUpdate
ssh root@192.168.11.78 esxcfg-advcfg -s 1 /VSAN/IgnoreClusterMemberListUpdates
ssh root@192.168.11.79 esxcfg-advcfg -s 1 /VSAN/IgnoreClusterMemberListUpdates
Step 10 – Execute the below command to check what’s running on the ESXi hosts. Your cluster VM’s should be shut at this stage.
ssh root@192.168.11.79 vm-support -V | grep -i runningStep 11 – If there are any VMs running shut it down via the below command.
ssh root@192.168.11.79 esxcli vm process list
ssh root@192.168.11.79 esxcli vm process list
ssh root@192.168.11.79 esxcli vm process list
Step 12 – Locate the World ID of all the VM’s that are running.

Step 13 – To shut down the guest operating system and then power off the virtual machine we will run the below commands.
ssh root@192.168.11.76 esxcli vm process kill --type=soft --world-id=1085343
ssh root@192.168.11.78 esxcli vm process kill --type=soft --world-id=1080496
ssh root@192.168.11.79 esxcli vm process kill --type=soft --world-id=1082673


Step 14 – Validate again if there are any running VM’s on the ESXi hosts.

Step 15 – The following reboot helper script must be run on only one vSAN node in the cluster.
python /usr/lib/vmware/vsan/bin/reboot_helper.py prepareStep 16 – Reboot helper script will take a while to run and will run an output saying Cluster preparation is done.

Step 17 – Put all member ESXi hosts of the vSAN cluster into maintenance mode.
esxcli system maintenanceMode set -e true -m noAction
Step 18 – Validate the status of all hosts prior to the shutdown
ssh root@192.168.11.79 esxcli system maintenanceMode get
Step 19 – Shut down all hosts by executing the below commands.
ssh root@192.168.11.76 esxcli system shutdown poweroff -r vSANShut
ssh root@192.168.11.77 esxcli system shutdown poweroff -r vSANShut
ssh root@192.168.11.78 esxcli system shutdown poweroff -r vSANShut
ssh root@192.168.11.79 esxcli system shutdown poweroff -r vSANShut
We have now successfully taken down the vSAN Cluster and also the hosts.
How do we start the vSAN cluster?
Step 20- Power on all hosts in the cluster and they should all come back in maintenance mode

Step 21- Run the below command to exit the hosts from maintenance mode
ssh root@192.168.11.76 esxcli system maintenanceMode set -e false
ssh root@192.168.11.77 esxcli system maintenanceMode set -e false
ssh root@192.168.11.78 esxcli system maintenanceMode set -e false
ssh root@192.168.11.79 esxcli system maintenanceMode set -e false
Step 22- Power on all hosts in the cluster and they should all come back in maintenance mode
ssh root@192.168.11.76 esxcli  system maintenanceMode get
ssh root@192.168.11.77 esxcli  system maintenanceMode get
ssh root@192.168.11.78 esxcli  system maintenanceMode get
ssh root@192.168.11.79 esxcli  system maintenanceMode get
Step 23 – Validate the status of all hosts

Step 24 – Reboot helper script will take a while to run and will run an output saying Cluster reboot/poweron is completed successfully!
ssh root@192.168.11.76 python /usr/lib/vmware/vsan/bin/reboot_helper.py recover
Step 25 – The following command can be used to check the cluster status on all vSAN nodes in the cluster. One node in the cluster should be the master, a second should be the backup and all others should be agents. The cluster settings should be identical for all vSAN nodes (except for master and backup IDs etc.).
ssh root@192.168.11.76 esxcli vsan cluster get
ssh root@192.168.11.77 esxcli vsan cluster get
ssh root@192.168.11.78 esxcli vsan cluster get
ssh root@192.168.11.79 esxcli vsan cluster get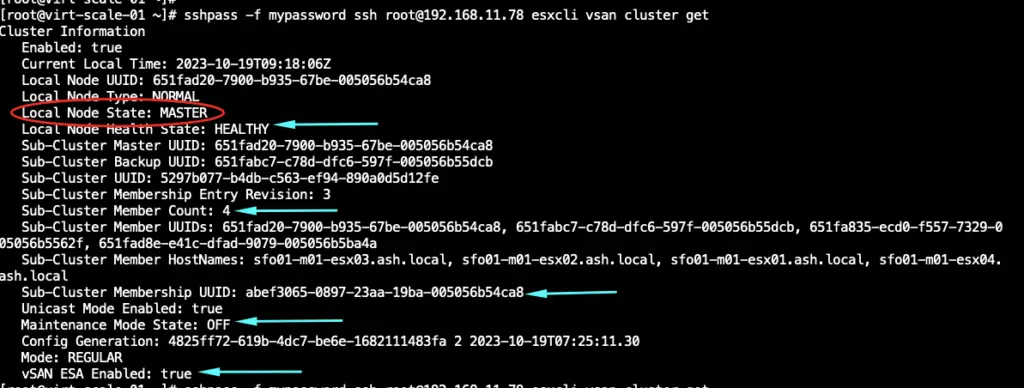
Step 26 – All health checks for the vSAN datastore should be green
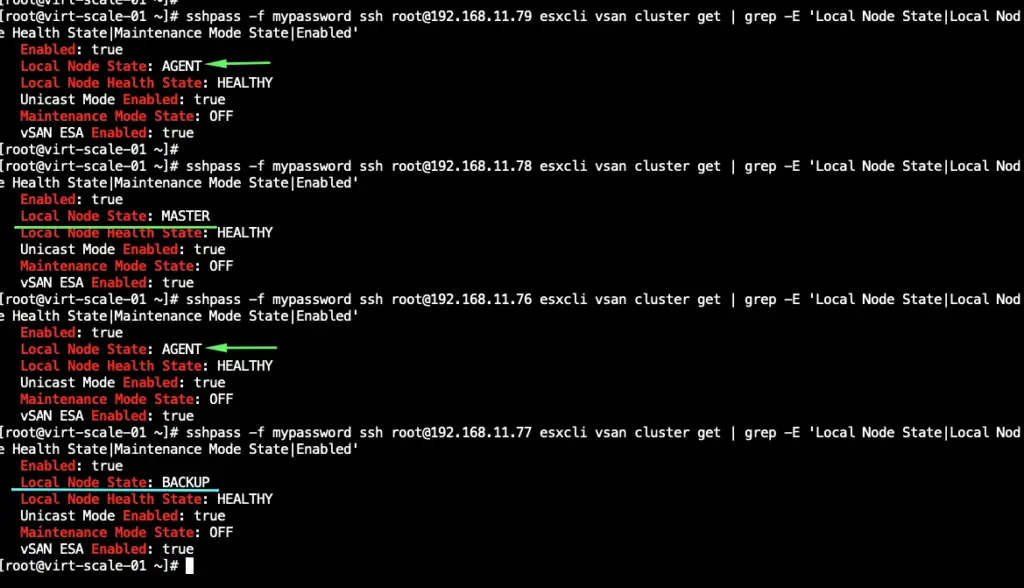
Step 27 – Log on to each host participating in the vSAN cluster via SSH, and enable the cluster member updates from the vCenter Server by running the following command.
ssh root@192.168.11.76 esxcfg-advcfg -s 0 /VSAN/IgnoreClusterMemberListUpdates
ssh root@192.168.11.77 esxcfg-advcfg -s 0 /VSAN/IgnoreClusterMemberListUpdate
ssh root@192.168.11.78 esxcfg-advcfg -s 0 /VSAN/IgnoreClusterMemberListUpdates
ssh root@192.168.11.79 esxcfg-advcfg -s 0 /VSAN/IgnoreClusterMemberListUpdates
Step 28 – If the DNS and NTP server VM resides on the cluster, it should start first.
Step 29 – Power on the vCenter Server and validate if all health checks have passed on the VAMI interface.
Step 30 – The vCLS Retreat Mode must be temporarily enabled (= true) so all vCLS VMs are deployed again
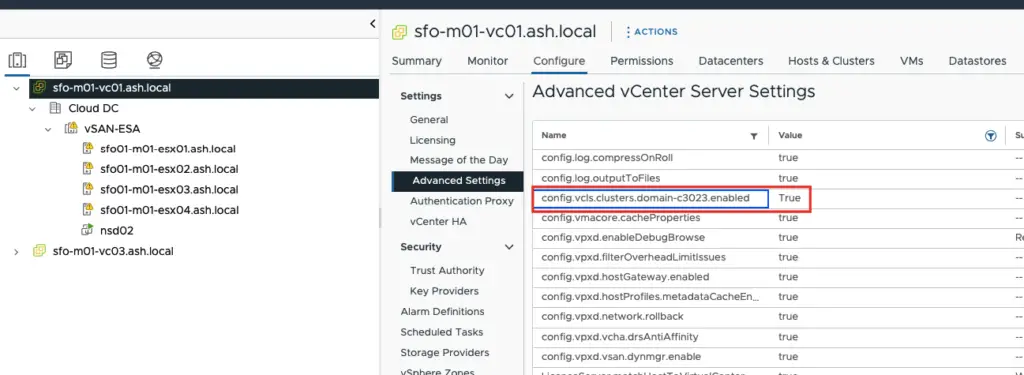
Step 31 – Enable vSphere HA and DRS
Step 32 – Stop SSH service on each vSAN node.
We have now successfully got the vSAN Cluster back alive.

