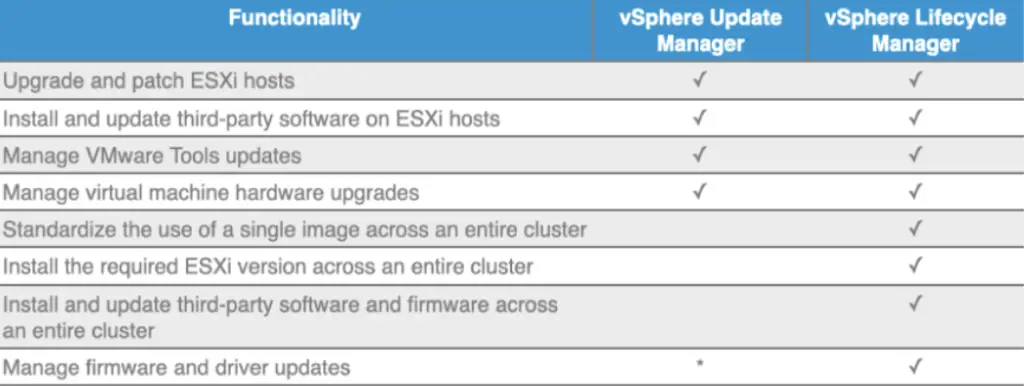
In this blog, we will explore the new vSphere Lifecycle Manager available in the 7. X version. LifeCycle Manager had existed earlier as well but on 7. 0.2 and above vSphere Lifecycle Manager transforms the ESXi patching/upgrade process forever with a new ESXi software management method.vSphere Lifecycle Manager enhances the functionality that vSphere Update Manager provided in previous vSphere releases by adding features for managing the ESXi host life cycle at the cluster level.
As of vSphere 7. X, vSphere Update Manager (VUM) & the old method of patching ESXi hosts using Baselines no longer exists and Lifecycle Manager is the new tool that provides centralized, automated patch and version management for ESXi hosts via cluster images.

These tasks can be achieved via the Lifecycle Manager in vSphere 7.X includes
- Install patches/upgrades on ESXi hosts using Cluster Images
- Install and update third-party software on ESXi hosts using Cluster Images
Creating a vSphere Cluster Image
Hover over to the Cluster > Updates > Baselines > Click manage with a Single Image

Choose to set up an image so the lifecycle manager gets ready to transition to image-based management. Baselines will disappear and we will have transitioned to image-based management of our vSphere 7 clusters after this process is complete.

Here, we will define the following
- An image based on the intended ESXi version we looking to target,
- Any vendor add-ons ( eg: Cisco UCS drivers, Dell EMC drivers), etc
- Any additional components such as a specific driver (eg: VMware tools) etc to add

Click Validate to ensure what you have added is compatible with your environment.

Once it’s validated, click Save

Click the Finish Image Setup button and from here, the vSphere cluster is transformed from the old baseline approach to the new patching method and we can no longer go back to the baseline method of ESXi patching.

Click Yes to continue

Before prechecks are done, we will choose to edit remediation settings. This is what controls

I will apply the following to my cluster
- Quick Boot optimizes the reboot path to avoid the hardware’s full power cycle, saving considerable time from the upgrade process.
- Migrate all powered VM’s to the peer host
- Disable DPM as well.
- Prevent remediation if hardware issues are found

Run a Pre-check to ensure that no new issues have arisen on the cluster or hosts since the last pre-check (if any) that prevent remediation so hosts will not reboot/go into maintenance mode simultaneously.


Click Start Remediation

A new task will begin which can be viewed in the Recent Tasks pane as it cycles through all the hosts in our cluster

After a few minutes, we can see our next host is placed into maintenance mode as well.

Finally, our ESXi hosts are all patched

The cluster image is completely customizable and we can get granular down to the individual driver level or modify it as we wish with this Lifecycle Manager image.
Updating VMware Tools on ESXi 7.X host using VMware Lifecycle Manager
In the past, we had to go via a baseline approach to add VMware tools onto to cluster, and with baselines now deprecated in this release, we do have to patch our Image.
Go to the cluster > Updates > Image > Edit > Add Components > Choose the version of VM tools we need

Click Save to update the image and that’s all we need to do.

The cluster will again through remediation however no ESXi host reboots are required.

We can check the status of the VM tools by going to the ESXi host > Updates > VMware tools

VM’s with outdated tools will be displayed which can later be patched with auto-update turned on or during the OS patching cycles
