Why Historical Context Matters
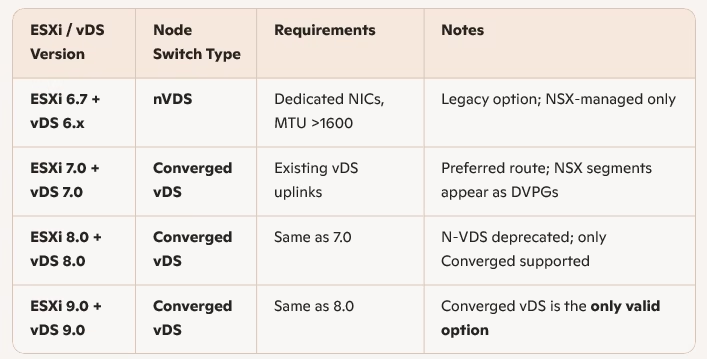
- vSphere 6.x + vDS 6.x required the NVDS route.
- NVDS was fully controlled by NSX‑T and invisible to vCenter (opaque networks).
- Modern versions (vSphere 7, 8, 9) use Converged vDS, but knowing NVDS helps learners understand migration workflows and legacy designs.
Choosing Node Switch Type by Version
The choice of Node Switch type depends on the installation you are attempting. If your ESX host is on version 6.7 and distributed switch is version 6. X, the route you will be taking is the nVDS route, and if the ESX host is on version 8.0 with vDS 8.0 the preferred route will be converged vDS.
This write will cover historical setup
Legacy Path – nVDS (vSphere 6.x)

For nVDS we need to ensure we have a free NIC available as shown and this will be the approach we are taking here.
Installing NSX-T as an nVDS option requires setting up a dedicated pNIC for consumption for N-VDS so n-VDS is not managed by the distributed switch but rather by the ESXi hosts directly.
The current State of my host shows 4 NIC’s connected to the distributed switch.

We will need to release one NIC from here for us to use it for N-VDS as that needs a dedicated NIC so we will pick vmnic4 for it and release the nic from our distributed switch.

We now have a free NIC available on our host and we can now use it for nVDS

Prepare the ESXi Hosts for NSX (nVDS)
We are to configure NSX on our Tenant cluster so let’s begin.

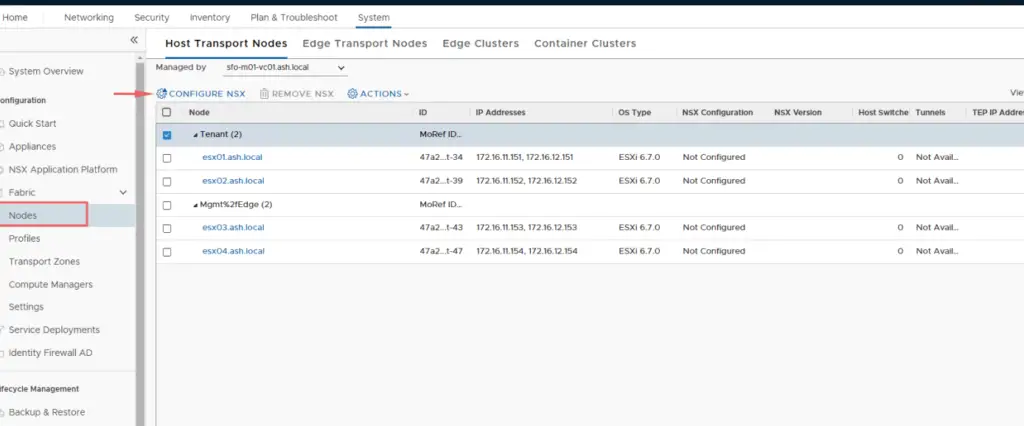
- System > Configuration > Fabric > Nodes > Host Transport Nodes.
- From the Managed by drop-down menu, select sfo-vc01.ash.local.
Newly added cluster and associated hosts will show up here, notice that the ‘NSX Configuration’ shows ‘Not Configured’.

We will be configuring NSX-T on our tenant cluster

For assigning IP to NSX transport zones, we are using DHCP leases on VLAN 1634 and this is configured in our tor router. Instead, we can as well create an IP Pool and use those IP’s being distributed to the NSX transport nodes.
My DHCP configuration is as below

If you wish to do it via the NSX, it is done via IP Pools as shown


Let’s prepare our host for NSX-T. Preparing would mean installing NSX vib’s on the ESXi host. Select Tenant cluster and Click Configure NSX
We will be required to create a transport node profile for which we need these details
| Prepare ESX Host Checklist | |
| Option | Action |
| Name | ESXi-TN-Profile |
| Type | Select N-VDS (default). |
| Mode | Select Standard (All hosts) (default). |
| Name (Node Switch) | PROD-Overlay-NVDS. |
| Transport Zone NIOC Profile | PROD-Overlay-TZ. |
| Uplink Profile | Select nsx-default-uplink-hostswitch-profile. |
| NIOC Profile | Select nsx-default-nioc-hostswitch-profile. |
| LLDP Profile | Select LLDP [Send Packet Disabled]. |
| IP Assignment | DHCP or VTEP IP Pool |
| IP PoolTeaming Policy Switch Mapping | Enter vmnic4 next to uplink-1 (active). |

Provide all the details

Choose the vmnic we released earlier ( vmnic 3) and Click Add


Now we begin the installation of NSX bundles on the host with the transport node profile we created earlier.

Select host – Configure NSX. This process will take around 10-15 mins and in the background, it installs the ESXi host with NSX bundles and also creates VXLAN adapters for use.

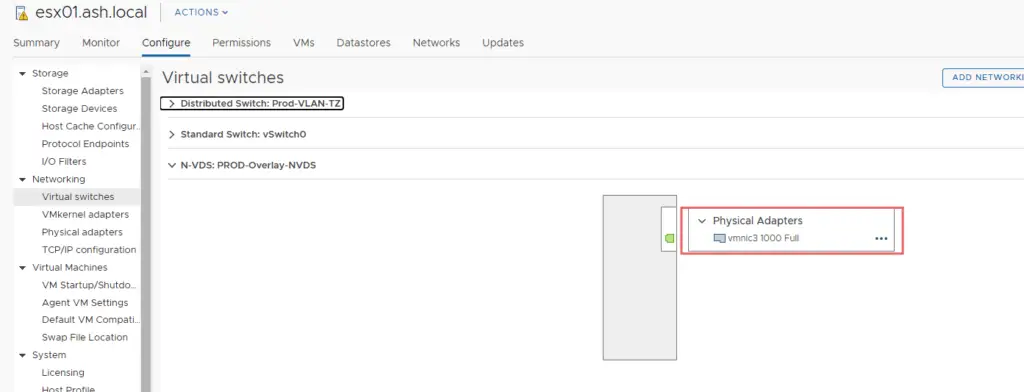
Let’s take a closer look at it via our vCenter and we now see a Prod-Overlay Switch is now created on the host

Our vmnic3 is now bound to the NVDS Overlay Switch
Let’s verify the NSX package installed

Monitor the ‘NSX Configuration’ status on UI and we should see NSX configured on our tenant cluster

Check the TEP IP.

It is from VLAN ID 1634. Let’s verify the ESXi host in vCenter.
Now we can see via the CLI the additional vmkernel adapters are created , this doesn’t appear in the GUI

We should see vmkernel (vmk) adapters in the list & vxlan as a TCP/IP stack.
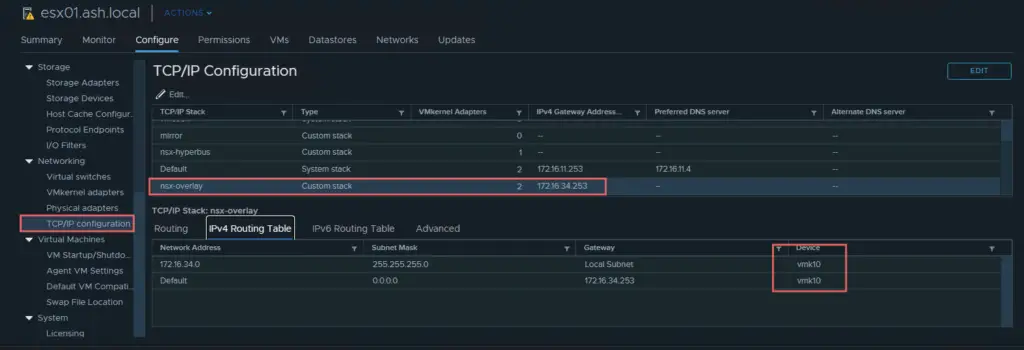
This NSX switch is fully managed through the NSX-T management plane so no editing of this switch is available from vCenter such as removing or adding uplink etc.

